
Owner's Manual


7
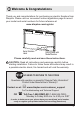
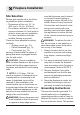
Site Selection
Review and consider all of the follow-
ing conditions before installation:
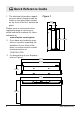
• Dimensions of the unit: 34.1 in.
(867 mm) x 19.4 in. (494 mm)
• For surface installation, the unit re-
quires a minimum of 2 wall studs in
order to ensure secure installation.
For other installation methods,
suitable framing is required.
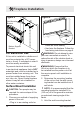
There are three possible mounting
methods:
• Surface mount (pg. 10);
• Partial Recessed (pg. 11);
• Flush mount (pg. 12),
and any of these have the option of
being hard-wired or plugged directly
into the wall outlet.
CAUTION: Ensure installation
does not allow replace to be in direct
contact with building vapor barrier or
insulation and meets all local building
code.
!
NOTE 1: A 15 Amp, 120 Volt
circuit is required. A dedicated circuit
is preferred but not essential in all
cases. A dedicated circuit will be
required if, after installation, the
circuit breaker trips or fuse blows on
a regular basis when the heater is op-
erating. Additional appliances on the
same circuit may exceed the current
rating of the circuit breaker.
WARNING: Ensure the power cord
is not installed so that it is pinched
or against a sharp edge and en-
Fireplace Installation
sure that the power cord is stored
or secured to avoid tripping or
snagging to reduce the risk of re,
electric shock or injury to persons.
Construction and electrical outlet
wiring must comply with local
building codes and other applica-
ble regulations to reduce the risk
of re, electric shock and injury to
persons.
WARNING: To reduce the risk of
re, do not store or use gasoline or
other ammable vapors or liquids in
the vicinity of the heater.
1. Select a location that is not sus-
ceptible to moisture and is away
from drapes, furniture and high
trafc.
2. For ease of electrical hook up you
may wish to locate the replace
near an existing outlet (for plug-in
convenience) (refer to NOTE 1).
3. Remove replace, front glass
and hardware from the box and
remove all packaging materials
before installation.
4. Store the replace in a safe, dry
and dust free location until you
are ready to install the replace.
Grounding Instructions
This product must be grounded. If it
should malfunction or breakdown,
grounding provides a path of least re-
sistance for electric current to reduce
the risk of electric shock. This product