
Operation Manual

54 Maintenance
Dimension BST 768 / SST 768 User Guide
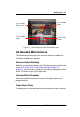
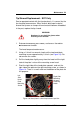
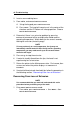
5. Locate the shroud, the shroud-mounting screws, and shield, as
shown in Figure 19.
Figure 19: Shroud and shield location
6. Remove the two shroud mounting screws using a 3/32 inch
hex wrench.
7. Once the screws are removed, pull the metal shield down to
remove. Be careful not to bend or damage the shield.
8. Pull the shroud downward to remove it.
9. Clean the exposed tip with the bronze brush provided in the
Startup Kit.
10. Install the new shroud by pushing it up onto the tip.
NOTE
The shroud is keyed and can only be installed with the holes
offset to the rear.
11. Slide the metal shield back over the shroud.
12. Check that both the shroud and shield are positioned correctly.
NOTE
Apply a thin coat of anti-seize compound to the threads of the
shroud mounting screws.
13. Drive the two shroud-mounting screws into the shroud and
tighten, but do not over-tighten the screws!
WARNING
Screws are very hot!! Use gloves when
working in this area of printer!
Shroud
Shroud
Mounting
Screws (2)
Shield