
Manual


Autotuning
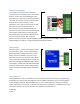
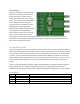
Kangaroo has a button labeled “Autotune”
between the speed limit potentiometers.
During autotuning, the motor and any
devices attached to it will move. For best
results, have a representative load applied
to the mechanism before starting the
tuning sequence. For example, if you are
building a positioning stage that will
support from 0 to 200 lb, a good test load
for tuning purposes would be 100 lb.
Ensure that the mechanisms are near the
center of their range of motion before
starting the tune. The tune procedure will take between 30 seconds and several minutes per axis,
depending on how rapidly the system being tuned responds. Systems that can accelerate faster and
have smaller travels will tune faster.
Selecting the tuning mode
To enter tuning mode, press and hold the Autotune button for at least one second. The LED will begin to
blink 1 blink, followed by a pause. Release the Autotune button. The LED will continue to blink one blink.
To confirm your selection of mode number 1, click and release the Autotune button. To instead change
to mode 2, press and hold the Autotune button. The LED will stop blinking, then after one second will
begin blinking two blinks followed by a pause. To confirm this mode, click the button. To go on to mode
3, hold down the button again and so on. In mode 4, holding down the button will bring you back to
mode 1.
In short, pressing and holding the autotune button selects between tune modes. Clicking the autotune
button confirms the current mode and begins setup of that tune. At any point before the tune is
completed, you may abort by unpowering and repowering the system. Kangaroo has four tuning modes.
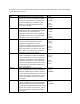
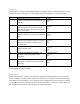
Tune Modes
Number
Mode
Overview
1
Teach Tune
Move the mechanism to define the tuning range
2
Limit Switch Tune
Normally closed limit switches define the tuning and operating range
3
Crash Limit Tune
Physical stops define the tuning and operating range
4
Input Calibrate Mode
This mode calibrates the R/C or analog inputs.