
Manual

schematic of the cartridge. For example,
.38 Special lists a maximum OAL of
1.55" (Lyman Reloading Handbook). If
you’re seating the bullet to the can-
nelure/crimping groove, the OAL
should be well within the maximum
OAL listed, however, use a set of dial
calipers to check it. (Dial calipers are
available from Dillon Precision). If the
bullet you’re using doesn’t have a can-
nelure/crimping groove, refer to the
specific type of bullet you’re using in
the reloading manual. For example – if
you’re loading a 158 gr. .38 Sp. JHP
and it doesn’t have a cannelure/ crimp-
ing groove, use the suggested OAL of
1.480 (Lyman Reloading Handbook).
Station 7 - Installation and
Adjustment of the Seating Die
Take the seating die from the die box
and screw it into Station 7. Screw the
die down until the bottom of the die is
flush with the bottom of the toolhead.
Note: At this point the die will not be
screwed down far enough to begin
seating the bullet, but it will give you a
place to start.
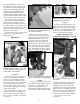
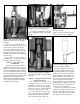
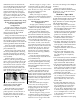
Place a case (with a belled case
mouth) into Station 7. Fig. 56
Place a bullet on the belled case
mouth and lower the toolhead. Then,
raise the toolhead just enough to
inspect the bullet without indexing the
shellplate. If the bullet is not seated
deep enough, screw the seating die
down 1/2 turn at a time. As a guide,
one full turn moves the die down about
70 thousandths of an inch, about the
thickness of a nickel. Again, cycle the
machine and inspect the seating depth.
Repeat these steps as necessary until
the correct overall length is achieved.
Use a dial caliper or equivalent to
measure the overall length of the car-
tridge. Check the overall length of the
round against the information in your
reloading manual.
Once you have obtained the proper
OAL, replace the cartridge into Station
7 and lower the toolhead. Using a 1-
1/8" wrench to turn the lock ring and a
7/8" wrench to hold the die body, snug
the lock ring.
Note: If you ever load a cartridge
that you are unhappy with, you can use
a Dillon bullet puller to reclaim your
components.
Station 8 - Installation and adjustment
of the Crimp Die
Screw the crimp die into Station 8.
Screw it down until it is flush with the
bottom of the toolhead. This is a good
starting point for the crimp adjustment.
Place a cartridge with a properly
seated bullet into Station 8.
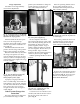
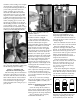
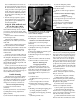
Lower the toolhead and continue to
screw the die down until it touches the
cartridge. Fig. 57
Raise the toolhead and screw the die
down 1/8 of a turn, lower the toolhead.
Raise the toolhead half-way and
inspect the cartridge. If the bell is still
present, or the desired amount of crimp
has not been achieved, give the die a
1/8 turn down and try again. Continue
making small adjustments to your
crimp die until the desired amount of
crimp has been achieved.
Once the adjustment is complete,
place the case back into Station 8 and
lower the toolhead. Using a 1-1/8"
wrench to turn the lock ring and a
7/8" wrench to hold the die body,
snug the lock ring.
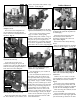
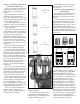
Note: When adjusting the crimp die
it is important to know what to look for.
Check that the crimp: Looks OK, allows
your firearm to function consistently
and the bullet feels tight in the case.
The drawing of case #3 (above) is a
depiction of a case that has been over
crimped by adjusting the crimp die
down (clockwise) too far. Note the
18
Fig. 56 - Place the bullet on the case
mouth at Station 7.
Fig. 57 - Cut away crimp die shows the
area being crimped while the case is
being fully supported by the die body.
Please note that every die set includes
seating stems to fit most common bullet
types. Select the appropriate seating stem
for the bullet type you are loading.
321