
Manual

Station 5 - Adjustment of the Powder
Die/Powder Funnel Cont...
Drop a case into the casefeed funnel
and cycle the handle twice. The case
should now be in the shellplate at
Station 2.
Move the handle down. Notice the
resistance at the end of the down
stroke. This is the resistance of the case
in the sizing die. Raise the handle. The
case will index to Station 3.
Cycle the handle to advance the case
to Station 4. Again, cycle the handle to
prime the case and index it to Station 5.
Cycle the handle.
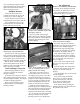
If the white cube has not traveled
its full distance, raise the toolhead just
enough to pull the case off of the pow-
der funnel (this will prevent the
shellplate from indexing while you
adjust the powder die). While holding
the powder measure, turn the die
down 1/8 of a turn. Again lower the
toolhead and observe the travel of the
powder bar.
Repeat as needed until the powder
bar travels its full distance, Fig. 51.
Once the powder bar travels fully
across you should continue to adjust
the powder die for the desired amount
of bell (turn the powder die 1/8 of a
turn at a time). The desired amount
bell is just enough to allow the bullet
to sit on the case mouth without
falling off and to keep the case from
shaving lead during the seating
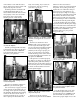
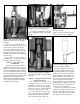
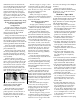
process - see the illustration (right)
example “B”.
Note: If you screw the die down too
far, the case will look like example "C"
in the illustration (right). You must then
discard this case, back the powder die
off, by turning it counter-clockwise,
and continue with a new sized case.
You’ll soon learn to judge the correct
amount of bell by simply looking at it.
In the meantime, you might want to
use your dial calipers to check it.
Twenty thousandths of an inch greater
(at the mouth of the case) than its origi-
nal diameter, should about do it.
Once you’ve achieved the desired
amount of bell – with the case in
Station 5, raise the toolhead. Run the
lock ring down hand tight.
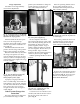
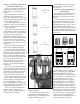
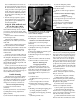
Insure the bellcrank and the return
rod bolt (in the frame) FIG 53 are
aligned. Using a 5/32" Allen wrench,
snug the collar clamp screws.
While holding the powder measure
in place, snug the lock ring using a 1-
1/8” wrench.
Station 7 - General Information on
Bullet Seating
The purpose of the seating die is to
insert the bullet into the case and to
push it down into the case the proper
amount.
How far the bullet is pushed into
the case will determine the overall
length (OAL). Several factors go into
determining the proper OAL – such as,
the maximum recommended OAL,
listed in the reloading manual, and the
type of bullet being loaded. The type
of bullet can determine the OAL in one
of two ways.
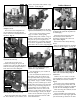
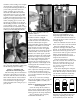
If the bullet has what is called a can-
nelure, or crimping groove Fig. 54 &
55, this will determine the proper
OAL. If the bullet you’re using doesn’t
have a cannelure or a crimping groove,
then you’ll need to refer to your
reloading manual for the suggested
OAL. The purpose of the cannelure
and crimping groove is to secure the
bullet by giving the mouth of the case
a place to go (without deforming the
bullet) when being crimped. When the
bullet is properly seated, the mouth of
the cartridge case should be near the
top of the cannelure/crimping groove.
Refer to your reloading manual.
Under the section specified for the cal-
iber you’re loading, you’ll find a
17
Fig. 54 & 55 - Shown are several examples
of a cannelure or crimping groove.
Fig. 53 - Make sure the bellcrank and return
rod bolt are aligned.
A
Correct amount
of bell.
B
Not enough bell.
C
Too much bell.