
Manual
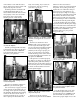
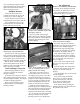

Again, move the toolhead down.
The case is now sized. If the case has a
spent primer, it will be deprimed.
Leave the toolhead in this position
with the case fully inserted in the die.
Fig. 48 This will ensure that the die
remains in alignment when tightening
the lock ring.
Using a 1-1/8" wrench to turn the
lock ring and a 7/8" wrench to hold the
die body, tighten the lock ring.
Station 3 - Adjustment of the
Expander Die
Install the expander die (caliber
specific) at Station 3. Place a case in
Station 2 and cycle the operating han-
dle once (sending the case to Station
3). Turn the expander die down until
you feel it make contact with the case
and cycle the operating handle. Make
adjustments in one-quarter turn
increments until the desired expan-
sion of the case mouth is achieved.
Tighten the die lock ring.
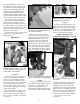
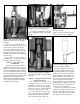
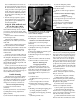
Aproperly expanded case should
show a slight flare at the case mouth.
Fig. 49
Station 5 - Adjustment of the Powder
Die/Powder Funnel
Note: Adjusting the powder die for
a straight wall case is not the same as
adjusting a powder die for a bottle-
necked case. This is because straight
wall cases are given a bell and bottle-
necked cases are not given a bell.
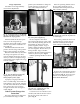
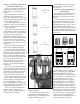
For the powder bar to properly dis-
pense a measured powder charge, the
powder bar must travel its full dis-
tance. To travel its full distance, the
white cube must contact the powder
measure body (see arrow FIG 51).
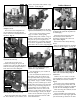
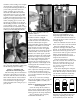
Also the belling process does not
begin until after the powder bar has
traveled its full distance. The angled
portion on the bottom of the powder
funnel (Fig. 52) is what bells the car-
tridge. Once the white cube has con-
tacted the powder measure body the
case is forced upward against the
tapered portion of the powder funnel
producing a bell. The more the powder
die is adjusted down (clockwise) the
more the case will be belled.
Note: If the powder die is not adjust-
ed down far enough to cause the pow-
der bar to travel its full distance the
powder charge will be erratic and the
case will not receive enough bell.
16
Fig. 49 - You don’t need any more expansion
than what you see in this photograph.
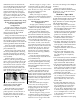
Fig. 48 - As the toolhead continues down,
it will reshape the case neck, shoulder
and body.
Fig. 50 - When properly adjusted, the
case mouth will go past the expanding
line and the stem will contact the bottom
of the case.
Fig. 51 - This photo shows the powder bar at
the end of its travel.
Fig. 52 - Adjusting the powder die up
reduces the amount of belling – down
increases the amount of belling.