
Manual
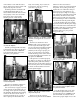
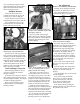

Now remove the shellplate lock
nut (#13425) by loosening the four
locator tab screws (#13895) about four
full turns. Fig. 37
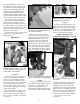
Loosen the ejector tab screw
(#13896) and swing the ejector tab
(#13189) out of the way. Fig. 38 Next,
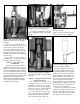
slide the casefeed plunger (#13073*)
back and remove the shellplate.
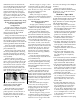
Rotate the primer slide stop (#13108)
90˚. This will allow you to remove, and
replace, the primer slide (#20318 - large
or #20317 - small). Fig. 39
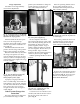
Next, remove the bushing (#13031 -
large or #13222 - small); spring
(#13858) and punch (#12849 - large or
#13307 - small) and replace them with
the parts for your new primer size.
Note that there is a specially designed
screwdriver supplied for the bushing
(included in the accessory bag). Fig. 40
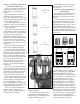
You should clean your machine at
this time. Fig. 41
Prior to installation, lube the base of
the primer punch. Now adjust your
new punch (#12849 - large or #13307 -
small) so that it is flush with the bush-
ing (#13031 - large or #13222 - small) by
turning set screw (#13226) up or down.
If the primer punch is too low, dirt will
collect on top of it leaving imprints on
your primers. If it is too high it will
bind the slide. Note: You can use the
slide for a guide. Slide it back and forth
over the bushing to check your adjust-
ments. See the schematic on page 29 or
the trouble shooting section for addi-
tional information.
Toolhead Removal
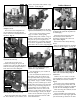
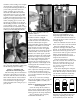
Disconnect the powder bar return
rod (#13960) from the bellcrank
(#17839) by releasing the return rod
clip (#13929). Fig. 42
Remove the Primer Early Warning
device.
Raise the primer slide lever assembly
(#20488) and lock in place - see Fig. 34.
Obtain a 15/16” socket or wrench
(not supplied) to remove the toolhead
bolt (#13342) and washer (#13449).
Fig. 43
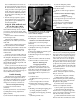
Now remove the toolhead (#20420).
Due to being spring loaded, there will
be some resistance. Wiggle the toolhead
up and off while holding the handle.
After removing the toolhead, careful-
ly lower the handle.
When reinstalling the toolhead bolt
(#13342) turn it in only finger tight then
cycle the handle up and down to make
14
Fig. 38 - Loosen the screw and swing the
ejector tab out of the way.
Fig. 39 - Rotate the primer slide stop 90˚ to
move the primer slide freely in or out.
slide stop
Fig. 40 - A special screwdriver for the bush-
ing has been included in your accessory bag.
Fig. 41 - It is very important to keep the
machine free of grit and debris.
Fig. 43 - Due to being spring loaded, there
will be some resistance when pulling the
toolhead off.
Fig. 42 - After removing the clip and discon-
necting the rod, replace the clip in the rod
for safe-keeping.
Fig. 37 - The four lock ring screws need only
be loosened about four turns to remove the
shellplate lock nut.