
Manual

will continue to run until the tube is
full, at which point a micro-switch will
temporarily stop the case flow.
From this point the casefeeder will
automatically fill the tube as you
reload. If the casefeeder does not func-
tion properly or the cases do not fall
base down, refer to the Trouble
Shooting section of this manual.
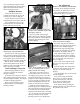
Pull the operating handle smoothly
to the bottom stop, then raise the han-
dle, a case has been fed to Station 1.
Cycle the handle again, strive to be
smooth in your operation.
The first case should be indexed to
Station 2. Cycle the handle again.
It is not necessary to apply any force
on the upstroke of the handle. All you
are doing on the upstroke is indexing
the shellplate. Remember that priming
is done on the down stroke. A slow
measured upstroke gives you lots of
time to pick up the next bullet and
ready it for seating. If you count one
second down, and one second up,
you’ll have a good pace.
The first case should now be in
Station 3 with a case in Stations 1 & 2
as well. Cycle the handle again. The
case is swaged and expanded at Station
3. Observe the swage operating part
(#20314*), if the swage is proper, pro-
ceed – if not see items 3 and 4 in the
Trouble Shooting section of this manu-
al. Cycle the handle again and the case
gets primed at Station 4.
If the primer is not seated properly
(too high or too deep) you will need to
adjust the primer push rod (#12819).
Clockwise turns of the primer push rod
will cause the primer to be seated deep-
er while counterclockwise turns will
seat the primer higher.
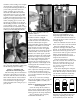
The first case in the sequence
should now be primed and at Station
5. Remove the locator button
(#20637*), extract the round and check
the primer. If everything looks okay,
replace the case and button and pro-
ceed. However, if the primer is not
seated properly (too high or too deep)
you will need to adjust the primer push
rod (#12819). Clockwise turns of the
primer push rod will cause the primer
to be seated deeper while counterclock-
wise turns will seat the primer higher.
Cycle the handle again, the automat-
ic powder measure will drop the charge
you’ve selected. Pistol casemouths will
be belled at this time. Look through the
inspection hole in Station 6 – you
should be able to see your powder
charge in the case.
Cycle the handle again. Now, with
your left hand, place a bullet on the
powder-charged case at Station 7 and
cycle the handle. Your bullet will be
seated to its proper depth, if not, a sim-
11
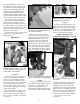
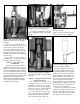
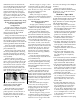
Station 5 - Here the case mouth is belled
and powder dispensed.
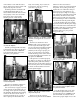
Station 1 - The casefeed plunger inserts the
case into the shellplate.
Station 2 - Here, spent cartridge cases are
resized and deprimed.
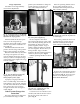
Station 7 - In this station, the bullet is seat-
ed to its proper depth.
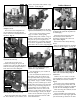
Station 8 - Here the case is crimped and
then ejected out of the shellplate with the
next pull of the handle.
Station 3 - Here the case mouth is expand-
ed while a rod supports the case base for
swaging.