
Manual

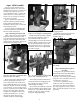

Once you’ve filled the pick-up tube,
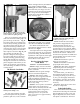
make sure the little retaining clip is in
place at the top of the tube. Fig. 22
Pivot the switch lever (#13864) away
from the Early Warning System hous-
ing and invert the pick-up tube over
the primer shield cap (#13957). You
will notice the cap has a bevel to help
you funnel the primers in. Hold the
tube in place as shown in Fig. 22, pull
the retaining pin and allow the
primers to drop into the magazine.
Pivot the switch the lever back over
the Early Warning System housing.
Gently slide the follower rod down
through the switch lever and into the
primer magazine tube. When you are
nearly out of primers, approximately
three remaining, the follower will acti-
vate the buzzer.
The Electric Casefeeder
Use only clean cartridge cases that
have been inspected for any potential
problems; split cases, rocks or smaller
caliber cartridges that may be hidden in
larger caliber cartridges. Fig 23
Warning: Be sure that no loaded rounds
are mixed with your empty cases. It is
possible to feed a blunt nosed cartridge
like a .38 Sp. WC into the shellplate
upside down and explode it when it is
hit by the decap pin.
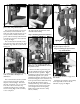
Now fill the casefeed bowl with
approximately 500 pistol cases or about
350 rifle cases. Fig 24
Your Super 1050 is now charged with
components and ready to go, but before
you start reloading, read the following
explanation of the sequence of the eight
reloading stations and the processes
that are done at each station.
Review: How the Super
1050 Works
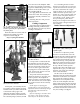
Stations 1 - 8 (counterclockwise)
Station 1: Empty cases are automati-
cally inserted into the shellplate via the
electric casefeeder.
Station 2: Here the spent cartridge
cases are resized and deprimed.
Station 3: This station is totally
unique. The case is supported from the
inside and slightly expanded (not
belled) while simultaneously a swager
is driven into the primer pocket to
remove any crimp.
Station 4: A new primer is installed
at this station. The spring driven
primer slide is extremely smooth. The
steel shrouded primer magazine is
capped with an electronic Early
Warning Device to let you know
when you’re down to approximately
three primers.
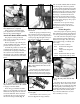
Station 5: Here the case is belled
and powder is dropped by the case-
activated powder measure. It is
extremely accurate and will not drop
powder unless a case is present. Dillon
Precision offers an optional accessory to
be utilized with the automatic powder
measure at this station – Dillon’s Low
Powder Sensor provides an audible and
visual reminder when it’s time to refill
the powder reservoir.
Station 6: This station is open to
allow for case inspection.
Station 7: The bullet is seated to its
proper depth at this station.
Station 8: In this station, the bullet is
crimped into place. The cartridge is
then automatically ejected into a collec-
tion bin.
As stated earlier, your dies have
been adjusted at the factory. Before
you change anything, try it the way it
is, once you thoroughly understand
the machine’s operation, make what-
ever adjustments to the dies you feel
necessary.
Reminder: There may be some varia-
tion due to components.
To Begin Reloading
Turn on the switch on the front of the
casefeed motor housing. The casefeeder
plate should begin to turn. Cases will
begin to dispense, base down, into the
clear plastic casefeed tube. The motor
10
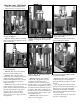
Fig. 22 - When installing primers into the
primer magazine, be sure the pick-up tube
centers itself before pulling the clip.
Fig. 24 - The casefeed bowl will hold
approximately 500 pistol cases or 350 rifle
cases. Do not overload the casefeed bowl.
Fig. 23 - When loading, use only cleaned
and inspected cartridge cases.
Fig. 25 - Dillon’s Low Powder Sensor gives
an audible and visual warning when the
powder reservoir gets low.