
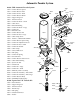
Manual
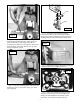

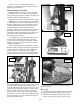


The short end of the ejector wire fits behind the
shellplate bolt (#13328). Note: The correct
positioning of the ejector wire is important or serious
damage to the sizing die could result. See Fig. 14.
Step 3: Changing and Adjusting Dies
Use of Dillon’s Bench Wrench is suggested when
changing or adjusting dies.
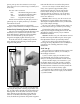
Remove screw (#13895) and remove the powder
measure. Remove screws (#13815) and (#14037) and
remove the toolhead assembly. Lift out the three die
inserts (#12864, #11628, #11734) from the frame.
Note: The toolhead you just removed is adjusted for
those dies. Store these parts for when you set up this
caliber again.
Now, take the dies of the caliber that you are
converting to and insert them into the frame,
corresponding to the position reference number on
each die. 1, 3 & 4. If you choose to use the toolhead
you removed, be certain that you back out the
adjustment bolt (#13908) at Station 4 and remove the
seating stem at Station 3.
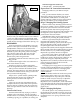
Reinstall the toolhead with screws (#13815).
Drop the correct powder funnel expander in
the die body (#13865) and mount the powder
measure just as you removed it. Loosen the clamp
screw (#13895).
To achieve proper adjustment of the die it is
important to understand that the adjustable powder
bar should reach the end of its travel at the same
time that the handle reaches the bottom of its stroke
against the frame stops.
To achieve this adjustment, the die body (#13865)
must be screwed up or down. A sized empty shell
case must be placed in the shellplate at Station 2 in
order to check this adjustment. No powder should
be in the measure during these adjustments.
Beware! If you pull the handle and the powder
bar reaches the end of its travel before the handle
reaches the bottom of its stroke, STOP! Raise the die
(#13865) several turns and try again. Once the
adjustment is correct but you want the case mouth
flared a little more, just screw die (#13865) down
1/4 turn or less.
The base of the bullet needs only to set within a
slightly flared case mouth.
Tighten screws (#14037) and (#13895).
Now, you can adjust the powder measure for the
charge your loading data tells you to use. Remember
that the powder charge adjustment screw (#13943)
turns counterclockwise to decrease the volume of
charge and clockwise to increase the charge.
Your conversion kit comes with the seating stems
to fit the most popular bullet styles; wadcutters,
semi-wadcutters and round nose. Choose one and
insert it in Station 3. Simply seat the bullet to a
desired depth. Consult your loading data!
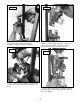
Now, index your seated cartridge to Station 4.
Lower the handle all the way against the frame
stops. Turn the die adjustment bolt (#13908) down
until you feel a slight opposition. Raise the handle
and turn the adjustment bolt clockwise 1/4 to 1/2 a
turn. Insert this cartridge back into the shellplate at
Station 4 and give the handle a full stroke. The
crimping die is now adjusted and you’re ready to
start loading.
Reloading Tips:
If you’re using new unfired brass remove the
sizing die (#12864). Virgin brass usually does not
require full length sizing. (Optional)
Always give the handle a FULL STROKE or
remove all cases and start over, as operations may
be only partially completed.
Use cleaned brass or damage to dies may result.
Avoid the use of military brass with crimped primer
pockets. Crimps can easily be removed with a Dillon
SS-600.
Mount the machine on a sturdy work bench that
will not move while loading. Bench movement will
impair your ability to prime correctly. Suggestion:
Nail or screw your bench directly to your wall.
Keep your machine clean! Read this manual
carefully! If you have any questions please call us!
We’ll help. 1-800-223-4570
NOTICE!
THIS MACHINE IS DESIGNED SPECIFICALLY
TO BE A MANUALLY OPERATED
HANDLOADING MACHINE. ANY ATTEMPTS TO
MECHANIZE THIS PRODUCT WILL VOID ANY
AND ALL WARRANTIES OFFERED BY THE
COMPANY. WE SPECIFICALLY WARN AGAINST
CONVERTING THIS PRODUCT TO AUTOMATED
OR MOTORIZED OPERATION.
All Dillon machines are warranted for life from
defects in material or workmanship, plus a one year
100% warranty against normal wear. All
electrical/electronic components in Dillon
equipment are covered by a one year warranty.
13
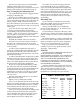
Caliber Conversion Chart
Caliber Shellplate Locator Powder
Button Funnel
.45 ACP #1 #1 E
.38/.357 #2 #2 D
.380 Auto #3 #3 F
.44 Mag./Spcl. #4 #4 G
9mm/.38 Super #5 #3 F
.41 Mag. #6 #1 H
.45 LC #C #4 E
10mm #W #2 W