
Manual

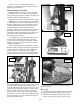

4.) From this point on, place a bullet on the case at
Station 3 with your left hand. Insert a case at Station
1 with your right hand and cycle the handle. Each
time you cycle the machine a finished round will be
ejected into the cartridge collection bin. (See Fig. 18)
REMEMBER!
Press forward firmly on the handle to seat your
primers. Primer jams or misfeeds can be caused by
misadjustment of the set screw (#13961) in the
primer feed block. The most common case of primer
misfeeds or jams is the primer punch not seating
fully onto the primer slide. This will cause the
primer cup to strike the flexible orifice on the
bottom of the primer magazine tube.
Watch the powder bar function, make sure you’re
getting powder.
Set the bullet straight on the case at Station 3 so
that it enters the die correctly.
Watch your supply of powder and primers,
you’ll be using them faster than you think you are.
Take your time and learn the machine and its
function. The Square Deal “B” will deliver hundreds
of trouble free rounds in short order, just relax and
take your time in the beginning.
Keep it clean – primer residue, spilled powder
and just plain dirt can jam your machine. All
bearing surfaces are Delrin and require no
lubrication.
Clean your powder bar and underneath your
shellplate about every 500 rounds. Some powders
build up and will eventually stick the powder bar.
Paint or lacquer thinner works well to remove any
build up.
Friend at the Factory
We started this manual by saying if you have a
problem, call us. We mean it. Anyone can make a
mistake. There’s no such thing as a dumb question. If
something is giving you a problem, let us help you!
Technical Support & Order Line
1-800-223-4570 FAX (480) 998-2786
Square Deal “B” Conversion Instructions
Changing calibers on your SDB is a simple
procedure.
First, you must decide whether you need to
change the priming system that is now set up on
your machine. Small calibers use small pistol
primers and large calibers use large pistol primers.
Skip step one if there are no changes needed.
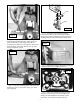
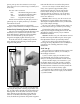
Step 1: Changing The Priming System
Remove Primer Early Warning System. Remove
three screws (#13989 – refer to schematic) to remove
the primer system from the front of the machine.
Remove the primer slide return spring from pin
(#13790) and remove the primer slide assembly from
the magazine system. Replace the correct size
primer slide in the same manner.
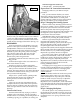
IMPORTANT Make sure the magazine is empty
of all primers by inverting the primer assembly.
Remove cap (#13957) and pull out the internal
magazine tube (#13673). Take the correct size
magazine tube and drop a primer, anvil side up, into
the top of the tube to make sure the primer drops
freely through the tube and orifice. Insert the
magazine tube (#13673) into the magazine shield with
the keyed side of the orifice pushed all the way down
into the notch or key way in the housing (#20900).
Replace the cap (#13957). Do not over tighten!
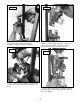
Now, insert a few primers, anvil side up, into the
magazine. Pull the handle, a full stroke, raise the
handle and a primer should appear at Station 2. If a
primer fails to appear, adjust the primer feed
adjustment screw (#13961a), located at the lower tip
of the flat spring (#13979) on the front of the
housing (#20900) as follows:
If changing from a large primer to a small primer
turn the primer feed adjustment scew (#13961a) in
1/8 turn increments clockwise. If changing from
small to large, turn in 1/8 turn increments
counter
clockwise.
Give the handle another full stroke and a primer
should appear. If the primer cup is not centered
under the shellplate or snaps into place when the
handle is raised it may be necessary to adjust the
primer slide travel by turning the slide stop
adjustment screw (#13961b) in 1/8 turn increments.
It is located between the primer slide and the coiled
spring (#13798) on the front on the housing. (See
pages 3 & 4.)
Step 2: Changing Shellplates
Lift out the ejector wire (#13433) and remove
the shellplate bolt (#13328). Carefully remove the
shellplate and be aware of a very small index ball
(#14019) that sits on a spring. Install the correct
shellplate.
12
Fig. 18