
Manual


primer pick-up tubes have different colored tips.
They have been color coded to help you identify size
more easily.
The color code is as follows:
Blue Small Primer Magazine Orifice
Red Large Primer Magazine Orifice
Yellow Small Primer Pick-up Tube
Green Large Primer Pick-up Tube
Primers are much easier to pick up if you use a
primer flip tray. A quality metal tray is available
from Dillon Precision.
Never forget that primers are potentially
dangerous. Never hit them or attempt to force them.
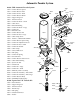
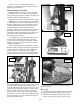
Primer Early Warning System Installation
(See page 4 for assistance.) Install the battery and
the battery cover (#13857) in the system’s main
body. Slide the Early Warning System Assembly
down over the knurled cap on your primer
magazine and lightly tighten the clamp screw.
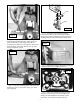
Pivot the switch lever (#13864) away from the
Early Warning System housing to fill the primer
magazine with primers.
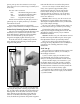
Invert the primer pick up tube over the knurled
cap and pull the primer retaining clip (#14040 – See
Fig. 17.) The primers should now fall smoothly into
the magazine. Pivot the switch lever back over the
Early Warning System housing. Gently slide the
follower rod (#13707) down through the switch
lever, the knurled cap and into the primer magazine
tube until the follower rod touches the primers.
You are now ready to reload. When you are
nearly out of primers (approximately three
remaining) the follower rod will activate the
buzzer. Never attempt to remove the primer
magazine shield, it is there for your protection.
Your primer system should now be ready. Let’s
move on to Station 3.
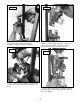
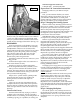
Station 3: This is an easy one. All we do is seat
the bullet to its proper depth in the cartridge case.
This depth was adjusted at the factory for the bullet
type on the sample cartridge.
We give you a choice of bullet seating stems, use
the one closest to the type of bullet you are using.
The depth of bullet seating may be adjusted
simply by screwing the seating stem in or out. The
adjustment is held in place by a layer of Delrin
beneath the toolhead.
Station 4: Another easy one. This station removes
the bell and crimps the bullet in place. Once again
this adjustment has been performed by Dillon.
More or less crimp can be achieved simply by
screwing the crimp adjustment screw (#13908) in or
out. Check your reloading manual for crimp
dimensions.
Load ‘em up
Okay now that you understand the purpose of all
of the Square Deal “B” stations, we are ready to
reload. Begin as follows:
1.) Place a clean, empty case in Station 1 and
cycle the handle, don’t forget to press forward
firmly to seat the primer in Station 2. Work slowly.
2.) Place another empty case in Station 1, cycle
the handle. Work slowly and carefully, watch the
powder bar function and be sure it travels fully to
the left each time. If it doesn’t, turn the powder die
(#13865) 1/8 turn clockwise and try again.
3.) Carefully place a bullet on top of the cartridge
case at Station 3. Insert a new empty case at Station
1, cycle the handle.
Fig. 17
11