
Manual

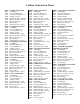

* Indicates a caliber specific part – see the caliber conversion
chart on page 19 for the caliber you are loading for.
14
When reinstalling the toolhead bolt (#13342) turn it
in only finger tight then cycle the handle up and down
to make sure everything is properly located. With the
handle in the down position, tighten the toolhead bolt
with the above mentioned wrench.
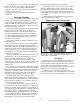
Shellplate Removal
Remove the ejector tab (#13189).
Loosen the four locator tab screws (#13895) about
two full turns.
Use a toothbrush to remove any powder that may be
in the threads before removing the lock ring.
Next remove the lock ring (#20311). Now push the
casefeed plunger back (#13073*) and lift the shellplate
(#11925) off. Be sure to lightly grease the bore of the
shellplate when reinstalling it. Rule of thumb: turn the
lock ring down until tight then back off one-eighth of a
turn. Then tighten the four locator tab screws (#13895).
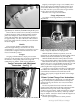
Casefeed Plunger Conversion
When changing calibers it may be necessary to
replace the casefeed plunger (#13073*).
To do this, remove the clear casefeed tube (#13761)
and pull out the colored casefeed adapter (#13654*). The
adapter is taped for shipping purposes.
Remove the two housing screws (#13815) and the
casefeed adapter housing (#13534).
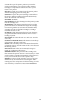
Place your hand on the plunger while removing
the roller bolt (#13333). This will prevent the
casefeed plunger and spring from jumping out of the
machine. Fig. 22
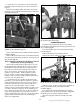
Thoroughly clean the track and casefeed parts with a
solvent. Now very lightly apply grease to the sides and
install the proper size casefeed plunger (#13073*).
Remember to grease the roller (#13498) and the roller
track and Loctite the threads on the roller bolt (#13333).
Install the casefeed housing and insert the proper
size adapter (#13654*). The casefeed tube (#13761)
should now be inserted into the casefeed adapter
(#13654*). Note that the tube is marked “up” on one
end. Press this end into the tube clip (#13859). See the
Trouble Shooting section for any adjustments.
Die Adjustments
Sizing Die Adjustments – Station 2
With the toolhead in the down position, screw the
sizing die down until the bottom of the die touches the
shellplate. Raise the toolhead and insert an empty case
into the shellplate. Now, lower the toolhead down all
the way over the case and tighten the die lock ring on
the sizing die. The process described above will insure
the die is centered correctly in the toolhead when it is
locked in place. A note of caution: Never attempt to
deprime a live primer. An explosion may occur.
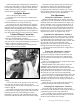
Expander Die Adjustments – Station 3
Install the expander die (caliber specific) at station 3
of the shellplate. Place a case in station 2 and cycle the
operating handle once (sending the case to station 3).
Turn the expander die down until it makes contact with
the case and cycle the operating handle. Make
adjustments in one-quarter turn increments until the
desired bell is achieved. Tighten the die lock ring.
A properly belled case should show a slight flare at
the case mouth.
Seating Die Adjustments – Station 7
Screw the seating die into Station 7 with the
appropriate seating stem installed. Each die set will
include seating stems to fit the most common bullet
types. Use the nose of the bullet to see which seating
stem fits best.
Refer to a reloading manual for proper bullet seating
depth or over all length (OAL).
With the handle in the down position, screw the
seating die down until it makes contact with the
shellplate. Then turn the die counterclockwise four full
turns. Raise the handle and place one of the cases
charged with powder into Station 7. Place a bullet on the
mouth of the case and cycle the operating handle.
Inspect the bullet for seating depth (OAL) with a dial
caliper or case gage. To make the OAL longer, turn the
seating die counterclockwise in small increments. To
make the OAL shorter, turn the seating die clockwise in
small increments.
When the OAL is correct, tighten the die lock ring
with the operating handle in the down position.
Crimping Die Adjustments – Station 8
Screw the crimp die into Station 8. Screw it down
until it is flush with the bottom of the toolhead. This is a
good starting point for the crimp adjustment.
Place a cartridge with a properly seated bullet into
Station 8. Raise the platform and continue to screw the
die down until it touches the cartridge.
Fig. 22: Be sure to lightly grease the plunger and roller after
cleaning.