
Manual


13
* Indicates a caliber specific part – see the caliber conversion
chart on page 19 for the caliber you are loading for.
Loosen the lever arm bracket screw (#13732) and
slide the bracket assembly up four inches and lock it
in place.
Raise the operating handle, remove the two primer
feed body screws (#13363) and lift the primer feed body
assembly (#20773) off.
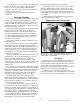
Remove the ratchet cam (#11686) from the toolhead
(#20420). Fig. 19
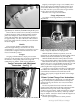
Remove the mechanical return rod (#13960) from the
powder measure bellcrank (#13871) by releasing the rod
clip (#13929). Fig. 20
Read complete toolhead and shellplate removal
instructions before proceeding.
Remove the casefeed tube (#13761) place it on your
bench and take the toolhead off. Now you can remove
the shellplate locknut (#20311) by loosening the four
lock ring screws about four complete turns. This will
allow you to remove, and replace, the primer slide
(#20318 - large or #20317 - small); bushing (#13031 -
large or #13222 - small); spring (#13858) and punch
(#12849 - large or #13307 - small) with the replacement
parts for your new primer size.
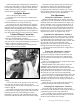
You should clean your machine at this time. Note
that there is a specially designed screwdriver supplied
for the bushing (found in your accessory bag). Prior to
installation, lube the base of the primer punch. Now
adjust your new punch (#12849 - large or #13307 -
small) so that it is flush with the bushing (#13031 - large
or #13222 - small) by turning set screw (#13226) up or
down. If the primer punch is too low, dirt will collect on
top of it leaving imprints on your primers. If it is too
high it will bind the slide. Note: You can use the slide for
a guide. Slide it back and forth over the bushing to
check your adjustments.
Toolhead Removal
Disconnect the mechanical return rod (#13960)
from the bellcrank (#20319) by releasing the return rod
clip (#13929). Fig. 20
Lower the handle and remove the toolhead ratchet
(#11686). Fig. 19
Remove the Primer Early Warning device.
Remove the primer slide lever assembly (#20488).
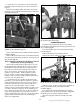
Obtain a 15/16” socket or wrench (not supplied) to
remove the toolhead bolt (#13342) and washer
(#13449). Fig. 21
Now remove the toolhead (#20420). Due to being
spring loaded, there will be some resistance. Wiggle the
toolhead up and off while holding the handle.
After removing the toolhead, carefully lower the
handle.
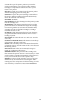
Fig. 21: Use a 15/16” socket wrench to remove the toolhead bolt.
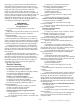
Fig. 19: Remove the toolhead ratchet by first removing the bolt
(#12486). See the schematic on page 21
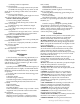
Fig. 20: After removing the clip and disconnecting the rod, replace
the clip in the rod for safe-keeping.