
Manual


11
* Indicates a caliber specific part – see the caliber conversion
chart on page 19 for the caliber you are loading for.
As stated earlier, your dies have been adjusted at
the factory. Before you change anything, try it the
way it is, once you thoroughly understand the
machine’s operation, make whatever adjustments to
the dies you feel necessary.
Reminder: There may be some variation due to
components.
To Begin Reloading
Turn on the switch on the front of the casefeed motor
housing. The casefeeder plate should begin to turn.
Cases will begin to dispense, base down, into the clear
plastic casefeed tube. The motor will continue to run
until the tube is full, at which point a micro switch will
temporarily stop the case flow.
From this point the casefeeder will automatically fill
the tube as you reload. If the casefeeder does not
function properly or the cases do not fall base down,
refer to the Trouble Shooting section of this manual.
Pull the operating handle smoothly to the bottom
stop, then raise the handle. Once again, strive to be
smooth in your operation.
The first case should be indexed to Station 2. Cycle
the handle again.
It is not necessary to apply any force on the upstroke
of the handle. All you are doing on the upstroke is
indexing the shellplate. Remember that priming is done
on the down stroke. A slow measured upstroke gives
you lots of time to pick up the next bullet and ready it
for seating. If you count one second down and one up
you’ll have a good pace.
The first case should now be in Station 3 with a case
in Station 2 as well. Cycle the handle again. The case
will be expanded when it comes out of Station 3.
Observe the swage operating part (#20314*), if the
swage is proper, proceed – if not see items 3 and 4 in the
Trouble Shooting section of this manual. Cycle the
handle again.
You should now have inserted a primer into the first
case in your sequence and it is now in Station 5. Remove
the locator button (#20637*) extract the round and check
the primer. If everything looks okay, replace the case
and button and proceed, if not, refer to the Trouble
Shooting sections regarding stations 3, 4, and 5.
Cycle the handle again, the automatic powder
measure will drop the charge you’ve selected. Pistol
casemouths will be belled at this time. Look through the
inspection hole in station 6 – you should be able to see
your powder charge in the case.
Cycle the handle again. Now, with your left hand
place a bullet on the powder charged case and cycle the
handle, your bullet will be seated to its proper depth, if
not a simple height adjustment to the seating stem may
be necessary. Refer to a loading manual for proper
loaded length (OAL). Add a bullet to the case at station
7, cycle again and check for crimp at station 8. Refer to
Trouble Shooting item 8 for adjustments if necessary.
Add a bullet, cycle again. Your first loaded round
should now be ejected into the collection bin.
If all has gone well to this point you’ve got it made.
Just keep adding bullets, watch your fingers so they
don’t get caught and don’t hurry. Just try to be smooth
in your operation. The speed will come naturally and
you’ll be doing a thousand rounds per hour before you
even realize it.
The following are some adjustment suggestions as
well as Trouble Shooting hints.
Adjustments and Conversions
Casefeeder
It may be necessary to readjust the microswitch for
different calibers. Cases may become lodged between
the microswitch and the tube wall. The other extreme is
the case failing to put enough pressure on the
microswitch to shut off the system causing it to continue
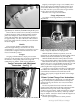
running and over flowing the tube. Fig. 15
The casefeed spacer (#13703) supplied in the
accessory package, is to be used when you are reloading
.41 mag, .44 mag, .37 mag, .30 Carbine, or .45 Long Colt.
Fig. 15: Shown is the microswitch that automatically shuts off
when a case is next to it. Also shown is an optional spacer for
certain calibers: .380 and 9mm.
Microswitch
Spacer