
User's Manual


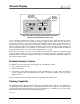
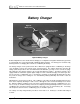
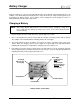

Table Of Contents
- Mark III Directional Drilling Locating System
- Table of Contents
- Table of Contents (Cont.)
- Table of Contents (Cont.)
- Safety Precautions and Warnings
- Safety Precautions and Warnings (Continued)
- Dear Customer:
- 3-3000-00b-F.pdf
- 3-3000-00c-F.pdf
- Receiver
- Display Window Icons
- On/Off
- Receiving the Transmitter’s Signals
- Clicking vs. Holding the Trigger
- Changing the Receiver’s Channel Setting
- Changing the Depth Measurement Units (English vs. Metric)
- Battery Status Display for Receiver and Transmitter
- Warning Tones for Transmitter Overheat
- Ultrasonic Function
- Calibrating the Receiver
- Using Depth Antenna Plumb Line to Mark Locate Points
- Finding Firmware Version
- 5.0 Series Firmware Functions
- Receiver
- 3-3000-00d-F.pdf
- 3-3000-00e-F.pdf
- 3-3000-00f-F.pdf
- 3-3000-00g-F.pdf
- 3-3000-00h-F.pdf
- 3-3000-00i-F.pdf
- 3-3000-00j-F.pdf
- Locating
- Locating Mode
- Locate Points (FNLP & RNLP) and Locate Line (PLL)
- Handling the Receiver
- Distance Between FNLP and RNLP Due to Depth, Pitch, and Topography
- Using Plus/Minus Indicators for Locating
- Locating the Transmitter from the Drill
- Locating the Transmitter from the Front
- Method for Confirming Position
- Locating on the Fly
- Off-Track Locating
- Splitting the Front and Rear Negative Locate Points
- Four-Turn Technique
- Calculating Depth Based on Distance Between FNLP & RNLP
- Running off Pitch or Calculating Depth from Pitch
- Transmitter’s Signal Shape
- Antenna Configuration
- Signal Reception
- Front and Rear Negative Locate Points
- Positive Locate Line Above Transmitter
- Locating
- 3-3000-00k-F.pdf
- 3-3000-00l-F.pdf
- 3-3000-00m-F.pdf
- 3-3000-00n-F.pdf
- 3-3000-00o-F.pdf
- 3-3000-00p-F.pdf

Remote Display
®
On/Off and Setting the Channel
To turn the unit on, place a fully charged DigiTrak battery pack into the battery compartment, terminal end
in first, then push the black button on the front of the display panel.
Select one of the four channels. Note that channels 1 and 3 use one frequency, and channels 2 and 4
use a second frequency. Be sure to change the channel selection on the receiver to match that selected
on the remote display (see “Changing the Receiver’s Channel Setting” in the Receiver Section).
NOTE: A zero (0) on the receiver indicates that the receiver’s telemetry is shut off and no signal will
be sent back to the drill, which will result in “dashes” across the three display windows on
the Remote. Setting the receiver to channel 0 may be useful for conserving receiver battery
power.
The transmitter information on the remote display will be the same as that at the receiver, except the
Remote will not display signal strength nor the “+/–” locating symbols. The remote display will continue to
display pitch, roll, and distance along with the flashing squiggle (“~”) in the top left window, indicating that
updates are being received. You should always wait for two consecutive updates with the same pitch/roll
information before making a steering action.
The remote display has no automatic shutoff function. To turn the unit off, push the on/off button. Never
ship a remote display or receiver with a battery in the battery compartment.
Transmitter Temperature and Battery Status
Remote displays with firmware versions of 3.9 or later automatically display the transmitter’s temperature
and battery status in the top right window for 2 seconds when a 4°C temperature increase occurs. The
transmitter’s temperature and battery status can also be viewed on command by turning the Remote off
and then back on. Remotes with older firmware versions (3.8 or earlier) will display transmitter status
automatically every 30 seconds but not at start-up. The drill operator will hear temperature increase
tones when a DataLog module is attached to the remote display.
For more information on transmitter temperature display intervals, see firmware update information on
DCI’s web page located at
www.digitrak.com. To determine the remote display unit’s firmware version,
see “Finding Firmware Version” below and, for the receiver, see “Finding Firmware Version” in the
Receiver Section.
26 DigiTrak
®
Mark III Operator’s Manual