
Inc N Scale Function Decoder - Manual


©2010 Digitrax, Inc. www.digitrax.com 3
grinding or cutting tool carefully cut a shallow 0.028” outside groove that
will allow the speaker wires to pass down the e.g.; left frame side, inside
the track spring and across to the center of the frame at the rear of the diesel
tank, as shown in Figure 3.
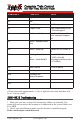
3. Reinstall the parts from step 1 in reverse order, substituting the SDN144K1E
decoder with added motor clips, for the factory light PCB. Make sure to
place some of the supplied Kapton tape under the motor saddle to ensure
the motor clips cannot short to the frames. Place the 13mm speaker in the
mounting location created in step 2, with the magnet side facing out and
ensure the speaker wires do not cause any binding problems and the insula-
tion is not damaged. Note that the frame halves are energized with track
voltage so no wires or metal speaker parts should short to these. Be sure to
inspect the speaker diaphragm for magnetic debris, dirt or damage, which
will affect sound quality. Other speaker(s) may be substituted and mounted
in combinations as long as the total impedance on the black/red speaker
wires is greater than 8ohms.
4. (Optional) Functions for other lights etc., may connected to the pads identi-
fied in Figure 4. These function leads effectively switch the track voltage,
so LED’s and 1.5V lamps will need current setting resistors installed exter-
nally as required.
5. In a SD40-2 unit installation the wired 100uF/25V electrolytic energy stor-
2443 Transmitter Rd
T
850-872-9890
Panama City, FL 32404
F
850-872-9557
www.digitrax.com
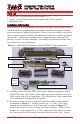
Figure 2: Kato SD40-2 -speaker mount hole in tank
space machined for speaker
13mm factory speaker
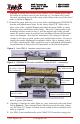
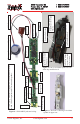
Figure 3: SDN144K1E Decoder installation in Kato SD40-2 - reassembly.
13mm Factory speaker
mounted in machined hole
kapton tape across
frame, under decoder
speaker wires in
added outside
grooves
Capacitor mounted in
cab volume. Trim left
side of small clip
diesel tank cover with
vent holes added