VERSION EX 1.
DECLARATION OF CONFORMITY ManufacturerÕs Name: IVL Technologies Ltd. per DigiTech specifications ManufacturerÕs Address: 6710 Bertram Place Victoria, B.C.
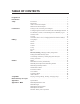
TABLE OF CONTENTS Program List Introduction Setup Performance Editing Utilities Song Mode Basic Harmony Concepts Appendix 1 Appendix 2 - MIDI ........................................................2 ........................................................3 Front Panel . . . . . . . . . . . . . . . . . . . . . . . . . . . . . . . . . . . . . . . . . . . . . . 6 Back Panel . . . . . . . . . . . . . . . . . . . . . . . . . . . . . . . . . . . . . . . . . . . . . . . 8 Audio Connection Examples . . . . .
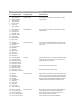
Vocalist Workstation EX Program List # Program Name Program Type Control Hints 1 2 3 4 5 6 7 Silky Thickener Stereo Doubler Mono Doubler Group Doubler Octave Down Octave Up Up and Down Auto Doubling Sing or play a vocal track. No front panel or MIDI input required 8 9 10 11 12 13 14 15 Blow Me Down Cher A Like Cyberian One Cyberian Two Cyberian Three I Can't Sing Ethyl Merman Barry Tone Special Effects Sing or play a vocal track.
INTRODUCTION Congratulations and thank you for purchasing the DigiTech Vocalist Workstation EX. This product incorporates a high quality, editable reverberation effect with the innovative vocal harmony technology that has made DigiTech a world leader in vocal harmony processing. We are confident you will be satisfied with its ease of use, elegant ergonomic design and sound quality whether your application is live performance or studio recording.
AC & GROUNDING INFORMATION WARNING The Vocalist Workstation EX is equipped with an AC adapter. Use only the 9.75V AC, 820mA adapter supplied with the Vocalist Workstation EX (Harmon Pro Group PS750). Any other adapter may cause damage to the Vocalist Workstation EX. The Vocalist Workstation EX, like any piece of computer hardware, is sensitive to voltage drops, spikes and surges.
FCC COMPLIANCE This equipment has been tested and found to comply with the limits for a Class B digital device, pursuant to Part 15 of the FCC Rules. These limits are designed to provide reasonable protection against harmful interference in a residential installation. This equipment generates, uses and can radiate radio frequency energy and, if not installed and used in accordance with the instructions, may cause harmful interference to radio communications.
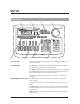
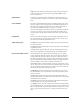
SETUP Front Panel 1 5 2 6 7 3 4 8 1) LCD display Provides visual feedback of all operating modes including performance, editing and utility modes. 2) LED displays The Input LED monitors the incoming signal from the Mic and Line inputs. The 0dB LED lights 3 dB before the onset of clipping. The MIDI LED indicates that the Vocalist Workstation EX is receiving MIDI. The Overflow LED indicates an overload of the digital signal processor. If it lights, reduce the input gain or front panel mixer faders.
Song mode is for editing and performance of ÒsongsÓ which are sequences of chord changes, key types and variations triggered by MIDI, the front panel, or a footswitch. 4) Data Wheel In Factory, User and Song modes, the Data Wheel selects and loads programs. In Edit mode, it increases or decreases the value of the selected parameter.
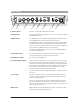
Back Panel 1 2 3 4 5 6 7 8 1) Power Switch Turns the Vocalist Workstation EX on and off. 2) Power Input Use only the Harmon Pro Group PS750 9.75V AC, 820 mA power adapter supplied with this unit. 3) MIDI section The MIDI input receives MIDI control and program information from external MIDI devices such as keyboards and sequencers. The MIDI output transmits system, specific button pushes and program information which can be recorded and played back externally from a sequencer.
Audio Connection Examples Audio Setup The drawing at left represents the basic Vocalist Workstation EX audio setup. You would most likely use this in live performance or if you are recording with a mixer that has a limited number of inputs. Mixing Console FX Return or Line Input FX Send Mixing Console Effect Processor Connect as follows: ¥ Connect the microphone to the Mic input. ¥ Connect the Left and Right audio outputs to the inputs of your mixer. For mono operation, connect the Left output only.
MIDI Connection Examples Basic MIDI Setup Vocalist Workstation MIDI Jacks MIDI THRU MIDI OUT MIDI IN Synth Module(s) MIDI Keyboard Vocalist Workstation MIDI Jacks MIDI THRU MIDI OUT MIDI IN Sequencer Vocalist Workstation MIDI Jacks MIDI THRU MIDI OUT MIDI IN Synth Module(s) Audio Recorder with Vocal Performance sync Sequencer MIDI Keyboard 10 This setup could be used for a live performance or live recording situation.
PERFORMANCE This chapter discusses the main operating features of the Vocalist Workstation EX. It begins with setting the correct levels and proceeds with discussions of the different harmony modes and their uses. We assume that you have connected your Vocalist Workstation EX according to the diagrams on the previous pages and that you are familiar with the other devices in your system. Setting the Input and Output Levels First, move the input and output level controls down to the bottom position.
Loading Programs The Vocalist Workstation EX is shipped from the factory with the first factory program selected once it is powered up. Turn the Data Wheel knob to scroll through the different factory programs. Programs are loaded automatically as you turn the wheel. Programs can also be loaded via MIDI program change. There are two banks of programs to choose from with 50 programs in each. The ÒFactoryÓ or ÒUserÓ button will light up when either of these banks are chosen.
Current Harmony Style Full Name This 12 character field shows the full name of the current Harmony Style. The style naming conventions are are described in the ÒUnderstanding the Five Harmony TypesÓ section. The Harmony Controls For musically correct harmonies to be generated automatically, you must provide the Vocalist Workstation EX with some musical information. ItÕs just like when you are playing with other musicians; they need to know what chords youÕre playing in order to stay Òin keyÓ with you.
The Vocalist Workstation EXÕs five basic harmony types are: ¥ Chordal ¥ Scalic ¥ Vocoder ¥ Chromatic ¥ Pitch Correct These three Harmony types need musical control from you as you are singing. These two Harmony types are for more specific uses. Chromatic doesn't require any special musical control. Used in Unison presets to thicken the sound of the Lead vocal. Pitch Correct can take input from a pitch bend wheel, front panel keyboard or a MIDI note.
Note: Scalic harmony programs that generate a single 3rd interval generally work for more songs than programs with a combined 3rd and 5th. Programs based on Scalic harmony have a selection of different scales you can choose from by pressing the softkeys. For example, the ÒEverlysÓ program (#36) has 3 different major scales and two minors as do many of the other Scalic-based programs. The major scales differ only on the harmony note generated on the fifth note of the scale i.e.
Chromatic Chromatic mode does not require the Vocalist Workstation EXÕs intelligent harmony because the harmony notes always remain a fixed interval away from the input note. This harmony type is used in programs that feature unison, octave, or fifth interval harmonies. You do not need to enter key information when you load Chromatic harmony programs.
EDITING This chapter describes the general principles of editing in the Vocalist Workstation EX and the individual editing modes in detail. To reduce the amount of redundant information, the general procedures, menu system and controls are described at the beginning of the chapter followed by detailed discussions of each of the edit parameters. The Harmony editing screens are split up in successive layers of complexity. This is done to make this section easier to understand.
The Edit Button When pressed from Factoryor User Programs mode, the Edit button presents the Parameter/Style Select screen. Once a parameter is selected, another press of the Edit button enters the Style Modify screens. When pressed from Songs mode, the Edit button presents the Arrangement screen. An additional press of the Edit button presents the Section editing screen. See page 52 of the Songs mode section for further details.
The Left and Right Arrow Buttons These buttons are active only when you see the ♦ and ∅ characters displayed in the upper corners of the LCD. They allow you to access the various editing screens in Factory, User, Songs and Utilities modes. Pressing the arrow buttons presents the next or previous edit screen. Repeated presses loop around the available screens. The Store Button The Store button allows you to save any changes you have made to a program or style.
style or, to create a new Gender style from scratch, load one of the blank styles (BlnkGend #) and then press the Edit button. 4. Press the softkeys below the LCD to select which voice you want to modify. 5. Turn the Data Wheel to change the Gender assignment for the selected voice. The softkeys can also be used for this purpose. 6. Press the Right Arrow button to go to the Gender settings screen. You will see the settings for Gender #1 on the left and #2 on the right. 7.
4. To modify the amount of Detune effect on the first voice, turn the Data Wheel. Press the softkeys below the other voices to select them for editing. The softkeys can also be used to change values. 5. To edit the Randomness parameter, press the Right Arrow button to move to the next edit screen. Select the voices with the softkeys and increase or decrease the amount of Randomness with the Data Wheel. 6. To edit the amount of Pitch Randomization, press the Right Arrow button.
3. Select a different style preset using the Data Wheel. If you are satisfied with loading a different style, refer to the ÒStoring your EditsÓ section on page 30. Press the Edit button again to modify the current Vibrato style or, to create a new Vibrato style from scratch, load one of the blank styles (BlnkVibr #) and then press the Edit button. 4. To increase and decrease the Vibrato Depth on voice number one, turn the Data Wheel. Press the softkeys below the LCD to select other voices for editing.
Vocoder Scoop Threshold (Vocoder styles only) With a Vocoder style currently loaded, this parameter allows you to produce a scooped harmony note only when you hit a keyboard note (or notes) above a certain velocity. The MIDI velocity range can be set from 0 to 127 although you will most likely be using the higher velocities. To edit the Scoop parameters: 1. Use the Data Wheel to select the program you want to edit and press the Edit button. 2. Press the softkey that corresponds to Scoop. (Scp) 3.
Room Type There are 5 room types available: Studio, Chamber, Club, Hall and Arena. The difference between them is the timing of the reflections. Decay Time This determines the amount of time it takes the particular room you have chosen to stop reverberating. Each room type has a slightly different range of decay times: Studio: .1-1 seconds, Chamber: .2-2 seconds, Club: .5-2.5 seconds, Hall: 1.5-4 seconds, Arena: 2-20 seconds. Brightness This parameter controls the decay time of the high frequencies only.
Harmony/Lead Mix This parameter varies the mix between your uneffected input voice and the sum of the harmony voices. Both settings are interactive, that is, setting either sets both. The relative levels are displayed in percent. Harmony Voice Levels The volume of each of the four voices are adjusted independently. The levels are edited in 1 dB increments between 0 dB (full volume) and off.
5. To change the panning of the lead voice, press the Right Arrow button to move to the Dry Pan screen. Turn the Data Wheel to change the pan position as described in the individual pans. 6 To change the Harmony Reverb Wet/Dry mix, press the Right Arrow button to move to the Harmony Reverb Mix screen. Turn the Data Wheel to change the pan position as described in the individual pans. 7 To change the Lead Reverb Wet/Dry mix, press the Right Arrow button to move to the Lead Reverb Mix screen.
mented 7th chord assigned to any of the softkeys, you could change its assignment from something you donÕt need such as a diminished 7th. Changing the Style Assigned to a Softkey: 1. Use the Data Wheel to select the program you want to edit and press the Edit button. 2. Press the softkey that corresponds to the Harmony parameter. The LCD shows the the current softkey selected by an arrow, its harmony style in quotation marks, and the other softkey assignments. 3.
Chordal harmonies allow you to choose intervals that belong to the current chord type only. The range is plus or minus 2 octaves with a separate bass voicing. The Bass voicing stays on the chord root and does not move with your voice like the other voicings. Scalic harmonies allow you to choose intervals that belong to the scale type only. The same ranges apply (plus or minus 2 octaves). There is no bass voicing in Scalic harmonies.
ered modes create thickening on single or two part harmonies. The 4 MIDI Channel mode allows individual control of each of the four harmony voices for complete pan position stability and independent pitch bend. Transpose (Vocoder and Pitch Correct only) In Vocoder mode, this feature allows you to transpose your harmonies +/Ð 3 octaves. You could use this when you are triggering your Vocoder harmonies from the bottom or top of your keyboard and the untransposed harmonies would be in the wrong octaves.
When you are satisfied, press Store once or Exit twice to save your changes. See ÒStoring Your EditsÓ at the end of this chapter for more details on saving. Level 3: Customizing A Harmony Customizing allows you to determine exactly which notes are produced for any given input note. It is the deepest harmony editing level and it is only available with Chordal, Scalic and Chromatic harmony types.
Note: If you want to reference your harmonies to any other key than C, press the Right Arrow button to present the Custom Harmony Key reference setting screen. Use the Data Wheel to change to the new key. 4. Press the Left Arrow button twice to locate the Ò[Edit] to CustomizeÓ screen. Press the Edit button. This presents the Custom Harmony Voicing screen showing the note assignments for the harmony style you have chosen. 5.
Storing your Edits There are two ways to save your edits using the Store function: Note: If you have edited and saved a style to the user bank, it is not permanently attached to the current program until you perform a Program Store. 1. Program Store - This is the term for saving any change you make such as attaching a different humanizing style to a program, loading different harmony styles or changing the mix.
UTILITIES Overview The Utilities mode allows you to make global (affecting all programs) configuration changes to the Vocalist Workstation EX, including MIDI channel assignments, audio configurations, program, song and style initialization and user preferences. To enter and exit Utilities mode: Press the Utilities button in any of the other operating modes including Programs, Edit, and Songs modes.
Note: If you decide to use the option of accessing styles by MIDI program changes, the key and harmony channel should be set to a different channel than the system channel to avoid conflicts between loading programs and loading harmony styles. The Key & Harmony channel allows you to select different keys or chords (depending on the harmony type) and any of the eight different harmony styles assigned to a program via MIDI.
MIDI Selection of Key & Harmony Controlling your harmonies can be done through MIDI as an alternative to using the front panel. You have the option of independently selecting key or chord root and style. There are several ways in which this can be done to provide you the most flexibility in live performance or sequencing.
Controller 16 is a MIDI continuous controller that can be used to select key and harmony together. The Vocalist Workstation EXÕs front panel keyboard and softkeys transmit this information over MIDI when you press them and can be recorded and played back from a sequencer.
Program Change messages can also be used to select key and harmony simultaneously. The following table shows how they are assigned. The top row represents the softkeys, the keyboard represents the chord root or key and the table shows the resulting program change number.
blow into a breath control device. It is with CCÕs that you introduce dynamics and emotion into your harmony performance. Note: All CC’s except Volume (CC7) reset to their default values when a MIDI program change message is received.
This utility can also control the reception and transmission of program changes. This is handy if you want the Vocalist Workstation EX to retransmit any program remappings you have created.
To set the Vocoder mode split point: Note: The split point is only available for the single channel Vocoder modes. 1. Press the Utilities button from any mode; this presents the UTILITIES main menu. 2. Press the MIDI softkey; this presents the MIDI Utilities sub-menu. 3. Press the softkey corresponding to Voco. 4. Use the softkeys to select either the above/below or note number fields. Use the Data Wheel to modify the settings. 5.
Any incoming Song Select command can be: ¥ Mapped to the same song number in the Vocalist Workstation EX ¥ Mapped to any other song number ¥ Ignored by the Vocalist Workstation EX (no change from previously loaded song) To edit the MIDI Song mapping: 1. Press the Utilities button from any mode; this will present the UTILITIES main menu. 2. Press the MIDI softkey; this will present the MIDI Utilities submenu. 3. Press the softkey corresponding to Song. 4.
5. Use the Data Wheel to select the desired Song Step option. 6. Press the Utilities button once again to exit; this returns you to the mode from which you entered. Song Step Direction can be controlled in various ways. The Vocalist Workstation EXÕs Song Step Forward messages can be assigned to MIDI Continuous Controller number 17, or any MIDI note from C -1 to G 9. Song Step Backward messages can be assigned to MIDI Continuous Controller 18, or any MIDI note from C -1 to G 9.
To dump a single program to another Studio Vocalist : 1. Press the Utilities button from any mode; this presents the UTILITIES main menu. 2. Press the MIDI softkey; this presents the MIDI Utilities sub-menu. If you are dumping all programs to a sysex librarian, ensure that the librarian is ready to receive a sysex dump. 3. Press the softkey corresponding to Dump. 4. Press the Right Arrow button once. 5. Press the Store button to dump all programs; the unit will display ÒDumping...
6. Press the Store button to dump the song; the unit will display ÒDumping...completedÓ after about one second to indicate that the dump is finished. 7. Press the Utilities button once again to exit; this will return you to the mode from which you entered. To dump all songs to another Vocalist Workstation EX or a sysex librarian: 1. Press the Utilities button from any mode; this presents the UTILITIES main menu. 2. Press the MIDI softkey; this presents the MIDI Utilities sub-menu.
or a sysex librarian program for later retrieval. (Refer to the MIDI Dump Utilities section above for help.) An easy way to free up memory in your Vocalist Workstation EX is to occasionally initialize all unused user styles. This procedure will initialize only the styles which are currently not used by any program, so there is no danger of changing the sound of existing programs.
5. Press the Store button to initialize the song; the unit will respond with ÒSong Init completeÓ. 6. Press the Utilities button once again to exit; this will return you to the mode from which you entered. To initialize all unused styles: 1. Press the Utilities button from any mode; this presents the UTILITIES main menu. 2. Press the Init softkey; this presents the Initialize Utilities sub-menu. 3. Press the softkey corresponding to Style. 4.
Note: The Data up and down parameters allow you to duplicate the Data Wheel using your footswitch. ¥ Song up (Sng ) ¥ Song down (Sng¬) ¥ Song Step up (Stp ) ¥ Song Step down (Stp¬) ¥ Data up (Dat ) ¥ Data down (Dat¬) The default switch assignment for the FS300, from left to right, is Program up Program down Bypass. To change the assignment of a footswitch button: 1. Press the Utilities button from any mode; this presents the UTILITIES main menu. 2.
To enable or disable voice editing of intervals: 1. Press the Utilities button from any mode; this presents the UTILITIES main menu. 2. Press the User softkey. 3. Press the Right Arrow button. 4. Use the Data Wheel to toggle voice editing of intervals on or off as desired. 5. Press the Utilities button once again to exit; this will return you to the mode from which you entered.
4. Use the Data Wheel to set the desired synthesizer volume level. 5. Press the Utilities button once again to exit; this will return you to the mode from which you entered. Audio Utilities There are several important audio parameters that you can adjust to optimize the performance of the Vocalist Workstation EX.
4. Use the Data Wheel to increase or decrease the Bass Rejection Threshold as desired. 5. Press the Utilities button once again to exit; this will return you to the mode from which you entered. Anti-feedback Control The Anti-feedback Control is useful for reducing high frequency feedback in live or other high volume applications. Increasing the value of the Anti-Feedback control attenuates sibilant sounds in the audio path. To adjust the Anti-feedback Control: 1.
SONG MODE The Song mode is a handy and effective tool for live performance that enables you to switch harmony styles Òon the flyÓ. Song mode also provides a convenient way to select key or chord change sequences from a Digitech FS300 footswitch. Choose different Styles, scales or special effects by entering them into a list that can be stepped through, almost like a manual sequencer.
you step through the songs, you will hear and see the step number increment and the current chord names and styles change. Depending on which demo song you have chosen, you may see the program change also. Creating Your Own Songs The arrangement and section editing screens in Song mode make it easy to create your own songs for non-MIDI performance. Each song in the Vocalist Workstation EX is made up of up to 16 different sections with a choice of preset names such as Verse, Chorus etc..
Section Letter Step Number Program Number Step Insert/Delete Key or Chord Program Name Name Editor 6. Press the Insert softkey to add a new step to your section. This presents the Step Insert screen. In this screen you can choose a different chord root or key, harmony style and program for each step in this section. 7. Turn the Data Wheel to select the program you want for this step.
4. Use the Data Wheel, softkeys and keyboard to enter the new information. The Arrow buttons are still active so you can make changes to additional steps. 5. Press the Exit button twice to exit and store your changes if you decide to keep them. Naming Songs and Sections Naming your song is important for your reference but not required by the Vocalist Workstation EX. If you plan to use the Arrangement editing feature you should assign each section a name such as verse, chorus etc..
If, however, you have other parts of your song you would like harmonies in, you will probably want to create some more sections and then piece them together in the Arrangement editing screen. To create more sections: 1. Repeat steps 1 to 4 above. Make sure to load the song you have just started even though it may still be called ÒBlank song #Ó. 2. Press the Insert softkey to add another section. 3. Turn the Data Wheel one notch to the right.
Changing Song Keys (Transposing) If you want to change the key of your song to accommodate a different singer or a sore throat, you can do so with the Song Transpose feature. All of the chords in your songs will automatically shift to the new key and you can decide whether to temporarily change the key or make the change permanent. To change the key of your song: 56 1. Press the Songs button to enter Songs mode, and use the Data Wheel to select the desired song. 2. Press the Edit button once. 3.
BASIC HARMONY CONCEPTS Overview A well-crafted vocal harmony can do a great deal towards enhancing a musical selection. The contrast between a lone singing voice and a group of voices signing together makes the music that much more interesting. But harmonies can be somewhat difficult to understand, so in this chapter, we will try and demystify this process.
The opposite of a diatonic harmony is chromatic. A chromatic scale is defined as: a scale type that uses all 12 semitones. Notice that the previous scale example had 8 notes. The chromatic scale uses all the sharp and flat notes in between as well. There are 12 of each of the major, minor, etc. scales; there is only one chromatic scale. To illustrate a chromatic harmony, see the following example of a chromatic 3rd above harmony on our C major scale.
a group of notes within one octave that falls in one of the following scale types; Chromatic, Major, Minor, Harmonic Minor, Melodic Minor, Wholetone, Diminished, Dorian and ÒBluesÓ. In the previous example showing the principle of diatonic harmony, we were showing a scalic harmony. That is, one whose harmony notes only fall within the notes that belong to that particular scale. For our C major scale, this means there are 7 possible harmony notes.
SPECIFICATIONS Microphone Input Balanced XLR, 1 KOhm impedance, cardoid (directional) type preferred Line Input Balanced or unbalanced 1/4" TRS, +4/-10 dB level (switchable), 2.2 KOhm impedance Microphone Input Range @ 150 Ohm source impedance: minimum -42.1 dBu, maximum -3.2 dBu Line Input Range Balanced input @ 50 Ohm source impedance: maximum +18.
IVL Technologies Vocalist Workstation EX Function...
.6=edit MIDI MESSAGES } MIDI PARAMETER EDIT format: format (edit buffer) : Example: procedure number 5Dh procedure number 60h 60 PACKED { effect number 01 query type (1=edit buffer) style number 01 data size hi parm number 01 data size lo value MSB (0,0,0,0,0,0,value lo.7,value hi.
byte 2 : data 1 byte (6-0 bits) MIDI EDIT BUFFER EDIT format: byte 3 : data 2 byte (6-0 bits) procedure number 5Ch byte 4 : data 3 byte (6-0 bits) PACKED { byte 5 : data 4 byte (6-0 bits) edit buffer data byte 6 : data 5 byte (6-0 bits) } byte 7 : data 6 byte (6-0 bits) Example: F0 00 00 10 00 36 5C ... packed edit buffer data ...
MIDI SYSEX Dump 1 Vocalist Workstation EX Program Formats SYSEX Header (7 bytes) { F0h - Beginning of SYSEX Message 00h 00h 10h - DigiTech Product Identifier xxh - Channel # 36h - Vocalist Workstation EX Device ID 42h - Procedure number (Dump 1 Program) Number of Styles (1 byte) { 1bh - number of styles Style Header (2 bytes) { Style ID Style Version (see note #2 below) Style Data (xx bytes) { # of data bytes = xxh style data bytes EOX { F7h - End of SYSEX Message see note #1 below Repeated
MIDI SYSEX Dump 1 Vocalist Workstation (non-EX version) Program Formats SYSEX Header (7 bytes) { F0h - Beginning of SYSEX Message 00h 00h 10h - DigiTech Product Identifier xxh - Channel # 35h - Vocalist Workstation 1.
MIDI SYSEX Dump All Vocalist Workstation EX Program Formats SYSEX Header (7 bytes) { F0h - Beginning of SYSEX Message 00h 00h 10h - DigiTech Product Identifier xxh - Channel # 36h - Vocalist Workstation EX Device ID 42h - Procedure number (Dump 1 Program) { 1 - number of styles (dumped one Style at a { Style ID Style Version (see note #2 below) Number of Factory Styles (2 bytes) Number of User Styles (2 bytes) see note #1 below Number of Styles (1 byte) Repeated for total number of Styles (see note
MIDI SYSEX Dump 1 Studio Vocalist Program Formats SYSEX Header (7 bytes) { F0h - Beginning of SYSEX Message 00h 00h 10h - DigiTech Product Identifier xxh - Channel # 24h - Studio Vocalist Device ID 42h - Procedure number (Dump 1 Program) Number of Styles (1 byte) { 18h - number of styles Style Header (2 bytes) { Style ID Style Version Style Data (xx bytes) { # of data bytes = xxh style data bytes EOX { F7h - End of SYSEX Message see note #1 below Repeated for total number of Styles (see note
MIDI Sysex Parameters 13 delay 0 0 to 250 (for 0 to 2.50) 14 delay 1 0 to 250 (for 0 to 2.50) PARAMETER EDITS 15 delay 2 0 to 250 (for 0 to 2.50) 16 delay 3 0 to 250 (for 0 to 2.
VARIATION STYLE: (EFFECT: 1 STYLES: 7-14) Style 7 = Variation 0 Style 8 = Variation 2 and so on up to Style 14 = Variation 7 0 protected 1 harmony type 0=Chromatic, 1=Scalic, 2=Chordal, 3=Vocoder, 4=PitchCorr 2 protected 3 scale type 0=Major, 1=Minor, 2=Whole, 3=Dimin, 4=Blues, 5=Dorian, 6=HarMin, 7=MelMin 4 chord type 5 interval 0 6 interval 1 0=maj, 1=maj7, 2=min, 3=min7, 4=dom7, 5=m7b5, 6=dim7, 7=aug7, 8=sus, 9=sus7 1 to maximum valid interval 1 to maximum valid interval 7 interval 2 1 to maxim
47 AUDIO synthmode 0=OFF, 1=ON 48 AUDIO synthvolume -24 to 0 CONTROLLER SWITCHES AVAILABLE THRU MIDI SYSEX 1 NOTE KEY use controller absolute and note key values 49 protected 50 USER uservoiceedit 0=OFF, 1=ON 51 USER footsw1 0=BypL, 1=BypM, 2=Pgm down, 3=Pgm up, 4=Sng down, 5=Sng up, 6=Stp down, 7=Stp up, 8=Dat down, 9=Dat up 2 ARROW controller increment (right arrow) controller decrement (left arrow) 3 SOFT use controller absolute and soft key values 4 ROTENC use controller increment / decr
Decimal / Hexadecimal /Binary Table Decimal / Hexadecimal /Packed Bytes Table Decimal Hexadecimal Binary Decimal Hexadecimal Packed 0 0 0000 -100 FF9C 03 7F 1C 1 1 0001 -50 FFCE 03 7F 4E 2 2 0010 -25 FFE7 03 7F 67 3 3 0011 -10 FFF6 03 7F 76 4 4 0100 -5 FFFB 03 7F 7B 5 5 0101 -2 FFFE 03 7F 7E 6 6 0110 -1 FFFF 03 7F 7F 7 7 0111 0 0000 00 00 00 8 8 1000 1 0001 00 00 01 9 9 1001 2 0002 00 00 02 10 A 1010 5 0005 00 00 05 11 B 1011 10 0
8760 South Sandy Parkway Sandy, Utah, 84070 Telephone (801) 566-8800 Fax (801) 566-7005 International Distribution: 7 Farmington Road Amherst, New Hampshire 03031 U.S.A. Fax (603) 672-4246 DigiTech is a registered trademark of DOD Electronics Corporation Copyright 1998 DOD Electronics Corporation Vocalist Workstation EX 1.