
User Guide

9
Audio Connection Examples
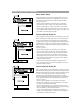
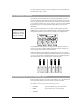
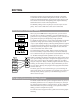
Basic Audio Setup
The drawing at left represents the simplest audio setup. You
would most likely use this in live performance or if you are
recording with a mixer that has a limited number of inputs.
Connect as follows:
• Connect the microphone to either the front or back Mic
input. Press the "Mic" button on the front panel to enable.
• Connect audio outputs 1 and 2 to the inputs of your mixer.
Ensure that the audio output mode is set to stereo. This is set
in the Utilities menu under the Audio softkey. See page 49 of
the Utilities section for further details.
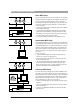
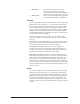
Advanced Audio Setup #1
This setup offers expanded control of the harmony voices and
allows external processing of the input voice. The signal pro-
cessor connected to the loop send and return could perform
compression, de-essing, or equalization for example. The indi-
vidual harmony and dry voice outputs provide the ability to
adjust pan, level, equalization and processing separately at the
mixing console.
Connect as follows:
• Connect the microphone to either the front or back Mic
input. Press the "Mic" button on the front panel to enable.
• Connect audio outputs from the dry voice and the four har-
mony voices to the inputs of your mixer. Ensure that the
audio output mode is set to Quad. This is set in the Utilities
menu under the Audio softkey. See page 45 in the Utilities
section for further details.
• Connect the Loop Send of the Studio Vocalist EX to the
input of the effect processor and the Loop Return to the out-
put of the effect processor.
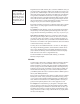
Advanced Audio Setup #2
This is the most likely studio arrangement. It allows you to use
the microphone preamp in your console and provides the most
flexible arrangement for pre and post effects generation. There
is no dry voice output because that is connected directly
through the board and monitoring and routing can be done
there. The individual harmony outputs allow you to adjust pan,
level, equalization and processing separately for each voice.
Connect as follows:
• Connect the microphone to your mixing console input.
• Connect the output from your console auxiliary send to the
line input on the Studio Vocalist EX.
• Connect the four harmony voice outputs to inputs on your
mixer. Confirm that the output mode is set to Quad. See page
45 in the Utilities section for further details.
• Connect the required dynamic (compression, limiting) or
spatial (reverb, delay) effects processors to your mixing con-
sole auxiliary send and return loops.