
User Guide


Set the Master Volume
The last column on the right side of the matrix includes the Speaker Simulator and Master Volume Parameters. Press the Parameter Right
button again so that the LED in this column lights. Use the Parameter Up or Down buttons to light the top vertical LED which represents the
Speaker Simulator on/off Parameter. If you intend to connect the RP14D directly into a mixing console, you should turn this on. If you are
going into an amp, it is a matter of personal taste whether to turn it on or off. You decide which sounds best for your application. Next press
the Parameter Down button which will skip the second vertical LED down (because there is no Parameter there) and the third LED down
should light. This is the Master Volume Parameter. Use the Value buttons to set the overall Volume that you desire for the Program. Since the
Pre/Post, and Update Parameters only affect the Program when the Expression Pedal is assigned to control Volume, and we will assign the
Expression Pedal to be Phaser Speed, it is not necessary to edit these parameters.
Assign Speed to the Expression Pedal
The Expression Pedal assignments are all made in the second column from the left, under the Wah status LED. Press the Parameter Left or
Right button until the horizontal LED in the Wah column lights. Use the Parameter Up or Down buttons to light the vertical LED third down
from the top. Following the grid across the Matrix to where the two LEDs intersect reveals that we are on the Link Parameter for the
Expression Pedal. Use the Value Up or Down buttons until the display reads Sped as the assignment. You can then set stop points for the
range of the Phaser Speed in the minimum and maximum values, but for our example we will leave these set to the full range.
Store the Program
The last step that we need to do is to store our changes to a User Program. If we changed Programs or turned the RP14D off without storing
these settings, it would forget what we had done and revert back to the original Program. Press the Store button once. A U begins flashing in
the Display, which is asking us to select the User Bank and Program number that we wish to save our changes to. Use the Value buttons to
select the User location that you want to store the changes to and press the Store button again.
Congratulations! You have successfully created a Program.
23
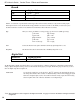
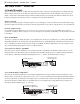
2. Use Value buttons to select
desired location
U
1. Press the Store button once,
U begins to flash
3. Press Store button again to save
pde
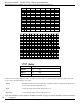
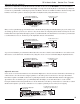
Use the Parameter Left/Right and
The selected Parameter is the
Expression Pedal Assignment
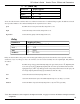
Use Va
l
ue
b
uttons to se
l
ect
Speed as the assignment
s
Up/Down buttons to light these LEDs
58
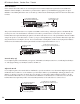
Use the Parameter Left/Right and
The selected Parameter
is the Volume Level
Use Value buttons to select
the Volume Level
Up/Down buttons to light these LEDs
25
RP14 UserÕs Guide Section Four - Tutorial