IMPORTANT SAFETY INSTRUCTIONS WARNING FOR YOUR PROTECTION, PLEASE READ THE FOLLOWING: KEEP THESE INSTRUCTIONS HEED ALL WARNINGS FOLLOW ALL INSTRUCTIONS CLEAN ONLY WITH A DAMP CLOTH DO NOT BLOCK ANY OF THE VENTILATION OPENINGS, INSTALL IN ACCORDANCE WITH THE MANUFACTURERS INSTRUCTIONS. The symbols shown above are internationally accepted symbols that warn of potential hazards with electrical products.
DECLARATION OF CONFORMITY Manufacturer’s Name: Manufacturer’s Address: declares that the product: Product Name: Product Options: Digitech Electronics 8760 S. Sandy Parkway Sandy, Utah 84070, USA RP14D All (requires a Class II power adapter that conforms to the requirements of EN60065, EN60742, or equivalent.
Warranty We at Digitech are very proud of our products and back-up each one we sell with the following warranty: 1. The warranty registration card must be mailed within ten days after purchase date to validate this warranty. 2. Digitech warrants this product, when used solely within the U.S., to be free from defects in materials and workmanship under normal use and service. 3.
Table of Contents Safety Information....................................................................................................I Declaration of Conformity ......................................................................................II Warranty ..................................................................................................................III Table of Contents ....................................................................................................
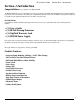
RP14 UserÕs Guide Section One - Introduction Section-1 Introduction Congratulations on your purchase of the Digitech RP14D! The DigiTech RP14D is the perfect sound shaping tool for the serious guitarist. The RP14D’s Amp Modeling utilizes the warmth and dynamic response that only a real 12AX7 tube can provide and is complimented by a library of the best effects available. The simple user interface lets you quickly create Programs and assign functions to the built in expression pedal.
RP14 UserÕs Guide Section One - Introduction Quick Start The RP14D comes with 50 pre-Programmed factory Programs, and 50 user Programs. From the factory, the user Programs are exact duplicates of the factory Programs. This allows you to experiment without running the risk of losing any of the original sounds contained in the RP14D. For those of you who prefer to burn now and read later, we’ve included this Quick Start section to get you up and running.
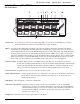
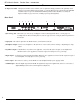
RP14 UserÕs Guide Section One - Introduction A Guided Tour of the RP14D The Front Panel 2 3 4 5 6 7 8 9 10 1 1. Footswitches - The footswitches are used to select Programs, change Banks, access the Tuner, turn individual effects on and off, change Amp Channels, select functions in Learn-A-Lick mode, or bypass the RP14D. 2 Matrix - The matrix provides all information regarding the current Program, parameter edit functions, and tuning status.
RP14 UserÕs Guide Section One - Introduction 9. Presence - This knob adjusts a global high end boost to the all Programs. 10. Expression Pedal - The Expression Pedal is used for real time control of parameters during performance. This pedal may control Volume in one Program, Wah in another Program, or control the Delay Level in yet another Program. Individual boundaries may be set up for the minimum and maximum parameter values that will be accessed by the Expression Pedal.
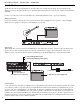
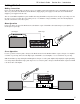
RP14 UserÕs Guide Section One - Introduction Getting Started Making Connections Before connecting the RP14D, make sure that the power to your amplifier is turned off, and that the power to the RP14D is disconnected. There is no power switch on the RP14D. To turn the RP14D on, simply plug the power supply in to an AC outlet. To turn the RP14D off, unplug the power supply from the AC outlet. There are several different amplification options available when using the RP14D.
RP14 UserÕs Guide Section One - Introduction Direct to a Mixing Console The RP14D can be connected directly to the inputs of a house PA system, or to a recording console. Connect the guitar to the input of the RP14D, and from the outputs of the RP14D to the channel inputs of the mixing console. Be sure to engage the RP14D’s Speaker Simulator in this application. See page 21 for more on selecting the Speaker Simulator.
RP14 UserÕs Guide Section One - Introduction When you select a Program, the number of the Program will be shown in the Display. The first digit in the Display will either be a U or an F to indicate whether the Program is a User Program or a Factory Program. The second digit of the Display will represent the current Bank number between 1 and 10, and the third digit will represent the program number (between 1 and 5) within that Bank .
RP14 UserÕs Guide Section Two - Editing Functions Section Two - Editing Functions Creating Programs Creating your own signature sound with the RP14D is easy and intuitive. The RP14D lets you create your own Programs, or fine tune existing Programs to suit your needs. Editing and creating is a very simple process that doesn’t require a lot of time dedicated to learning the menus. Once a Program has been edited to your liking, you may store those settings to any of the 50 User Program locations.
RP14 UserÕs Guide Section Two - Editing Functions Storing/Copying a Program Once you have modified the Parameters and Effects to your liking, you can store them to a user Program location. When editing a Program, the Store LED will light indicating that you have changed a Parameter and need to store the changes. The following steps outline the procedure for storing a preset: 1. Press the Store button once and the first seven segment LED in the Display window will flash U.
RP14 UserÕs Guide Section Three - Effects and Parameters Section Three - Effects and Parameters About the Parameter Matrix The Parameter Matrix displays all the Effects and Parameters found in the RP14D. The Parameters are arranged in horizontal rows and the Effects are in vertical columns. Use the Parameter Select keys to navigate the matrix. The Effects and their Parameters are as follows: Compressor Parameters Displayed Values Threshold - 60 . . . 0 Ratio 1 . 5:1 . . . oo:1 Gain 0 . . . .
RP14 UserÕs Guide Section Three - Effects and Parameters Expression Pedal Parameters Displayed Values Link See Chart Below Max Value Parameter dependent Min Value Parameter dependent The RP14D’s Expression Pedal allows you to control various Parameters in real time during performance. To assign a parameter to be controlled by the Expression Pedal, you must first enter the Edit mode. Use the Parameter Right or Left buttons to select the second column from the left.
RP14 UserÕs Guide Section Three - Effects and Parameters Amp Model Column One Parameters Displayed Values Amp Type CLn . . . AC4 (see list below) Amp Channel grn - red Amp Model Column Two Parameters Displayed Values Gain * 1.0...11.0 Bass 0...10 Mid Range 0...10 Treble 0...10 Level 0....100 The RP14D has several extremely flexible Amp and acoustic Guitar Models.
RP14 UserÕs Guide Section Three - Effects and Parameters Bass, Mid Range, Treble The Amp Model offers a three band equalizer. The Equalizer is much like the tone controls on a conventional amplifier. The Bass, Mid, and Treble allow you to boost and cut the tonal response for Channel A and B individually. Ranges are from 1 to 10. Level Allows you to set independent Amp Volumes for the green and red Channels individually.
RP14 UserÕs Guide Section Three - Effects and Parameters Chor (Chorus) Parameters Displayed Values Speed * 0...100 Depth * 0...100 The RP14D offers a chorus that is unique in both character and sound. A Chorus adds a short delay to your signal and modulates the delay time which takes the delayed signal slightly in and out of tune. The delayed signal is then mixed back with the original signal to create a thicker texture as if two guitars were playing the same part.
RP14 UserÕs Guide Section Three - Effects and Parameters The RP14D’s adjustable Phase Shifting effect is reminiscent of the classic Phasers used in mid-70’s keyboard and guitar sounds. A phaser splits the incoming signal, and then changes the phasing of the signal. This signal is then taken in and out of phase and mixed back in with the original signal. As the phasing changes, different frequencies get canceled resulting in a warm sort of twisting sound.
RP14 UserÕs Guide Section Three - Effects and Parameters PAn (Auto Panning) Parameters Displayed Values Speed * 0...100 Depth * 0...100 An auto panner is a modern relative of the tremolo that modulates the sound from left to right at a given rate. Parameters are as follows: Speed Controls the Panning speed (speed of modulation). Ranges from 0 to 100 Depth Adjusts the intensity of the Panning effect. Ranges from 0 to 100. detn (Detuner) Parameters Displayed Values Amount * - 30 . . . .
RP14 UserÕs Guide Amount Section Three - Effects and Parameters Selects the bend range of the Whammy™ Module. There are 16 ranges available in the Whammy Module.
RP14 UserÕs Guide Section Three - Effects and Parameters The following is a list of harmony notes relative to their assigned interval and scales: Major Minor Harm.Minor Mel.
RP14 UserÕs Guide Section Three - Effects and Parameters a ya (Auto Ya) Parameters Displayed Values Speed * 0...100 Depth * 0...100 Regeneration * 0 . . . . 40 An Auto Ya is like the YaYa in sound in as much as it combines the characteristics of a wah and a flanger together. The difference is that the Auto Ya provides animation to the sound automatically. The Auto Ya parameters are as follow: Speed Determines the rate of sweep in the YaYa effect. Ranges from 0 to 100.
RP14 UserÕs Guide Section Three - Effects and Parameters Reverb Parameters Displayed Values Type CLub . . . SPrn Level * 0...100 Decay Time 1...10 Ambience, or reverberation, is produced when sound energy is reflected off room surfaces and objects. Using reverb in recorded program material gives the listener a sense that the material is being performed in an actual room or hall. It is this similarity to actual acoustic spaces that makes reverberation a useful tool in recorded music.
RP14 UserÕs Guide Section Three - Effects and Parameters Speaker Simulator Parameters On/Bypass Displayed Values O n - By p The RP14D’s Speaker Simulator circuitry allows you to use it in both recording and live situations without lugging heavy amps and/or cabinets around. Just connect the RP14D’s outputs to a mixing console and engage the Speaker Simulator. No miking hassles, no heavy equipment, just full on miked cabinet sound. On / Bypass Turns the Speaker Simulator on or off.
RP14 UserÕs Guide Section Four - Tutorial Section Four - Tutorial A Guided Example Suppose you wanted to create your own dual channel program which used no compression, the ripping distortion of a British Stack Amp with boosted lows in the EQ on the red channel, the warm sounds of an American Combo in the Green Channel, a Noise Gate that opens quickly, a classic Phaser sound with the Expression Pedal controlling the Phaser Speed, no Delay, and a little bit of a Hall reverb.
RP14 UserÕs Guide Section Four - Tutorial Adjust the Gain, EQ, and Level At this point, you should still be on Amp Model Column One (the LED to the left of the words AMP MODEL is on). Press the Parameter Right button once and the Amp Model Column Two LED will light (to the right of the words Amp Mod). Use the Parameter Up or Down buttons until the top vertical LED is on. Following the grid across the Matrix to where the two lit LEDs meet indicates that this is the Amp’s Gain Parameter.
RP14 UserÕs Guide Section Four - Tutorial Select the Phaser Next we wanted a classic Phaser Effect in our custom Program. Press the Parameter Right button again and the horizontal LED in the Mod/Pitch column should light. Use the Parameter Up or Down buttons to light the top vertical LED which corresponds to the Type of Modulation or Pitch Shifting Effect that we want. Use the Value Up or Down buttons until the Display reads phas which is the abbreviation for Phaser.
RP14 UserÕs Guide Section Four - Tutorial Set the Master Volume The last column on the right side of the matrix includes the Speaker Simulator and Master Volume Parameters. Press the Parameter Right button again so that the LED in this column lights. Use the Parameter Up or Down buttons to light the top vertical LED which represents the Speaker Simulator on/off Parameter. If you intend to connect the RP14D directly into a mixing console, you should turn this on.
RP14 UserÕs Guide Section Five - Appendix Section Five - Appendix Reinitializing the RP14D This option allows you to restore the contents of the RP14D’s memory to the original factory condition and calibrate the expression pedal. ATTENTION: Performing this function will destroy all user-programmed data. All such data will be lost forever! To restore the factory Programs and calibrate the expression pedal, the procedure is as follows: 1. Plug in the RP14D while holding down the Parameter Select Up button.
RP14 UserÕs Guide Section Five - Appendix Program List The following is a list of all the factory Programs in the RP14D.
RP14 UserÕs Guide Section Five - Appendix Specifications A/D Converter: 24 bit D/A Converter: 24 bit Sample Rate: 44.1 kHz. DSP Section: Architecture: Static-Dynamic Instruction Set Computer (S-DISC™) Digital Signal Path Width: 24 bits (144.5 dB) Internal Data Path Width: 48 bits (289 dB) Dynamic Delay Memory: 256k x 24 bits (3.5 seconds) Static Delay Memory: 256 24-bit registers (6.55 milliseconds) Data ALU Processing: 11.3 MIPS Address ALU Processing: 16.
RP14 UserÕs Guide Section Five - Appendix 29
8760 S. Sandy Parkway Sandy, Utah 84070 Telephone 801-566-8800 Fax 801-566-7005 International Distribution 8760 S. Sandy Parkway Sandy, Utah 84070, USA Telephone 801-568-7638 Fax 801-568-7642 DigiTech, RP14D, and S-DISC II are Trademarks of the Harman Music Group Incorporated Copyright 1999 The Harman Music Group Incorporated Printed in the USA 6/99 Manufactured in the USA RP14D 18-6326-A Please Visit DigiTech on the World Wide Web at: http://www.digitech.