User’s Guide
Warning For your protection, please read the following: Water and Moisture: Appliances should not be used near water (e.g. near a bathtub, washbowl, kitchen sink, laundry tub, in a wet basement, or near a swimming pool, etc.) Care should be taken so that objects do not fall and liquids are not spilled into the enclosure through openings. These symbols are internationally accepted symbols that warn of potential hazards with electrical products.
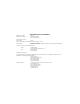
DECLARATION OF CONFORMITY Manufacturer’s Name: Manufacturer’s Address: DigiTech 8760 S. Sandy Parkway Sandy, Utah 84070, USA declares that the product: Product name: RP100 Note: Product name may be suffixed by the letters EX, EU, JA, and UK. Product option: all (requires Class II power adapter that conforms to the requirements of EN60065, EN60742, or equivalent.
Warranty We at DigiTech are very proud of our products and back-up each one we sell with the following warranty: 1.The warranty registration card must be mailed within ten days after purchase date to validate this warranty. 2. Digitech warrants this product, when used solely within the U.S., to be free from defects in materials and workmanship under normal use and service. 3.
Table of Contents Safety Information .............................................................I Declaration of Conformity ............................................II Table of Contents............................................................III Section One - Introduction Getting Acquainted1 Included Items ...................................................................1 A Guided Tour...................................................................2 Front Panel ...............................
Section-1 Introduction Getting Acquainted Congratulations on your wise choice in purchasing the RP100.Thanks to the continuous advances in musical technology, you have the flexibility, power, and capability of producing sonic creations never before thought possible. Although the RP100 is so user friendly you may not even need to read this manual, we recommend that you become better acquainted with us, and what we have to offer by going through this User’s Guide with your RP100 in front of you.
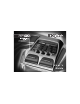
A Guided Tour of the RP100 The Front Panel 2
1. Footswitches - These 2 Footswitches are used to select Presets, access the Tuner, or bypass the RP100.The Footswitch on the right will increase, and the Footswitch on the left will decrease the selected Preset. Pressing both Footswitches together will bypass the currently selected Preset. Pressing and holding both Footswitches will access the Tuner. 2. Parameter Knobs - The Parameter knobs perform various functions depending on which mode is currently active in the RP100.
6. Display - The Display provides information for different functions depending on the mode that has been selected. In Performance mode, the Display will show the currently selected Preset number. In Edit mode, the Display will show the value of the parameter being adjusted. In Tuner mode, the Display will show the note played. 7. Store - The Store button is used to save your custom edits to the user Presets. Rear Panel 1. Input - Connect your instrument to this jack. 2.
3. Control In - Connect an expression pedal or volume pedal to this jack for the purpose of controlling Volume, Wah, or Whammy™in the RP100. 4. Headphones - Connect a pair of stereo headphones to this jack. 5. Power Input - Connect only the optional DigiTech PS0913B power supply to this jack. Getting Started Making Connections There are several different connection options available when using the RP100.The following diagrams show the connections for some of these options.
NOTE: When using a guitar amp, it may be best to connect the guitar to the input of the RP100 and the Output of the RP100 to the effect return of the amplifier.
Stereo Operation For stereo operation connect the guitar to the Input of the RP100. Connect a TRS stereo “Y” cord to the RP100’s Stereo Output. Connect one end of the “Y” cord to the input of one amplifier, channel of a mixer, or power amp. Connect the second end of the “Y” cord to a second amplifier, second channel of a mixer, or power amp.
Applying Power There are two options for powering the RP100: battery power, and AC power. Before applying power to anything, set your amp(s) to a clean tone and set the tone controls to a flat EQ response (on most amps, this would be 0 or 5 on the tone controls).Then follow the steps listed below. Battery Power The RP100 can be run for about 8 hours on 6 AA batteries.The battery compartment is located on the bottom of the RP100.The following diagram shows the correct polarity for battery installation.
AC Power The RP100 can also be powered with the optional PS0913B power supply. Once the audio connections have been made, turn the RP100’s Master Level (far right knob) all the way down. Connect the plug of the PS0913B power supply to the power jack on the rear panel of the RP100. Connect the other end of the PS0913B power supply to an AC outlet.Turn the power of your amplifier(s) to the on position and adjust the volume(s)to a normal playing level.
About the RP100 The Presets Presets are numbered locations of programmed sounds which reside in the RP100. Presets are recalled with the Footswitches.The active effects in each Preset will be indicated by the lighted LEDs in the Effect Matrix.The RP100 comes with 40 User Presets (Presets 1-40) and 40 Factory Presets (Presets 41-80).The User Presets are locations where your creations may be stored.The Factory Presets will not allow you to store any changes to them.
Tuner Mode The Tuner in the RP100 allows you to quickly tune or check the tuning on your guitar. Enter Tuner mode by pressing and holding both Footswitches simultaneously.The Display will briefly show tu indicating that you are in Tuner mode. To begin tuning, play a note on your guitar (a harmonic at the 12th fret usually works best).The Display shows the note being played.The Matrix LEDs indicate whether you are sharp or flat.The top 4 Red LEDs indicate the note is sharp and should be tuned down.
Section Two - Editing Functions Editing/Creating Presets Creating your own signature sound with the RP100 is easy and intuitive.The RP100 lets you create your own Presets, or fine tune existing Presets to suit your needs. When creating or editing a sound, you must first start with one of the User or Factory Presets. It is not possible to start with a completely empty Preset.
The Matrix The Matrix is where all Effects and Parameters are selected for editing. In Edit mode, successive presses of the Select button will advance to the next Effect row.The LED will light indicating which Effect group has been selected. Each Effect will have up to 3 Parameters which can be modified.The Knob under each column of Parameters is used to change the value for the corresponding Parameter of the selected Effect. As a Knob is rotated, the Parameter value or status will be shown in the Display.
Storing/Copying a Preset Once the Preset has been modified to your liking, you may store your settings to any of the 40 User Preset locations (Presets 1-40). The following steps outline the procedure for storing changes to a Preset or copying a Preset to a different location: 1. Press the Store button once and the current Preset location will flash in the Display.This is asking you to select a User Preset location where your new sound will reside. 2. Select the User Preset location using the Footswitches.
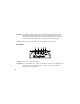
Section Three - Effects and Parameters About the Effects The RP100 can be thought of as several different “virtual” amplifiers, and individual, hi-tech stomp boxes.With stomp boxes, the order in which they are connected can make a big difference in how good the overall sound is. The following diagram shows the order of the effects contained in the RP100. Effect Definitions Each Effect within the RP100 can be programmed to suit your personal tastes and application.
Pickup/Wah The Pickup Simulator lets you get the thick tone of a humbucker pickup from a guitar with single coil pickups, or the bright edgy sound of a single coil pickup from a guitar with a humbucker.This allows you to have the best of both worlds without having to change guitars during a performance. Wah is an effect controlled by an Expression Pedal making the guitar sound as if it’s saying “Wah.” Pickup Type - The Parameter 1 knob selects the Pick Up type which will be simulated.
Amount - The Parameter 2 knob adjusts the Amount of Compression (ratio and sustain) and ranges from 1 (slight compression) through 20 (maximum sustain). Gain - The Parameter 3 knob adjusts the Output Gain from the Compressor. Ranges from 0 to 6. Amp Modeling Amp Modeling is a technology which applies the tone of several popular modern and vintage amps. Amp Modeling also includes an acoustic guitar simulation.
Bass - The Parameter 1 knob adjusts the amount of low end enhancement (Bass). Mid - The Parameter 2 knob adjusts the amount of mid range enhancement. Treble - The Parameter 3 knob adjusts the amount of high end enhancement (Treble). Cabinet/Gate The Cabinet Modeling simulates different types of miked speaker cabinets.You have your choice of 3 Cabinet Types and 4 Mic Placements in relationship to the speaker cabinet. A Noise Gate is designed to eliminate noise while you are not playing.
Of - Turns the Noise Gate off. ng - Selects the Silencer™ Noise Gate. A1 to A9 - Selects the Auto Swell volume swell effect. These settings will automatically ramp up the volume from a 200 milliseconds volume fade in to 2 second volume fade in. Gate Thresh - The Parameter 3 knob sets the signal strength (Threshold) required to open or close the Noise Gate.The Gate Threshold parameter ranges from 1 (opens easily) to 40 (requiring strong signals to open).
Flange (FL) A Flanger uses the same principle as a Chorus but uses a shorter delay time and adds regeneration (or repeats) to the modulating delay.This results in an exaggerated up and down sweeping motion to the effect. Amount - The Parameter 1 knob simultaneously adjusts the rate (Speed) and intensity (Depth) of the Effect. Ranges from 1 to 99. Level - The Parameter 2 knob controls the mix level of the Effect. Ranges from to 99.
Panner (Pa) An Auto Panner modulates the sound from left to right at an even rate. Amount - The Parameter 1 knob adjusts the rate (Speed) at which the signal pans from side to side. Ranges from 1 to 99. Level - The Parameter 2 knob adjusts the intensity (Depth) of the changing pan. Ranges from 0 to 99. Vibrato (br) A Vibrato effect modulates the pitch of the incoming signal at an even rate. Amount - The Parameter 1 knob adjusts the rate (Speed) at which the pitch modulates. Ranges from 1 to 99.
AutoYah™ (AY) An AutoYah™ combines the characteristics of a Wah and a Flanger together creating an almost human vowel characteristic as if the guitar were saying “Yah.” The AutoYah™ provides animation to the sound automatically based on string attack. Amount - The Parameter 1 knob adjusts the rate (Speed) of the sweep. Ranges from 1 to 99. Level - The Parameter 2 knob adjusts the intensity (Depth) of the vowel sound. Ranges from to 99.
Detune (dt) A Detuner will make a copy of your incoming signal, take the copied signal slightly out of tune from the original, and mix the two signals together.The result is a doubling type of effect as if two guitars were playing the same part together. Amount - The Parameter 1 knob adjusts the amount of pitch difference applied to the copied signal. Ranges from -12 to 12. Level - The Parameter 2 knob controls the mix of the detuned note. Ranges from 0 to 99.
Delay Delay is an effect that will record a portion of the incoming signal, and then play it back a short time later.The recording can repeat just once or several times. Type/Level - The Parameter 1 knob selects one of the 3 different types of Delay, as well as the volume level of the Delay. OF - Turns the Delay Effect off. 1d through 9d - These are Digital Delays with Level control. 1A through 9A - These are Analog Delays with Level control. 1P through 9P - These are Ping Pong Delays with Level control.
Section Four - Other Functions Expression Pedal The rear panel of the RP100 includes an input for an expression pedal. Any passive volume pedal will operate as an expression pedal with the RP100. Connect from the output of a passive volume pedal to the Expression Pedal Input on the RP100.The expression pedal will control the RP100’s Volume,Wah, or Whammy™ parameters. If Wah and Whammy are disabled, the expression pedal will function as a volume pedal.
Factory Reset This function resets the RP100 to its original factory settings.This procedure will erase all custom user Presets, and recalibrate the Expression Pedal. ATTENTION: Performing this function will erase all user-programmed data. All such data will be lost forever! Be sure you want to erase the memory and start fresh before continuing with this procedure. The procedure for performing a Factory Reset is as follows: 1.
Section Five - Appendix Specifications Input: 1/4” Output: 1 - 1/4” Stereo TRS Headphone: 1/8” Stereo TRS A/D/A: 24 bit Delta Sigma Power Supply: 6 AA Batteries or 9 VAC, 1.3A (PS0913B) Power Consumption: 1.3A Memory: 40 User/40 Factory Effects: Pickup Simulator,Wah, Compressor, 12 Amp/Guitar Models, 3 band EQ, Noise Gate, Cabinet Modeling, Mic Placement, Chorus, Flange, Phaser,Tremolo, Panner,Vibrato, Rotary Speaker, Auto Yah™, Enveloped Filter, Pitch Shift, Detune,Whammy™, Delay, and Reverb.
Preset List (User/Factory) 28
DigiTech 8760 S. Sandy Parkway, Sandy, Utah 84070 PH (801) 566-8800 FAX (801) 566-7005 International Distribution 8760 S. Sandy Parkway, Sandy, Utah 84070 USA PH (801) 568-7642 FAX (801) 568-7638 DigiTech and RP100 are trade marks of the Harman Music Group Inc. Copyright the Harman Music Group Printed in China RP100 Owners Manual 18-6360V-A Please visit DigiTech on the World Wide Web at: http://www.digitech.