GENETXTM GUITAR WORKSTATION USER’S GUIDE
Warning For your protection, please read the following: Water and Moisture: Appliances should not be used near water (e.g. near a bathtub, washbowl, kitchen sink, laundry tub, in a wet basement, or near a swimming pool, etc.) Care should be taken so that objects do not fall and liquids are not spilled into the enclosure through openings. These symbols are internationally accepted symbols that warn of potential hazards with electrical products.
DECLARATION OF CONFORMITY Manufacturer’s Name: Manufacturer’s Address: DigiTech 8760 S. Sandy Parkway Sandy, Utah 84070, USA declares that the product: Product name: GNX3 Note: Product name may be suffixed by the letters EU, JA, NP and UK. Product option: all (requires Class II power adapter that conforms to the requirements of EN60065, EN60742, or equivalent.
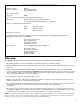
Table of Contents Introduction . . . . . . . . . . . . . . . . . . . . . . . . . . .1 Quick Start . . . . . . . . . . . . . . . . . . . . . . . . . . . . . . .2 Making Connections . . . . . . . . . . . . . . . . . . . . . .2 Apply Power . . . . . . . . . . . . . . . . . . . . . . . . . . . .2 Select an Analog Output Mode . . . . . . . . . . . . . .2 Select The Target System Setup . . . . . . . . . . . . . .2 Select a Preset . . . . . . . . . . . . . . . . . . . . . . . . . . .2 A Guided Tour of the GNX3 . .
Table of Contents Using Undo While Playback is in Progress Playing Back a Recorded Track . . . . . . . . . . . Setting Track Playback Levels and Panning . . Setting each track’s playback level: . . . . . . Setting each track’s pan: . . . . . . . . . . . . . . Recording Multiple Tracks . . . . . . . . . . . . . . Changing Track Status . . . . . . . . . . . . . . . . . Punching In / Punching Out . . . . . . . . . . . . . Bouncing/Merging Tracks . . . . . . . . . . . . . . . Drums Track . . . . . . . . . . . .
Introduction Introduction The DigiTech GNX3, is the most advanced guitar processor of its kind. Thanks to the highly advanced technology provided by GeNetX™, and the extreme horsepower contained in the Audio DNA™ DSP engine, you now have the tools to create your own guitar amplifier and speaker cabinet models. All of this power lets you create a sound that is your own. The GNX3’s built-in 8 track digital recorder is a valuable tool for designing models, and it has a library full of studio quality effects.
Introduction Quick Start The Quick Start section is included for those of you who would rather play now and read later. Making Connections 1. Connect your instrument to the INPUT jack on the rear panel. 2. Connect the LEFT/RIGHT OUTPUTS to the input(s) of your amplifier(s), power amp, or mixer. Apply Power 1.Turn the OUTPUT level knob, on the rear panel of the GNX3, all the way down (fully counter clockwise). 2. Connect the PSS3 power supply to the POWER jack on the GNX3. 3.
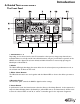
Introduction A Guided Tour of the GNX3 The Front Panel 1. Footswitches 1- 5 Depending on the selected mode, these 5 footswitches select presets, change amp channels, turn individual effects on and off, control Learn-A-Lick functions, and give you hands-free operation of the GNX3’s recorder. Bypass,Tuner, Learn-A-Lick, and Mode functions are accessed by pressing the labeled pair of footswitches. 2.
Introduction 6. Parameter Knobs In performance mode, these 5 knobs select Amp Models, Speaker Cabinets, and Warp Models. In Green or Red mode, they adjust the Amp Gain, EQ and Level of the selected amp channel. In Edit mode, they adjust the parameters listed in the column directly below each knob for the selected group of effects. 7. Display The display shows the selected preset name and number.
Introduction 10. Down/Up Footswitches These footswitches select User preset banks (Bank Mode), User presets (Stompbox Mode), select songs (Recorder Mode), and change playback speed (Learn-A-Lick). 11. Expression Pedal The Expression Pedal controls effect parameters in real time. Most GNX3 parameters can be assigned to the Expression Pedal. Applying extra pressure to the toe of the Expression Pedal switches control between the assigned parameter(s) and the Wah.
Introduction The Rear Panel 1. Mic Output This XLR jack passes your mic signal to the mixing console. 2. Mic Input This XLR jack connects a low impedance mic to the GNX3 that can be used for recording vocals into the GNX3’s Recorder. It can also be used for the Talker Vocoder effect. A mic with a cardioid pattern is recommended. 3. Mic Level Controls the gain of the mic input preamp.
Introduction 13. S/PDIF Output This is the GNX3’s digital output. The output signal is in a stereo digital format, and is intended to be connected to a digital S/PDIF input found on other S/PDIF compatible devices and sound cards. NOTE: Do not connect the S/PDIF output to analog auxiliary, CD, phono, or tape inputs on consumer electronic devices. It is not compatible with these inputs. 14. MIDI In This jack receives all incoming MIDI data.
Introduction PAN / LEVEL SETUP REMAIN Stereo Operation 1. Connect the guitar to the input of the GNX3. 2. Connect the GNX3’s Left output to the input of one amplifier or channel of a power amp. 3. Connect the GNX3’s right output to a second amplifier, or to a second channel of a power amp. 4. Select Stereo as the Output configuration from the Utility menu. See page 65 for more on selecting the Output configuration.
Introduction S/PDIF Digital Output Connect the GNX3’s S/PDIF output to the S/PDIF input on your digital audio compatible mixer or computer sound card. You must have S/PDIF inputs on the receiving device in order to use this output. Be sure to use a 75 ohm or RCA video cable to connect from the Digital Output to the input of the other device.
Introduction presets. When you select a preset, the name of the preset appears in the green alpha-numeric display and the number of the preset appears in the red numeric display. The User LED to the right of the numeric display lights indicating the User preset is active. The Factory LED lights indicating a Factory preset is active. The GNX3’s Modes When you first apply power to the GNX3, it powers up in one of three modes: Bank, Stompbox, or Recorder. Modes are selected in two different ways: 1.
Introduction 1.Turn the delay on. 2. Press and hold the Footswitch 4 while in Stompbox Mode. 3. Press and hold it again to change it back to a Delay on/off switch. Recorder Mode When Recorder mode is active, the GNX3’s UP/DOWN footswitches are used for selecting songs and loops that reside in the recorder’s memory. The 1-5 footswitches are used for hands-free control of the recorder’s functions. FOOTSWITCH 1 rewinds back through a song. FOOTSWITCH 2 deletes the last track recorded.
Introduction Jam-A-Long / Learn-A-Lick The Jam-A-Long feature lets you connect a Tape, CD, or MP3 player to the GNX3. The tape, CD, or MP3 player’s signal is output through the GNX3’s left, right, and headphone outputs. To use the Jam-A-Long feature, do the following: 1. Connect the headphone output of your player to the JAM-A-LONG INPUT, on the rear panel of the GNX3, with a 1/8” stereo cable. 2. Press play on your Tape, CD, or MP3 player.
Introduction To use the Drum Machine, do the following: 1. Press the Drums button.The Drums button’s LED lights and the current drum pattern begins playing. If the Drums button is pushed, the Store, Utility, and Amp Save LEDs light. 2. Press the Store, Utility, or Amp Save buttons to adjust the Pattern,Tempo, or Level using the DATA WHEEL. Select a Pattern 1. Press the STORE (Pattern) button to adjust the drum pattern. The selected drum pattern is shown in the display. 2.
Introduction Editing/Creating a Preset The GNX3 was designed to make sound processing easy and intuitive. Because the GNX3 provides both Amp Modeling and Effects Processing, the editing functions are divided into two sections: the Amp/Cabinet Modeling section and the Effects section. The GeNetX™ technology contained in the GNX3 lets you go much further than mere Amp Modeling. GeNetX™ lets you create your own Amp/Cabinet HyperModel™ and store this custom creation to a User Amp/Cabinet location.
Introduction Mode is active). After models are selected for the Green and Red channels, the models can be Warped together to create a HyperModel™. Selecting Amp/Cabinet Models The first step to editing an Amp Model, Cabinet Type, or creating your own HyperModel™ is to select the Amp and Cabinet types for the Green and Red Amp channels in your preset. The procedure for selecting an Amp Model or Cabinet Type for the Green or Red Amp Channels is as follows: 1.
Introduction Creating HyperModels™ Creating new, unique HyperModels™ is what GeNetX™ is all about. Once the Green and Red Amp Models and Cabinet types are selected, and the Amp Parameters and Cabinet Tuning have been adjusted, GeNetX™ technology lets you do something amazing. The characteristics of each Amp and Cabinet assigned to the Green and Red Channels can actually be combined or “Warped” to create a completely new Amp HyperModel™.
Introduction Rotating the parameter knobs increases or decreases the value of the parameter and you hear the change in real time. When parameter values have changed, the Store LED lights indicating the preset has been modified and needs to be stored (see page 17 for more on the storing procedure). Changing presets, or turning the power off before storing any changes will erase your changes and revert to the stored values.
Introduction 7. Press the STORE button again to finish. To copy one preset to another preset location, begin by selecting the preset you want to copy, then follow the steps listed above. Press EXIT at any time during the procedure to aborts the process.
Effects and Parameters Effects and Parameters The GNX3 can be thought of as several different “virtual” amplifiers, and individual, hi-tech stomp boxes. With stomp boxes, the order in which they are connected can make a big difference in how good the overall sound is. Whether the stomp boxes are placed before the amp, or in the amp’s effects loop will also make a difference. The following diagram shows the signal path through the processing contained in the GNX3.
Effects and Parameters Compressor A compressor is used to increase sustain, and tighten up a guitar signal. A compressor sets boundaries for a signal’s strength. When a signal exceeds the set boundary, it is forced back into the set boundary. As the signal fades to a point where it no longer exceeds the boundary, the compressor expands the signal strength and increases sustain. The compression parameters are as follows: Comp On/Off - The STATUS button turns the Compressor (Compress) on and off.
Effects and Parameters Parameter 2 (Whammy™) - The Parameter 3 knob provides a manual control of the Whammy™ pedal position. Ranges from 0 to 99. The Parameter 4 knob has no function when the Whammy™ is selected. Intelligent Pitch Shifting (IPS) Intelligent Pitch Shifting makes a copy of the incoming signal, and then changes the pitch of the copied note to a diatonically correct interval specified by the Amount parameter.
Effects and Parameters Talker™ The Talker™ is an effect designed exclusively by DigiTech, that lets your instrument speak. The Talker™ requires a microphone be connected to the Mic Input on the rear panel of the GNX3. As you speak into the microphone, your instrument mimics what you say. The Talker™ effect is output only at the 1/4” left and right outputs. When the Talker™ is bypassed, the mic signal is passed from the XLR mic input to the XLR mic output unaffected. There are five Talker™ types.
Effects and Parameters Equalization helps shape the tonal response of your guitar signal. The EQ in the GNX3 is similar to the tone knobs on an amplifier with the exception that the GNX3 lets you choose the center frequency for the Mid Range and Treble adjustments. EQ Green/Red - The STATUS button adjusts the EQ when a Warped combination (green and red) of amps is selected. This button does not function if only the green or red channel is selected.
Effects and Parameters A Chorus adds a short delay to your signal.The delayed signal is modulated in and out of tune and then mixed back with the original signal to create a thicker sound. Parameter 1 - The Parameter 2 knob adjusts the rate (Speed) of the modulation. Ranges from 1 to 99. * These Parameters are only available using the GenEdit™ computer editor software. Parameter 2 - The Parameter 3 knob adjusts the intensity (Depth) of the modulation. Ranges from 1 to 99.
Effects and Parameters Mod Mix - The Parameter 5 knob controls the mix (mod mix) of wet and dry signal. Ranges from 0 (all dry) to 99 (all wet). * These Parameters are only available using the GENEDIT™ computer editor software. Triggered Flanger A Triggered Flanger is the same sound as a regular Flanger but it lets you choose the starting point of the Flanger sweep. With a regular Flanger, the low frequency oscillator (LFO) is continually sweeping up and down.
Effects and Parameters An Auto Panner modulates the sound from left to right at an even rate. Parameter 1 - The Parameter 2 knob adjusts the rate (Speed) at which the signal pans from side to side. Ranges from 1 to 99. Parameter 2 - The Parameter 3 knob adjusts the intensity (Depth) of the changing pan. Ranges from 0 to 99. Parameter 3 - The Parameter 4 knob selects the type of wave form the modulation uses. Choices include: Triangle , Sine, and Square.
Effects and Parameters * Parameter 4 - Adjusts the left to right balance of the wet signal. Ranges from L 99 to R 99. Mod Mix - The Parameter 5 knob controls the mix (mod mix) of wet and dry signal. Ranges from 0 (all dry) to 99 (all wet). YaYa™ The YaYa™ is an effect exclusive to DigiTech products. The YaYa™ is controlled by the Expression Pedal and combines the characteristics of a wah and a flanger together providing a unique talk box type of effect.
Effects and Parameters Mod Mix - The Parameter 5 knob controls the mix (mod mix) of wet and dry signal. Ranges from 0 (all dry) to 99 (all wet). Detune A Detuner makes a copy of your incoming signal, takes the copied signal slightly out of tune from the original, and mixes the two signals together. The result is a doubling type of effect as if two guitars were playing the same part together. Parameter 1 - The Parameter 2 knob adjusts the amount of pitch difference (amount) applied to the copied signal.
Effects and Parameters Feedback - The Parameter 3 knob adjusts the number of times the delayed signal will repeat (feedback). Ranges from 1 to 99 and rpt hold (infinite repeat). Ducker Threshold - The Parameter 4 knob adjusts the level (threshld) the input signal must reach before the Delay signal is attenuated. Ranges from 0 to 99 and off (oF). * Ducker Attenuation - The Ducker Level selects the amount of attenuation applied to the Delay signal when the Ducker Threshold has been exceeded.
Tutorial Tutorial Suppose you wanted to create your own HyperModel™ that incorporates the sweet tones of a vintage Tweed using an American 2x12 cabinet, and the ripping distortion of a Rectified Amp with a British 4x12 cabinet.
Tutorial Adjust the Green Channel Parameters The Tweed amp that we selected for our Green Channel assignment uses the factory default settings for the Gain, EQ, and Level Parameters.Therefore, you may want to change the settings. To access the Green Channel Parameters, do the following: 1. Press the STATUS button. All horizontal LEDs light green indicating that all 5 knobs will adjust the Green Channel Parameters. 2. Rotate the Parameter 1 knob to adjust the Tweed Gain. 3.
Tutorial Tune the Cabinets As an option, you may also want to adjust the resonance for the American 2x12 and the British 4x12 Cabinets. To access the Cabinet tuning for both Red and Green Channels, do the following: 1. Press and hold the STATUS button until the display reads CAB TUNe (Cabinet Tuning). 2. Release the STATUS button and rotate the Parameter 2 knob to adjust the tuning for the Green Cabinet (gtune º0). 3. Rotate the Parameter 5 knob to adjust the tuning for the Red Cabinet (rtune º0). 4.
Tutorial 4. When the display reads RECTWeeD, press the AMP SAVE button again. Now we need to choose one of the 9 User HyperModel™ locations.The alpha-numeric display should read EMPTY (Empty) and the red numeric display should read U1 if this is the first HyperModel™ stored to your GNX3. 5. Press the AMP SAVE button again to save to this Amp location.The display briefly reads AMP SaVD (Amp Saved) and then returns to the name of the selected preset.
Tutorial Select the Pickup Type In our example preset we use a single coil pickup, but want it to sound like a double coil humbucker. With the Wah-Pickup LED lit, rotate the Parameter 4 knob until the display reads SC>Humb. This makes a single coil sound like a Humbucker. Turn the Compressor Off We don’t use compression in our preset so, we need to turn the compressor off. To turn the compressor off, do the following: 1. Press the EFFECT SELECT DOWN button.
Tutorial Channel) can be adjusted individually. To adjust the EQ, do the following: 1. Press the EFFECT SELECT DOWN button until the Equalizer LED lights. The GNX3 defaults to the Green Channel EQ adjustments. Therefore, the display briefly reads EQ green . 2. Rotate the Parameter 1 knob to adjust the Red Channels Bass enhancement. 3. Rotate the Parameter 2 knob to select the center frequency for the Mid-range. 4. Rotate the Parameter 3 knob to adjust the Mid-range enhancement. 5.
Tutorial Select and Adjust the Chorus Next we wanted to thicken up the sound, by adding a subtle Chorus effect, in the following manner: 1. Press the EFFECT SELECT DOWN button again and the LED in the Chorus/Mod row lights. 2. If the display reads off (Of), press the STATUS button until the display reads on (On). 3. Rotate the Parameter 1 knob until the display reads Chorus (Chorus) for the effect type. 4. Rotate the Parameter 2 knob to set the Chorus Speed to 5. 5.
Tutorial 5. Rotate the Parameter 3 knob to set the Reverb Decay to 15. 6. Rotate the Parameter 4 knob to set the Reverb Damping to 40. 7. Rotate the Parameter 5 knob to set the Reverb Level to 30. Store the Preset The last step, is to store our changes to a User Preset. If we changed presets or turned the GNX3 off without storing these settings, it would forget what we had done and revert back to the original preset. To store the preset, do the following: 1. Press STORE.
Recorder Recorder The GNX3 is equipped with an 8-track digital recorder. The recorder interface features standard recording transport buttons,Track buttons, Drums button, Level/Pan button, Setup button, and Remain (time remaining) button. Song and Time displays help you keep track of what song or loop you are working with and how much recording time has elapsed or remains. The recorder functions are also mapped to the GNX3’s footswitches allowing hands-free functionality to the recorder.
Recorder Recorder Setup Before you begin recording your first song, you will want to become acquainted with the recorder Setup functions. Setup functions include: Record Input, Stereo Record, Click Track,Tempo, Pre-Roll, Song Repeat, Quantize, Record Quality, Auto Stop, Card>PC, and Memory Card Format . These functions dictate how the recorder works for each song. Each song can have these functions setup in different ways so that you can customize how the recorder works depending on your needs.
Recorder GTR DRY – Select this input to route a dry, unprocessed guitar signal direct from the input to the recorder while processed signal is heard at the GNX3’s outputs. This input is great for laying down a dry guitar track that can be replayed through different amp models and presets using the Reamp input . You can still monitor the guitar signal through all of the GNX3’s effects processing while recording.
Recorder 1 00 00 sterorec OF 1. Begin with the recorder stopped. 2. Press the SETUP button until the GNX3’s main display reads sterorec Of. 3. Use the DATA WHEEL to turn the Stereo Enable feature on and off. 4.When finished, press EXIT. This feature doesn’t affect track arming when using the recorder panel. You can arm two tracks using the track buttons. When two tracks are armed for recording using the panel, they are automatically panned hard left and right.
Recorder 1 00 00 tmpo=120 OF 1. Begin with the recorder stopped. 2. Press the SETUP button until the GNX3’s main display reads tmpo=120. 3. Use the DATA WHEEL to adjust the tempo. By turning on the DRUMS button, you can hear the change of the Drums tempo in the audio outputs. 4.When finished, press EXIT.
Recorder Song Repeat To rehearse with the song you just created, Song Repeat continuously plays the song without having to press the REWIND and PLAY buttons to re-start it. Each time the song ends during playback, it automatically restarts from the beginning when this feature is turned on. To enable Song Repeat, follow these steps: 1 00 00 song rpt OF 1. Begin with the recorder stopped. 2. Press the SETUP button until the GNX3’s main display reads song rptOf. 3.
Recorder 1. Begin with the recorder stopped. 2. Press the SETUP button until the GNX3’s main display reads Quantize. 3. Use the DATA wheel to turn the quantize function Of or On. 4.When finished, press EXIT. Record Quality There are 3 different recording qualities the GNX3’s recorder can record in. The higher the selected quality, the shorter the total amount of available recording time. CD is the highest quality the GNX3’s recorder offers. It is a true 44.1kHz CD quality sample rate.
Recorder Card>>PC - Preparing a Card for the Computer The GNX3’s recorder uses a proprietary format when recording audio to an external memory card. In order to access tracks created using the GNX3’s recorder on a computer, it is necessary to save these files in a format that can be read by an external card reader connected to a PC. Here are the steps for preparing the card for this purpose: 1. Once recording is complete, press the SETUP button until the GNX3’s main display reads CARD>>PC.
Recorder To use an external memory card with the GNX3, follow these steps: 1. Place the card into the MEMORY CARD slot with the contacts facing down. When a memory card is inserted into a GNX3 for the first time, it needs to be formatted by the GNX3 in order to use it. To format the card, do the following: 1. Once a card has been inserted into the GNX3’s Memory Card slot, the display reads format? and the RECORD button begins flashing. 2.
Recorder Song01_rock song01 rock SONG01 rock Song01rock The following names are not acceptable for song folders: Song_01 Song 01 Song 1 The following names are acceptable for individual audio track files: Trak01_solo.wav trak03lead.wav trak04 rhythm.wav TRAK05 bass.wav The following names are not acceptable for audio track files: TRAK_01 Track 01 track 1 It is possible to have duplicate songs or tracks when renaming them in the computer.
Recorder Recording Time The GNX3 is equipped with 16Meg of on-board recording memory. This gives you six total track minutes available for recording in Normal Record Quality (three minutes in CD Record Quality and 12 minutes in Economy Record Quality). Therefore, you can record one track for six minutes, two tracks for 3 minutes, and so forth using Normal Quality . The number of songs that can be in memory is dependent on the total amount of record time.
Recorder Using the UNDO Button to Erase a Track Every track you record may not be a take you want to keep. The GNX3’s recorder features an UNDO button, that erases the contents of a track. You can Undo a track even while recording is in progress, thus eliminating having to stop and start all the recording procedures again. WARNING: Deleting a track is permanent and once it is deleted it cannot be retrieved. Please use the UNDO button with caution. The following steps explain how Undo works.
Recorder Using Undo While Playback is in Progress You can also Undo a track while playback is in progress. This essentially deletes the track recorded to last. To undo the track while playback is in progress, follow these steps: 1. Press the UNDO button once. The GNX3’s main display reads del trkx. If you want to delete a different track, press the track button you want deleted. 2. Press the UNDO button again within 3 seconds to delete the track.
Recorder 3. Press the PLAY button. Playback of the tracks begins. 4.To adjust the playback level of the tracks, press the LEVEL / PAN button once. It lights green. 5. Press any track button that is playing back. It flashes green. The main display reads tkx levl 50 (X = track number). 6.Turn the DATA WHEEL to adjust this track’s playback level. 7. Select other tracks and adjust their playback level by repeating steps 5 and 6. 8. Press the LEVEL / PAN button twice to exit. Setting each track’s pan: 1.
Recorder 1. Press any TRACK button repeatedly until it lights green, flashes red, or flashes yellow. If the button lights green, there is recorded material present. If the RECORD or PLAY button is pressed the material is played back. If the button light flashes red, and the RECORD button is pressed (the button light is a solid red) it is recorded on. If the light flashes yellow, it merges armed tracks for playback, including recorded material already present on this track.
Recorder Drums Track The GNX3’s built-in drum machine is not only a great practice tool but can actually be used for song creation as well. Using the Drums button located in the recorder panel, you can either sync the drum machine with your other recorded audio tracks, or record the drum machine patterns to any of the recorder’s tracks.
Recorder Recording the Mic Input The GNX3 is equipped with a mic input that is used for recording vocals or acoustic instruments. In order to get the best level recorded, it is necessary to setup the mic input gain properly. To setup the input gain for the mic, follow these steps: 1. Connect a microphone to the MIC INPUT on the rear panel. 2. Begin singing or playing the instrument into the mic. 3.
Recorder S/PDIF output. Configurations 2 and 3 are for the Dry Track setup (see the section on Digital Output setup for more on Dry Track). 4. Press the EXIT button. Working with Songs and Loops A Song and a Loop are a group of recorded tracks. The GNX3’s recorder has 99 songs available to record to as recording memory allows. With an optional 128M Smart Media™ card, for example the GNX3 has a total of 48 Normal quality track minutes available.
Recorder Playing Back a Recorded Track After a track is recorded, playing it back is simple. If you are at the end of the track or the song, press PLAY. The recorder automatically begins playing back the track/song from the very beginning. If you want to start playback at the beginning of a track or song but are someplace other than the end of the song, follow these steps: 1. Begin with the Recorder stopped. 2. Press the REWIND footswitch.
Recorder Using the GNX3’s JamMan Delay Looper The GNX3’s recorder also doubles as a JamMan™ Delay Looper. The JamMan is used to create a recording loop that you can playback with. The JamMan functions are accessed using the GNX3’s footswitches while they are in Recorder mode. The only difference between regular multi-track recording and looping is the way you use the footswitches after recording your first track.
Recorder If at anytime you are not satisfied with your current take while recording overdubs with your original loop, you can undo it by pressing the UNDO footswitch. This erases the contents of a track and lets you proceed with trying another take without having to stop. To use the UNDO function while recording a loop, follow these steps: 1. Press the UNDO button once. The GNX3’s main display reads rerecord. 2. Press the UNDO button again within 3 seconds to start re-recording.
Recorder Recording a Track To begin recording a track using the FS300 footswitches, follow these steps: 1. Press the B-RECORD footswitch. The TRACK 1 button will automatically light red, which will arm it to record, and the recorder will begin recording on this track. The TIME display will begin counting off the recording time. 2. Once recording is completed, press the A-STOP/UNDO footswitch. This stops the recording process, and saves the track.
Recorder Using the FS300 for Looping Recording a Loop To begin recording a loop is no different than when you are doing multi-track recording. You must begin with a new song in order to create a loop. Press the GNX3’s UP footswitch (the GNX3’s footswitches must be in recorder mode first) or the F FWD button to select a new song that has not been recorded on . Here are the steps for creating a loop: 1. Press the B-RECORD footswitch.
Recorder pressed the PLAY footswitch in relation to the tempo you are using for your loop. Lets say you were recording a four second loop and you pressed the PLAY footswitch just a little late. No problem, with Quantize enabled, the looper will automatically cut off the extra recording and give you a perfect four second loop. Same goes for if you pressed the PLAY footswitch a little early. Quantize will push out the length and make it four seconds. To enable the Quantize feature, follow these steps: 1.
Recorder Other Functions Expression Assign The GNX3 has several options for real-time control over effects parameters in each of its presets. Parameters can be modified during performance both manually and automatically by several methods. These are referred to as expression controllers and include the following: the built-in Expression Pedal, Internal LFOs (low frequency oscillators), and the Control Footswitch.
Other Functions bottom turn around point for the LFO (not available when volume is the assigned parameter). 5. Rotate the Parameter 3 knob to select the maximum value the assigned parameter reaches at the top turn around point for the LFO (not available when volume is the assigned parameter). 6. Rotate the Parameter 4 knob to select the speed that the LFO oscillates from the minimum to the maximum values. LFO speed ranges from (.O5 HZ) to 10 Hz (1ºO HZ). 7.
Other Functions 3. Rotate the Parameter 1 knob until the Parameter is displayed. See the Expression Parameter Assignment list on page 63 for a complete list of assignable Parameters. 4. Rotate the Parameter 2 knob to select the minimum value the assigned parameter reaches when the Control footswitch is turned off (not available when volume is the assigned parameter). 5.
Other Functions gatthres (Noise Gate Threshold) - Controls the Noise Gate’s Threshold. gatattak (Noise Gate Attack) - Controls the Noise Gate’s Attack time. PLK SENS (Noise Gate Pluck) - Controls the Noise Gate’s Pluck Sensitivity. fx onoff (Chorus/Mod On/Off) - Turns the Chorus/Mod module on and off.
Other Functions Analog Output Configuration The GNX3’s analog outputs can be configured several different ways, giving you a variety of signal routing possibilities for both recording and performing applications.
Other Functions 1. Press the UTILITY button. The Utility button’s LED lights. 2. Using the MODE or DRUMS button, scroll to the left or right until volumpdl (Volume Pedal Update) is displayed. 3. Rotate the DATA WHEEL to select On (enabled), or OF (disabled). 4. Press EXIT to return to the GNX3 presets. V-Switch Threshold Applying extra pressure to the toe of the Expression Pedal engages a feature called V-Switch.
Other Functions 3. Use the DATA WHEEL to select the User Bank you want to rename. 4. Press STORE to access the naming menu.The far left character of the Bank name begins to blink. 5. Use the DATA WHEEL to select the desired alpha-numeric character. 6. Press the DRUMS button to select the next character to the right, and the MODE button to select the previous character to the left. 7. Repeat steps 5 and 6 until the Bank name appears in the display. 8.
Other Functions 5. Press STORE. The Display reads SeND TO. 6. Use the DATA WHEEL to select the destination preset number. 7. Set the MIDI recording device to record. 8.Press STORE again.The display reads send pst until the dump is complete at which time the display briefly reads DONE before it returns to PrSTDuMP. 9. Press EXIT to return to the GNX3 presets. The Preset Dump sends information on the MIDI channel defined in the MIDI Channel menu.
Other Functions MIDI Merge The MIDI Merge function echos the incoming MIDI data to the MIDI Out port of the GNX3. This is useful when multiple MIDI devices are chained together, and you want to pass incoming MIDI Data on to MIDI devices downstream from the GNX3.The procedure for enabling or disabling the MIDI Merge function is as follows: 1. Press the UTILITY button. The Utility button’s LED lights. 2. Using the MODE or DRUMS buttons, scroll to the left or right until midimrge is displayed.
Other Functions To change the GNX3’s digital output configuration, follow these steps: 1. Press the UTILITY button. The Utility button’s LED lights. 2. Press the MODE or DRUMS button, to scroll to the left or right until digi out is displayed (Digital Output configuration setup menu). The display begins flashing between digi out and the selected digital output configuration. Note: gtr+rec is the default digital output configuration set from the factory. 3.
Other Functions GENEDIT™ Editor/Librarian The possibilities are endless when you install the GENEDIT™ Editor/Librarian software on your home computer. Before installing GENEDIT™ on your Mac or PC, connect the computer’s MIDI output to the GNX3’s MIDI input, and the GNX3’s MIDI output to the computer’s MIDI input.Then insert the GENEDIT™ CD ROM into the CD ROM drive on your computer, and follow the install instructions that appear on the screen.
Appendix Preset List Bank 1 Showcase 1. HYBRID 2. CLNCHRS 3. 2CHUNK 4. BAD BASS 5. FUSNSOLO Bank 2 GENETX 6.WARPME 7. BLAKBASS 8. MEATX2 9. GNX DIRT 10. CLN/MEAN Bank 3 Stars 11. ERIC J 12. CARLOS 13. KOBB 14. OLD EVH 15. PAT JAZZ Bank 4 Amps 16. BASS MAN 17. MATCHED 18.VOXTOP 19. HIWATTAG 20. JAZZDRIV Bank 5 Bass Amp 21. MODERN 22. GTR BASS 23. ROCKIN 24. GROOVE 25. GRINDER Bank 6 Metal 26. RECTIFY 27. SOLO 28.WHAMMY 29.THE ZONE 30. BIG DUCK Bank 7 Blues 31. BLUE DLY 32. BLUEBALL 33.TEX BLUE 34.
Appendix MIDI CC List Parameter 74 CC# Parameter CC# Pickup Type/Off Wah On/Off Wah Type Wah Minimum Wah Maximum Wah Pedal CC CC CC CC CC CC 1 2 3 4 5 6 Amp Morph Cabinet Morph Amp/Cabinet Morph CC 79 CC 80 CC 81 Comp On/Off Comp Attack Comp Threshold Comp Ratio Comp Gain IPS On/Off IPS Type IPS Level IPS Param 1 IPS Param 2 IPS Param 3 Whammy Pedal CC CC CC CC CC CC CC CC CC CC CC CC 8 9 10 11 12 13 14 15 16 17 18 19 Gate On/Off Gate Type Gate Threshold Gate Attack Gate Pluck CC CC CC CC CC
Appendix Specifications General Specifications A/D Converter: D/A Converter: Sampling Frequency: DSP Section: Preset Memory: 24 bit 24 bit 44.1 kHz 3 - Audio DNA™ DSP Processors 65 Factory Presets, 65 User Presets Connections: Guitar Input and Outputs: Jam-A-Long/CD_Input: Mic Input and Output: Headphone: MIDI: S/PDIF Output: Memory Card: Footswitch: 1/4" TS 1/8" Stereo TRS Balanced XLR 1/4" Stereo TRS In and Out/Thru RCA connector SmartMedia™ Memory (3.
DIGITECH 8760 S. SANDY PARKWAY SANDY, UTAH 84070 PH (801) 566-8800 FAX (801) 566-7005 INTERNATIONAL DISTRIBUTION 8760 S. SANDY PARKWAY SANDY, UTAH 84070 USA PH (801) 566-8800 FAX (801) 566-7005 DIGITECH, GENETX,AUDIO DNA, AND GNX3 ARE TRADE MARKS OF THE HARMAN MUSIC GROUP INC. COPYRIGHT THE HARMAN MUSIC GROUP PRINTED IN THE USA 04/2002 MANUFACTURED IN THE USA GNX3 USER’S GUIDE 18-6382-A PLEASE VISIT DIGITECH ON THE WORLD WIDE WEB AT: http://www.digitech.