
User Guide


Quick Start
We have included this handy Quick Start guide for those of you who are anxious to get started and prefer to play now
and read later.
Making Connections:
Connect your instrument to the input jack on the rear panel of the Genesis3. Connect the LEFT and/or RIGHT
Outputs to the input(s) of your mixer.
Apply Power:
Turn the OUTPUT LEVEL knob on the rear panel of the Genesis3 all the way down (counter clockwise). Connect
the plug of the power supply to the power jack on the Genesis3. Connect the other end of the power supply to an
AC outlet. Press the POWER switch located on the rear panel of the Genesis3 to the on position. Turn your mixer’s
power switch to the on position and adjust the channel faders to their nominal position (0 dB). Gradually increase the
Genesis3’s OUTPUT LEVEL knob to achieve the desired level. Be sure that the input(s) of your mixer are not
clipping.If clipping occurs, reduce either the level of the Genesis3’s OUTPUT LEVEL or the channel trim pots on
your mixer.
Select the Desired Output Mode:
Select either Mono or Stereo as your Output Mode in the Utility menu. To do this, press the AMP SAVE and
STORE buttons simultaneously.This will take you into the Utility menu. Press the TAP-IT or EDIT buttons until
MONO or STEREO appears in the display. Turn the DATA/PRESET Knob to select MONO or STEREO .
Select Target System Setup:
The Genesis3 needs to know the type of amplification system it will be used with. From the previous Output selection
step,press the EDIT button once. This takes you to the Target System Setup menu. Use the DATA/PRESET Knob
to select the amplification system you will be using the Genesis3 with (see page 32 for more information about Target
System Setup). Press the AMP SAVE and STORE buttons simultaneously to return the Genesis3 to Performance
mode.
Select Preset:
The Genesis3 comes loaded with 48 pre-programmed factory presets,and 48 user presets. From the factory, the user
presets are exact duplicates of the factory presets. This allows you to experiment without running the risk of losing
any of the original sounds contained in the Genesis3. Rotate the DATA/PRESET knob to select different Presets.
Once you have found presets that suit your taste, you can alter the sounds to your specific needs.
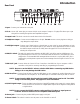
Customize Your Sound:
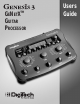
Rotate the AMP MODEL knob (1) to change Amp Models for the selected Amp Channel. Push down the Warp
knob (12) to select one of two Amp Channels. Rotate the CABINET knob (11) to select Cabinet Models to be
applied to the Amp Model. Rotate the GAIN knob (13a) to adjust the amount of distortion,the TREBLE, MID,and
BASS knobs (13b,c,& d) to adjust the EQ, and the AMP LEVEL knob (13e) to adjust the volume of the selected
Amp Channel. Rotate the WARP knob (16) to combine the characteristics of the Amp and Cabinet Models selected
for the Green and Red Amp Channels. In performance mode,the five knobs (a,b, c, d,& e) located directly beneath the
Display adjust the modulation speed or pitch amount, modulation depth,modulation level,delay level,and reverb level.
Press the EDIT button (3) to access all effects and parameters. Successive presses of the EDIT button advance
through each effect module. The selected effect is indicated by the effect LEDs (4).The Effect Parameter knobs beneath
the display adjust the parameters of the selected effect.
Note: Keep in mind the user presets are duplicates of the factory presets,so don’t be afraid to experiment.
Introduction
2