
User Guide


Tutorial
A Guided Example
Suppose you wanted to create your own Hypermodel™ that incorporated the sweet tones of a vintage Tweed with a
Blonde 2x12 cabinet,and the ripping distortion of a Rectified Amp with a Marshall 4x12 cabinet.Let’s also suppose that
we want to be able to toggle between an acoustic guitar simulation and this new HyperModel™ in a Preset which gave
your single coil pickup a humbucker sound, used no Compression,had a Noise Gate that opens quickly, a subtle
Chorus effect,no Delay, and a little bit of a Hall reverb.The following steps will guide you through the procedure for
creating just such a Preset in the Genesis3.
Choose a Preset
The first step in creating a Preset is selecting your starting point.You can start with any Preset,but for this example
let’s start with Preset 40. Rotate the DATA knob to select Preset 40.
Create a Hypermodel™
For this example,we are going to use a vintage Tweed amp with an Blonde 2x12 Cabinet,and warp it with a Rectified
Amp using a Marshall 4x12 cabinet.After selecting Preset 40,the Genesis3 will be ready to select the Amp Models.
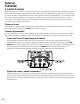
Select the Green Channel Amp and Cabinet
Press the Warp knob until the LEDs next to the Amp Parameter knobs are green indicating that the Green
Channel has been selected for editing.To assign the vintage Tweed amp to the Green Channel,rotate the AMP
MODEL knob until the Display reads TWEED (Tweed).The LED next to the word “Tweed” in the LEDs surround-
ing the Amp Model knob will light green.Then rotate the CABINET knob until the Display reads BL2X12
(Blonde 2x12).The LED indicating Blonde 2x12 surrounding the Cabinet knob will also light green.
Adjust the Green Channel Parameters
The Tweed amp that we selected for our Green Channel assignment will initialize with factory default settings for
the Gain,EQ, and Level Parameters.These settings may not necessarily suit your personal taste and require some
fine tuning. Use the 5 Amp Parameter knobs next to the green LEDs to adjust the Green Channel Gain, Bass,Mid,
Treble, and Level.
EDIT
Tutorial
22