
User Guide


S/PDIF Digital Set Up
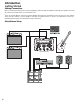
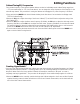
The Genesis3 includes a S/PDIF digital output allowing direct connections to digitally equipped devices.Connect from
the S/PDIF output of the Genesis3 to the S/PDIF input on your digital mixer or recorder.You must have S/PDIF inputs
on the receiving device in order to use this output.You may use the analog and digital outputs of the Genesis3 simulta-
neously. Be sure to use a shielded 75 ohm or RCA video cable when connecting the Digital Output.
NOTE: Do not connect the S/PDIF output to analog auxiliary, CD, phono, or tape inputs on consumer
electronic devices.It is not compatible with these inputs.
Applying Power
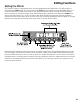
Once the audio connections have been made,turn the OUTPUT LEVEL located on the rear panel of the Genesis3
all the way down (counterclockwise). Press the POWER switch on the rear panel. Select your desired Output mode
in the Genesis3’s Utility menu (see page 32 for more on selecting the Output mode). Select the appropriate Target
System Setup option in the Utility menu (see page 32 for more on selecting the Target System Setup). Turn your mixer
and the amp powering your speakers to the on position. Set the channel faders of your mixer to the nominal level (0
dB).Gradually turn the OUTPUT LEVEL of the Genesis3 up to achieve the desired volume level.
About the Genesis3
Performance Mode
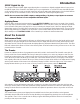
When you first turn on the Genesis3,it will power up in Performance mode.This is the top level mode and the mode
used while you are performing.While in Performance mode, the display will show the currently selected preset name
and number and the 5 knobs directly beneath the display adjust the parameters labeled directly above them. The effect
LEDs will indicate which effects are active in the selected preset.From Performance mode, you have access to all of the
presets within the Genesis3.
The Presets
Presets are numbered locations of programmed sounds which reside in the Genesis3.The Genesis3 comes with 48
Factory and 48 User Presets available.The Factory Presets will not allow you to store any changes to them.The User
Presets are locations where your creations may be stored. From the factory, the 48 User Presets are exact duplicates
of the 48 Factory Presets.This allows you to make your own Presets without the worry of losing any of the sounds
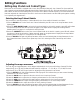
that originally came with the Genesis3. When you select a Preset, the name will be shown in the alpha-numeric Display,
and the preset number will be shown in the red numeric Display. An LED in the lower right corner of the numeric
Display indicates whether you are in a User or Factory Preset.To select a preset,rotate the Data knob.
After selecting a Preset,all Parameter values will correspond to the values of the knobs at the time the Preset was
stored.The current position of the effect parameter and amp parameter knobs will not reflect the values that you are
hearing.The knobs must be turned before the Genesis3 will update the parameter value to the position of the knob.
Bypass Mode
The Genesis3 does not have a total bypass function available from the front panel.All effects can be bypassed
individually using the Effect Edit functions.The Amp Modeling can be bypassed by selecting Direct as the Amp Model.
The optional Control X foot controller has the ability to bypass all Modeling and Effects within the Genesis3,thus
providing a clean,unprocessed signal.
Introduction
7