GENETX GUITAR PROCESSOR TM Users Guide
I
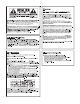
DECLARATION OF CONFORMITY Manufacturer’s Name: Manufacturer’s Address: DigiTech 8760 S. Sandy Parkway Sandy, Utah 84070, USA declares that the product: Product name: Genesis3 Note: Product name may be suffixed by the letters EU, JA, UK and NP. Product option: all (requires Class II power adapter that conforms to the requirements of EN60065, EN60742, or equivalent.
Warranty We at DigiTech are proud of our products and back-up each one with the following warranty: 1.The warranty registration card must be mailed within ten days after purchase date to validate this warranty. 2. DigiTech warrants this product, when used solely within the U.S., to be free from defects in materials and workmanship under normal use and service. 3.
Table of Contents Safety Information ..................................................................................I Declaration of Conformity ..................................................................II Warranty ..................................................................................................III Table of Contents ..................................................................................IV Section One - Introduction Section Four - Tutorial Congratulations ............
Introduction Introduction Congratulations on your purchase of the DigiTech Genesis3! You now own one of the most powerful studio tools available anywhere. The Genesis3 is more than a professional guitar amp modeling and effects processing system equipped with a digital output for direct recording. There is no other direct recording device quite like the Genesis3 in the world.
Introduction Quick Start We have included this handy Quick Start guide for those of you who are anxious to get started and prefer to play now and read later. Making Connections: Connect your instrument to the input jack on the rear panel of the Genesis3. Connect the LEFT and/or RIGHT Outputs to the input(s) of your mixer. Apply Power: Turn the OUTPUT LEVEL knob on the rear panel of the Genesis3 all the way down (counter clockwise). Connect the plug of the power supply to the power jack on the Genesis3.
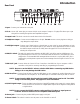
Introduction Guided Tour Front Panel PICKUP - WAH PRESET COMP - GATE WHAMMY / IPS CHORUS / MOD DELAY REVERB EDIT SPEED / AMOUNT TAP-IT VALUE DEPTH MOD LEVEL DELAY LEVEL REVERB LEVEL ASSIGN DATA / PRESET AMP SAVE STORE UTILITY P1 P2 P3 P4 P5 1. Amp Model - This knob is used to select the Amp Model for the active green or red amp channel (indicated by the color of the amp parameter LEDs). One green and one red LED light indicating the selected Amp Models for both Channels.
Introduction c. Mod Level/P3 - In Performance mode, this knob adjusts the Modulation level or mix. In Edit mode, this knob adjusts the third parameter of the selected effect. d. Delay Level/P4 - In Performance mode, this knob adjusts the Delay level of the selected preset. In Edit mode, this knob adjusts the fourth parameter of the selected effect. e. Reverb/P5 - In Performance mode, this knob adjusts the Reverb level of the active preset.
Introduction Rear Panel 1. Input - Connect your instrument to this jack. 2. CD In - Use an 1/8” stereo plug to connect this jack to the output of a tape or CD player.This allows you to jam along with a recording through the same amplification system. 3. Output Level - This knob controls the overall volume level of the Genesis3. 4. Headphone Output - Connect stereo headphones to this jack. Do not connect a mono plug here as doing so may damage the output driver. 5.
Introduction Getting Started Making Connections Before connecting the Genesis3 to external equipment, make sure that the amplifier powering your speakers is turned off, and that the power switch on the Genesis3 is off. There are several different connection options available when using the Genesis3.You may run mono into one channel, stereo into two channels, connect digitally to the input of a digital recorder or mixer, or a combination of these.
Introduction S/PDIF Digital Set Up The Genesis3 includes a S/PDIF digital output allowing direct connections to digitally equipped devices. Connect from the S/PDIF output of the Genesis3 to the S/PDIF input on your digital mixer or recorder.You must have S/PDIF inputs on the receiving device in order to use this output.You may use the analog and digital outputs of the Genesis3 simultaneously. Be sure to use a shielded 75 ohm or RCA video cable when connecting the Digital Output.
Introduction CD In (Jam-Along™) The CD input allows you to connect a Tape, CD, or MP3 player to the Genesis3, and jam with your favorite artists.The signal from your player is output through the left and right, and headphone outputs of the Genesis3. To use the CD INPUT feature, do the following: 1. Connect the headphone output of your player to the CD INPUT. NOTE: Use a 1/8” stereo cable. 2. Press play on your Tape, CD, or MP3 player. 3. Adjust the volume. 4. Adjust the Genesis3’s OUTPUT LEVEL.
Editing Functions Editing Functions Editing/Creating a Preset The Genesis3 was designed to make the process of sound creation easy and intuitive. Because the Genesis3 provides both Amp Modeling and Effects Processing, the editing functions have been divided into the Amp/Cabinet Modeling section and the Effects section.The GeNetX™ technology contained in the Genesis3 allows you to go much further than mere Amp Modeling.
Editing Functions Editing Amp Models and Cabinet Types Each Preset in the Genesis3 is equipped with a Green, Red, and Yellow (Warped) Amp Channel.The Green and Red Amp Channels include individually assignable Amp Models, Cabinet Types, Gain, EQ, and Level settings. Each Green and Red Cabinet can also be tuned, meaning that you can select the Cabinet’s resonant frequency.
Editing Functions Cabinet Tuning/EQ Frequencies The resonant frequency of the selected speaker cabinets can also be individually tuned. Cabinet Tuning ranges from -1™0 (one octave below) to 1™0 (one octave above). You can change the center frequencies of the amp EQ for the selected amp channel. The procedure for tuning the cabinets and changing the EQ center frequency is as follows: 1. Press and hold the WARP knob down.
Editing Functions Saving HyperModels™ (Amp Save) When you have obtained the desired blend of the Green and Red Channels, you now must perform the Amp Save procedure to create your new HyperModel™ for future use.This Hypermodel™ can be saved in one of 9 User Hypermodel™ locations.Your new Hypermodel™ can then be selected for use in either the Green or Red Amp Channel, and can even be Warped again with any other Factory Amp Model or User Hypermodel™.The Amp Save procedure is as follows: 1.
Editing Functions Editing the Effects The Genesis3 contains a comprehensive library of fully programmable, studio quality Effects. The Effects section is accessed with the EDIT button. Successive presses of the EDIT button will advance through all available effects in a Preset.The effect LEDs will light one at a time to indicate the selected Effect.When you have selected the desired effect, you have up to 5 Parameters which can be edited using the effect parameter knobs.
Editing Functions Storing/Copying a Preset When editing a Preset, the Store LED will light indicating that you have changed a Parameter and need to store the changes. Once you have modified the Amp Models, Cabinet types, and Effect Parameters to your liking, you can store your creation to a User Preset location.The following steps outline the procedure for storing a Preset: 1. Press the STORE button once and the Genesis3 will enter a naming mode.
Effects Effects About the Effects The Genesis3 can be thought of as several different “virtual” amps combined with a studio full of high quality effects. The following chart shows the order of the effects and Amp Modeling in the Genesis3. Effect Definitions Each Effect within the Genesis3 is fully programmable to suit your personal tastes and application. Understanding how these Effects will alter the sound, and how each Parameter will alter the Effect will help you achieve the sound you are looking for.
Effects Threshold - The P3 knob selects the maximum strength the signal is allowed to reach before the compressor begins to work. Low Threshold settings will activate the Compressor with weaker signals. Higher settings will require a stronger signal to activate compression. Ranges from 0 to 99. Gain - The P4 knob adjusts the Output Gain from the Compressor.This parameter should be used to balance the level of the Compressor in order to achieve unity gain.
Effects IPS Amount - The P2 knob selects the Amount or interval of the shifted pitch. Interval choices include: 2NDUP (a second above) OCTDN (octave down) 3RDUP (a third above) 7THDN (a seventh below) 4THUP (a fourth above) 6tHDN (a sixth below) 5THUP (a fifth above) 5tHDN (a fifth below) 6THUP (a sixth above) 4tHDN (a fourth below) 7THUP (a seventh above) 3RDDN (a third below) 2NDDN (a second below) OCTUP (an octave above) IPS Scale - The P3 knob selects the scale the IPS will use.
Effects Phaser (PHaseR) A Phaser splits the incoming signal, and then changes the phasing of the signal.This signal is then taken in and out of phase and mixed back in with the original signal. As the phasing changes, different frequencies get canceled resulting in a warm sort of twisting sound. Speed - The P2 knob adjusts the rate (SPEED) of the modulating phase. Ranges from 1 to 99. Depth - The P3 knob adjusts the intensity (DEPTH) of the modulation. Ranges from 1 to 99.
Effects Vibrato (viBRTO) A Vibrato effect modulates the pitch of the incoming signal at an even rate. Speed - The P2 knob adjusts the rate (SPEED) at which the pitch modulates. Ranges from 1 to 99. Depth - The P3 knob adjusts the intensity (DEPTH) of the modulating pitch. Ranges from 1 to 99. Waveform - The P4 knob selects the type of wave form the modulation will use. Choices include: TRINGL (triangle), SINE (sine), and SQUARE (square). The P5 knob has no function when the Vibrato is selected.
Effects Envelope Filter (eNvlOp) The Envelope Filter is an automatic Wah effect that alters your sound based upon how hard the strings are struck. Sensitivity - The P2 knob adjusts the sensitivity (SENSTV) of the input signal required to trigger the Wah effect. Ranges from 1 to 99. Range - The P3 knob adjusts the frequency range (RANGE) of the Wah effect. Ranges from 1 to 99. Balance - The P4 knob adjusts the left/right balance of the Wah signal. Ranges from BAL L99 (left 99) to BAL R99 (right 99).
Effects Reverb Reverb can give the listener a sense that the material is being performed in various acoustical environments. It can provide the tight acoustics of a small room, or the ambience of huge arena. Reverb On/Off - The DATA knob turns the Reverb on and off. Reverb Type - The P1 knob selects the Type of Reverb or acoustic environment.
Tutorial Tutorial A Guided Example Suppose you wanted to create your own Hypermodel™ that incorporated the sweet tones of a vintage Tweed with a Blonde 2x12 cabinet, and the ripping distortion of a Rectified Amp with a Marshall 4x12 cabinet.
Tutorial Select the Red Channel Amp and Cabinet Press the WARP knob until the LEDs next to the Amp Parameter knobs are red indicating that the Red Channel has been selected for editing. Rotate the AMP MODEL knob until the Display reads RECTIF (Rectified).The LED next to the word “Rectified” in the LEDs surrounding the Amp Model knob will light red.Then rotate the CABINET knob until the Display reads BR4x12 (Brit 4x12M).The LED indicating Brit 4x12M surrounding the Cabinet knob will also light red.
Tutorial Warp the Green and Red Channels Together When we have the Amps and Cabinets in our Green and Red Channels dialed in to suit our taste, we can Warp them together to create our new HyperModel™. Rotate the WARP knob to achieve the desired blend of the Amps and Cabinets in our Green and Red Channels. Save the HyperModel™ Now that we have designed our own Amp/Cabinet HyperModel™, we need to save our creation to one of the 9 User HyperModel™ locations.This will enable us to use it in Presets.
Tutorial Edit the Preset The next step to creating our example Preset is to enter the Effect Edit mode.To do this, press the Edit Button once. At this point only the Wah-Pickup LED should light.The Display will briefly show EDIT and then cycle between showing the status of the Pickup simulator Effect. Select the Pickup Type In our example Preset we were assuming that we were using a single coil pickup, but wanted it to sound like a double coil humbucker.
Tutorial Adjust the Noise Gate For our example, we wanted our Noise Gate to open quickly with a relatively weak signal.This type of gate would use the Silencer™ with a low Threshold and short Attack Time. Press the EDIT button again and the Noise Gate LED will light. If the Display indicates that the Noise Gate is off (GATE OF), rotate the DATA knob until the Display reads GATE ON (Gate On). Rotate the P1 knob until the Display reads SILNCR (Silencer) as the type of gate.
Tutorial Select and Adjust the Reverb In our example Preset we also wanted a little bit of Hall Reverb to provide some ambience. Press the EDIT button again and the Reverb LED will light. If the Display indicates that the Reverb is off (ReVeRBOF), rotate the DATA knob until the Display reads REVERBOn (Reverb On). Rotate the P1 knob to select HALL (Hall) as the Reverb Type. Rotate the P2 knob to set the Reverb Predelay to a value of 2. Rotate the P3 knob to set the Reverb Decay to a value of 15.
Tutorial/Other Functions “Busy” Display The Genesis3 utilizes the latest advances in programming and semiconductor technology, including FLASH memory. This type of memory allows users to store the sounds they create to memory that requires NO internal backup battery, and to update their units to the latest software version from their computer via the Internet. To keep the Genesis3 groomed and working to peak performance, the system will optimize FLASH memory after approximately every thirty preset saves.
Other Functions LFOs The Genesis3 includes two assignable low frequency oscillators (LFO1 and LFO2) which can be assigned to any of the same parameters available for assignment to the Expression Pedal. A low frequency oscillator will automatically vary the value of the assigned parameter at a steady rate. A minimum and maximum value each LFO will reach may be also be assigned.
Other Functions A WARP (Amp Warp) - Warps the Green and Red Amp Models. C WARP (Cabinet Warp) - Warps the Green and Red Cabinet types. WARP (Warp) - Warps the Green and Red Channels. G GAIN (Green Gain) - Controls the Amp Gain for the Green Channel. G LEVL (Green Level) - Controls the Volume of the Green Channel. R GAIN (Red Gain) - Controls the Amp Gain for the Red Channel. R LEVL (Red Level) - Controls the Volume of the Red Channel. GATTHR (Gate Threshold) - Controls the Noise Gate’s Threshold.
Other Functions Utilities The Utility section contains various menus which affect global functions of the Genesis3.These menus include: Output Mode,Target System Setup,Tuner,V-Switch Sensitivity,Volume Pedal Update, Bank Names, MIDI Channel, MIDI Bulk Dump, MIDI Preset Dump, MIDI Mapping, MIDI Merge, Digital Output Level, Dry Track Enable, Expression Pedal Calibration, and Factory Reset.To access the Utility functions, press the AMP SAVE and STORE buttons simultaneously.
Other Functions Output Mode The output mode is used to select whether the Genesis3 will produce a stereo image or a mono signal at the left and right outputs. Setting the Output mode to Stereo will produce a Stereo image. Setting it to Mono will produce a mono signal.The procedure for selecting the Output Mode is as follows: 1. Press the AMP SAVE and STORE buttons simultaneously. Both buttons will light green indicating you are in Utility mode. 2.
Other Functions Expression Pedal Calibration The Expression Pedal on the Control X Foot Controller needs to be calibrated for use when first connected or after a factory reset has been performed.This calibration procedure is automatically entered if the Control X is connected at the time of the factory reset procedure. In the event the Pedal’s calibration fails, or if the Pedal does not function properly, it can be re-calibrated using the Pedal Calibration menu.
Other Functions MIDI The Genesis3 utilizes full MIDI implementation to control parameters and presets in real time. Every aspect of the Genesis3 can be controlled using MIDI, as well as programming your presets using the GENEDIT™ Editor Librarian software. NOTE: Before making any MIDI connections to the Genesis3, make sure that the MIDI IN/FC switch on the rear panel is depressed (MIDI In). Leaving this switch out (FC position) could damage any connected MIDI equipment.
Other Functions Hypermodel™ Amp Dump The Amp Dump menu allows archiving of just the Genesis3 Amp HyperModels™ to a sysex librarian, or MIDI recording device.This is useful for making a backup copy of your customized Amp HyperModels™, or loading your HyperModels™ into another Genesis3.The procedure for performing a Sysex Preset Dump is as follows: 1. Connect a MIDI cable from the Genesis3 MIDI Out to the the MIDI In of a MIDI recording device or the MIDI in of another Genesis3. 2.
Other Functions Digital Output Level This menu allows you to adjust the signal strength at the S/PDIF Digital Output.This is useful in getting enough level into a digital mixer or recorder.The procedure for selecting and adjusting the Digital Output Level is as follows: 1. Press the AMP SAVE and STORE buttons simultaneously. Both buttons will light indicating you are in the Utilities. 2. Press the TAP-IT or EDIT buttons until DIGLVL shows in the display. 3.
Other Functions Foot Controller Options The Genesis3 can be remotely controlled using the optional Control X Foot Controller (or any MIDI controller).The Control X is a full function foot controller with 8 switches and an expression pedal.The Control X will change Presets, toggle Amp Channels, and turn on and off the Chorus/Mod Effects, and Delay.The Control X displays the active Preset number, and provides access to the Tuner as well as Tuning indicators.
Appendix Appendix Preset List Bank 1 (SHOCAS) 1. HYBRID 2. CLNCHO 3. 2CHUNK Bank 2 (GENETX) 4.WARPME 5. BLKBAS 6. MEAT2X Bank 3 (STARS) 7. ERIC J 8. CARLOS 9. KOBB Bank 4 (AMPS) 10. BASSMN 11. MATCHD 12. VOXTOP Bank 5 (BLUES) 13. BLUDLY 14. BLUBAL 15.TEXBLU Bank 6 (CNTRY) 16. PICKEN 17. PSTEEL 18. A MIXO Bank 7 (ROCK) 19. MO WAH 20. FAZOUT 21.THICKR Bank 8 (CLEAN) 22. ACOUST 23. CMPCLN 24.WRMCLN 38 Bank 9 (METAL) 25. RECTFY 26. SOLO 27.WHAMMY Bank 10 (STUDIO) 28. STACKD 29.VOLSWL 30.
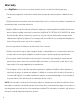
Appendix Continuous Control (CC) Continuous Control is a type of MIDI command capable of changing the value of a parameter in real time..These CC commands make up the backbone when using the GENEDIT™ software to control or program the Genesis3. Every Parameter in the Genesis3 is assigned an individual CC number. Sending value changes on these CC numbers will change the Parameter setting in real time.
Appendix MIDI Implementation 40
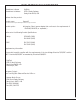
Appendix Specifications A/D Converter: D/A Converter: Sampling Frequency: 24 bit 24 bit 44.1 kHz DSP Section: Dual DSP architecture with true 24-Bit stereo processing @ 128 Million Instructions Per Second (MIPS) Connections: Guitar Input and Outputs: Headphone: CD Input MIDI: Foot Controller: Digital Output: 1/4" TS 1/8" Stereo TRS 1/8" Stereo TRS In and Out/Thru Input via MIDI In jack S/PDIF format General (all distortions and effects disabled): Frequency Response: 25 Hz. – 20 kHz.
DigiTech 8760 S. Sandy Parkway Sandy, Utah 84070 Telephone 801-566-8800 FAX 801-566-7005 International Distribution 8760 S. Sandy Parkway Sandy, Utah 84070, USA DigiTech, GeNetX™, and Genesis 3 are trademarks of the Harman Music Group Incorporated Copyright 2001 the Harman Music Group Incorporated Printed in USA 6/01 Manufactured in the USA Genesis 3 Manual 18-0430-B Please Visit DigiTech on the World Wide Web at: http://www.digitech.