
User`s guide


I - 5DigiGate-700
™
for Windows
®
- User’s Guide
DigiGate-700
for Windows
™ ®
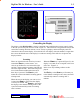
The DigiGraphics system allows you to change some of the default settings. The defaults that can
be changed are: Scan speed, Flash speed, time Delay after keypad entry, and the color settings for
the unit’s status.
These settings are changed using the
Menu
key on the remote control. Figure I-3, Page I-3.
Programming the Display
6. Press the
Log
key to select the item you want to
change. The status bar will show “Use up/
down arrows to increment, then
END.” Use the arrow keys to change the value
then press the
End
key to save the change.
6. You may then use the arrow keys to go to the
next value you want to change. Repeat the
procedure in steps 5 and 6 for each item you
decide to change.
7. When all changes have been made, press
the
End
key to return to the normal
display of the Site.
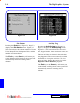
The Menu
1. To access the DigiGraphics menu, press the
Stop
key on the remote to suspend scanning.
2. Press the
Menu
key to activate the on-screen
Menu. Figure I-7.
3. The status bar at the bottom of the display
screen gives instructions as you proceed.
Figure I-7.
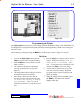
4. The enlarged menu shown in Figure I-8, shows
the default settings for the selections.
5. Press the up or down arrow key until the
selection you want is named in the status bar.
i.e. “Press the LOG key to modify
xyz parameter.” Here “xyz” will be
replaced by each choice as you press the arrow
keys.
Figure I-8
Figure I-7