
User`s guide


3 - 64 Operating Instructions
DigiGate-700
for Windows
™ ®
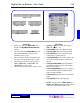
Figure 3-135
1. From the
DigiGate Word Processor
menu,
Click on the
DigiEdit
button. Figure 3-134.
Note: See your Windows manual or that of
most Word Processors for a description of the
menu items, buttons, and other control fields.
2. This will open the
DigiEdit Word Processor
window. Figure 3-135.
3. The editor follows Windows’ word processor
standards. The controls and layout will be
familiar to windows word processor users.
4. Below the title bar and the bar menu are two
rows of icon buttons that provide the standard
word processor features.
5. The first row contains buttons for document
(file) handling. These are:
Create a New
Document
,
Open File
,
Save file
,
Print
Document
,
Cut
,
Copy
,
Paste
, and
Undo
Last Action
.
6. The second row contains controls for text
formatting. These are:
Font Name, Font
Size, Bold Text, Italic Text, Underline, Left
Justified, Centered, Right Justified
, and
Flush both sides
.
7. The last two buttons on the second line will
insert the Date and Time, respectively, at the
cursor position in the document.
Figure 3-134
Word Processing - Editor
This section deals with
Word Processing
, both creating letters or forms and merging data from the
DigiGate-700 for Windows system into those letters or forms. For all of the following, we will assume that
you have Clicked on the
Editor
button on the
Main Menu
and that the
DigiGate Word Processor
window is active.
DigiEdit
Screen Layout