
User`s guide


3 - 26 Operating Instructions
DigiGate-700
for Windows
™ ®
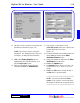
1. The report display window, Figure 3-50, holds
four groups of buttons and a
Close
button
above the report viewing area of the window.
2. The first group, Figure 3-51, controls the size of
the report page image in the window.
3. Click on the first or left button to make the
entire report page fit in the window.
4. Click on the second or center button to make
the report page full size. There will be vertical
and horizontal scroll bars to move the report in
the window. Figure 3-51.
5. Click on the third or right button to make the
report page fit to the width of the window.
There will be a horizontal scroll bar to move the
report up and down in the window. Figure 3-50.
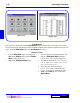
6. The second group, Figure 3-52, controls the
page of the report displayed for reports with
multiple pages.
7. Click on the first or left button to go to the first
page of the report. Figure 3-52.
8. Click on the second button (left facing arrow) to
go back one page or to the prior page of the
report. Figure 3-52.
9. Click on the third button (right facing arrow) to
go forward one page or to the next page of the
report. Figure 3-52.
10. Click on the last or right button to go to the last
page of the report. Figure 3-52.
Reports
The
Reports
option on the
Main Menu
, Figure 3-46, Page 3-24, is the method you will use to display and
print the information about your tenants and their renting preferences, your units, and other information you
have gathered.
Each report, when run, will first display on the screen in a report display window which is consistent
throughout this section. Each report window will be titled with the report title. Also, in each window are
controls to change the display and print the report.
Figure 3-50
Figure 3-51
Figure 3-52
Viewing Reports