
User`s guide


3 - 21DigiGate-700
™
for Windows
®
- User’s Guide
DigiGate-700
for Windows
™ ®
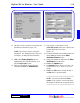
17. This activates a screen where you can
{Add | Edit | Delete} other users of the unit who
will have different Access Codes.
Figure 3-40.
18. To edit the information for an Other Authorized
tenant, Select the tenant from the
Other
Authorized Tenants
list box.
19. Change the information displayed in the
Other
Authorized
area of the screen.
20. Click on the
Update
button.
21. The
Confirm
window, Figure 3-42, Page 3-22,
will open with a “Save Modifications”
prompt.
22. Click on the
Yes
button to change the data or
the
No
button to cancel the update.
***************************************
NOTE: If you have purchased the Picture
Option, see the “Options” section at the end of
this chapter for instructions on using the option.
***************************************
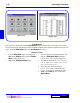
14. This will activate a screen for reviewing the unit
information on the tenant. Figure 3-39.
NOTE: This screen is only for viewing the
information. See” Modifying Units,” Page 2-41
in Chapter 2, to change the unit information.
15. Click on the
Display Graphics
button to
highlight their unit on the Site Monitor if you
have the DigiGraphics option.
16. When you are finished reviewing the unit
information, Click on the
Authorized
tab.
Figure 3-39 Figure 3-40