
Installation Instructions


28
Installation Guide
GB
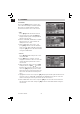
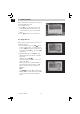
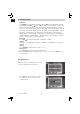
4.2 Multi Search
When you enter the “Multi Search” menu a
window like the one beside will open.
1. In the “Satellite” item press [Vol
] to
select the satellite which you want to scan
or press [OK] to open the “satellite list” to
select directly with [CH ] , and press
[OK] to mark/unmark and [MENU] to
fi nish the selection. You can select several
satellites in this menu. The system will
use DiSEqC1.0/1.1, DiSEqC1.2 and USALS
functions to search the marked satellites
and scan channels.
2. On “FTA Only” item, press [Vol ] to select scanning of all channels or just scanning
of free channels. If you select “Yes”, it will scan free channels only.
3. On “Scan Channel” item, press [Vol ] to select the scanning range from TV + radio
channels, only TV channels or only radio channels.
4. On “Scan Mode” item, you can select “Auto Scan”, “Preset Scan” or “NIT Search” to
blind scan preset transponders or network transponders of the selected satellite.
5. Select “Search” and press [OK] to start scanning. In the lower part of the window the
progress of scanning and the found channels are displayed.
6. Press [Menu/Exit] to cancel or fi nish the scanning and saving the found channels.
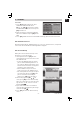
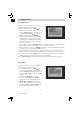
4.3 TP Scan
When you enter “TP Scan” menu a window
like the one beside will be displayed.
1. In the “Satellite” item press [Vol ] to
select the satellite which you want to scan
or press [OK] to open the “satellite list” to
select directly with [CH ] , press [OK]
to confi rm it.
2. TP Index: Use [Vol ] to select the
desired transponder or press [OK] to
open the TP list to select directly with
[CH ], press [OK] again to display
the TP number where the channel can be
found. Press [Red / Green / Yellow] key
on the RCU for the related functions.
4. INSTALLATION