Installation Guide IMPERIAL DB 2 T basic Version 1.1 www.digitalbox.
GB SAFETY PRECAUTION CAUTION: The lightning flash with arrowhead symbol, within an equilateral triangle, is intended to alert the user to “dangerous voltage” and to prevent from a risk of electric shock. Warning: To reduce the risk of electric shock, don’t open the cabinet. Refer servicing to qualified personnel only. The exclamation point within an equilateral triangle is intended to alert the user to important operating and maintenance (servicing).
SAFETY PRECAUTION GB Attachments: Never add any attachments and/or equipment without the manufacturer´s consent; as such additions may result in the risk of fire, electric shock, or other personal injury. Locating: Slots and openings in the cabinet are provided for ventilation to protect it from overheating. Do not block these openings or allow them to be blocked by placing the STB on a bed, sofa, or other similar surface, nor should it be placed over a radiator or heat register.
GB CONTENTS 1. REMOTE CONTROL & PANEL DESCRIPTION ..................................................... 6 1.1 Front Panel Description .............................................................................................................. 6 1.2 Rear Panel Description ............................................................................................................... 7 1.3 Remote Control Description ...........................................................................................
CONTENTS 4.2 4.3 4.4 4.5 GB Radio Channel List ...................................................................................................................... 19 Favorite group list name .......................................................................................................... 19 Delete All Favorites ..................................................................................................................... 20 Delete All Channels . ..........................................
GB 1. REMOTE CONTROL & PANEL DESCRIPTION 1.
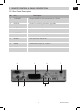
1. REMOTE CONTROL & PANEL DESCRIPTION GB 1.2 Rear Panel Description No Key 1 TV SCART Output SCART for the connection to a TV set 2 RS-232 Serial Port allowing software upgrades 3 ANTENNA IN Terr. input of the digital tuner 4 LOOP OUT Terr.
GB 1. REMOTE CONTROL & PANEL DESCRIPTION 1.
2. HOTKEY GB 2.1 Power 1. Press [Power] button to switch from TV mode to Standby mode 2. In Standby mode press [Power] button again to switch back to TV mode. The last active channel will be showed. 3. To switch off the STB complete press the main power button. 2.2 TXT 1. Press [TXT] button in TV mode to open the teletext page. This service is depending on the support of the channel provider. 2. If the channel does not support teletext information, it will show “No Teletext Data” on the screen. 2.
GB 2. HOTKEY 2. Press [ / / / ] keys can move highlight among each preview program, and only the highlighted preview program can play normally. 3. When the highlight moves to the preview program that you want to play, you can press [OK] key to enter the full screen play. 4. Press [Exit] key to go back to full screen. 2.6 CH+/CHIn TV mode press [CH ] to change channel. 2.7 Vol+/VolIn TV mode, press [Vol ] to adjust volume. 2.8 TV/RADIO In TV mode, press [TV/RADIO] to switch to Radio mode.
2. HOTKEY GB 2.12 Channel List 1. In full screen, press [OK] key can enter “Channel List”, please refer to TV Channel List for detail information. 2. In “Channel List” menu, press [OK] key to play the highlighted channel. 2.13 Audio 1. In TV mode, press the [Audio] button to open the Audio Mode window. 2. Select the item you want to adjust with [ ] and change the value with [Vol 3. Press [Exit] key to exit. ]. 2.
GB 2. HOTKEY 3. Press number key [1] can display all programs schedule information of the selected channel. The window is like right: 4. Press number key [2] can display the current channel detail information. The window is like right: 5. Press number key [2] in schedule and detail window can open the timer window directly. This operation can add the highlighted program to a timer quickly. 2.16 Sub Press [Sub] key set up subtitle on/off. 2.17 Zoom 1.
2. HOTKEY GB 2.19 PGUP/PGDN In full screen, press [Page Up/Page Down] key can switch group directly. 2.20 Fav 1. In TV mode press the [Favorite] button to display the Favorite Group window on the screen as the picture beside shows. 2. In the Favorite Group window you can select the desired favorite channel with [ / ] and confirm it with [OK] to switch to it. In bigger groups you can navigate with [Page Up/Page Down]. 3. With [ / ] you can select different Favorite Groups. 4.
GB 3. WELCOME PAGE 1. When first time power on, it will show welcome page like below. This Welcome page is only for easy operation when first use, user also can setting them in main menu/Tools/Welcome Page. 2. Press [CH ] key to move highlight. 3. Press [ / ] key to modify setup. 4. After set up the parameter, move the highlight to “Auto Scan” and press [OK] key to begin to scan. Move highlight to “Main Menu” and press [OK] key to enter to main menu.
4. MENU GB Press [Menu] in the TV mode to enter the main menu. 1. Press [CH ] to select the menu item among Channel, lnstallation, Setup and Tools. 2. Press [OK] to enter the selected item. In the Channel menu: 1. Press [CH ] to select the wanted menu item among TV Channel List, Radio Channel List, Delete All Favorites and Delete All channels Channel. 2. Press [OK] to enter the selected item. 4.1 TV Channel List When you enter to “TV Channel List” menu, there will display the screen like right. 1.
GB 4. MENU 4.1.1 Favorite 1. Press number key [1] can open the “Favorite” window like right. 2. You can move highlight between 8 favorite groups by press [CH ] key and press [OK] key to make a favorite mark in the right side of the selected favorite group. 3. Press [OK] key again on the marked favorite group can cancel the exist favorite mark. 4.
4. MENU GB 4.1.3 Find 1. Press number key [3] can open the “Find” window like right. You can press number [0] key to [9] key to input letter or number into the dialogue. Every time you press number key it will change the letter or number. For example, every time you press number [2], it will show “a”->“b”->“c”->“a”>“b”->“c”->“2”->“a”->… 2. After input each character, the program list on the left will search the channel according your input, and list the matched channel. 3.
GB 4. MENU 4.1.5 Edit 1. Press number key [5] will open a message box for you to enter password, and the default password is “0000”. 2. There are five items of “Edit Channel”: Delete, Skip, Lock, Edit, and Delete all. 3. Press [Exit] can exit “Edit Channel” menu. 4. If you carried our 1-5 function of “Edit Channel “ menu, the system will show up a message box to inquire you whether saving or not. 4.1.5.
4. MENU GB 4.1.5.5 Delete all 1. In “Edit Channel” menu, press number key [5] can mark all the channel with delete mark 2. Press number key [5] again can cancel all the delete mark. 4.2 Radio Channel List Basically, the operation of “Radio Channel List” is same as “TV Channel List”, but there is one point different: In “Radio Channel List” mode, there is no video information, so it will always display Radio’s logo in the right side preview window. 4.
GB 4. MENU 4.4 Delete All Favorites In “Delete All” item: 1. There will display an dialogue for user to key in password. The default Password is “0000”. 2. When you input the correct password, there will show up a warning message box to inquire you whether delete all or not. 3. If you select “Yes”, all favorite channels will be deleted. 4. In step 1 and step 2, press [Exit] key can exit the function directly without save. 4.5 Delete All Channels In “Delete All” item: 1.
5. INSTALLATION GB When you enter to “Installation” menu, there will display the screen like right: In “Installation” menu; 1. Press [CH ] key to select menu pages among Auto Scan, Channel Scan, Channel Setup and Aerial Adjustment. 2. Press [CH ] key to select menu items among each items. 3. Press [OK] key to enter the selected item. 5.1 Auto Scan When you enter to “Auto Scan” menu, there will display the screen like right: 1.
GB 5. INSTALLATION 5.3 Channel Setup When you enter to “Channel Setup” menu, there will display the screen like right: 1. You can see the channel information like the picture displaying 2. Move the [CH ] key can move the highlight to select the channel. 3. When press [OK] key again, you can see the window like right: 4. Input PID information, then move highlight to “Search” item and press [OK] key, then it will begin to scan. 5.
6. SETUP GB When you enter to “System Setup” menu, you will see the screen like right: In “System Setup” menu: 1. Press [CH ] key to select menu pages among OSD Language, TV System, Start up Service, Region and Time, Timer Setting, OSD Setting, Parental Lock and RCU Position. 2. Press [CH ] key to select menu items among each items. 3. Press [OK] key to enter the selected item. 6.1 OSD Language When you enter to “OSD Language” menu, you will see the screen like below: 1.
GB 6. SETUP 6.2 TV System When you enter to “TV System” menu, you will see the screen like right: 1. Display Mode is use for switching the screen-displaying mode. Now we provide below options: Auto / PAL-M / PAL-BG / NTSC/ PAL-N. You can press [ / ] key to select each mode circularly. 2. Aspect Mode is used for switching the screen aspect ratio mode. Now we provide below options: 4:3 PS / 4:3 LB / 16:9 / Auto. You can press [ / ] key to select each mode circularly. 3.
6. SETUP GB 6.4 Region and Time When you enter to “Region and Time” menu, you will see window like right: 1. Region is used for selecting the country which you are in. You can press [ / ] key to select each mode circularly. 2. GMT Usage: This item is use for open the usage of GMT. You can press [ / ] keys to switch “Off / User Define / By Region”. 3. The “GMT Offset” item is valid only when the setting of “GMT Usage” is “Uesr Define”.
GB 6. SETUP Wakeup Channel: press [OK] key to enter channel list and select channel that you want to setting. Wakeup Date: use number keys to input your wakeup date. Wakeup Time: use number keys to input your wakeup time. Once the time’s up, no matter what the system is in standby mode or in playing mode, the system will automatically switch to the channel you want and start to play.
6. SETUP GB 3. Load Default Timer Setting When you enter “Load Default Timer Setting”, you will see the window like right: Press [OK] key on “Load Default Timer Setting”, it will show “Input Password” dialogue. After you input the correct password, there will show a warning message to inquiry you “All Timers will be cleared, continue?” If you select “Yes”, it will clear all the timer. You can press [Exit] key to exit. 6.
GB 6. SETUP 6.7 Parental Lock You can set a password for anyone who wishes to operate in the “Installation” menu. And you can also set the password for the lock channels. (How to set the lock channel please refer to LOCK) Here will show you how to setting and how to revising the password. 1. In “Parental Lock” function, press [OK] key, there will pop an dialogue for you to input the password. The default password is “0000”. When you input the correct password, you will see a screen like right: 2.
7. TOOLS GB When you enter to “Tools” menu, you will see a screen like right: In “Tools” menu: 1. Press [ / ] key to select menu pages among Information, Game, Load Factory Default, Software Upgrade and Welcome Page. 2. Press [ / ] key to select menu items among each items. 3. Press [OK] key to enter the selected item. 7.1 Information 1. When you enter to “Information” menu, you will see a screen like left. The screen displays information of software version. 2.
GB 7. TOOLS 2. Snake Moving highlight to “Setup” and press [ / ] key to select the game level (speed). Moving highlight to “Start” and press [OK] key to start the game. Moving highlight to [Cancel] keys and press [OK] key to draw back from the game. Start on the game: • [ / / / ] — use these arrow keys to guide the snake. • [OK] — Pause/Play game • [Exit] — Quit game and draw back to “Snake” menu. 3. Othello Moving highlight to “Setup” and press [ / ] keys to select the game level (degree of difficulty).
7. TOOLS GB 7.4 Software Upgrade 1. We offer the functions for user to connecting receiver (Master) to the other receiver (Slave) via serial interface to upgrade software code and program list. 2. Connect master receiver to slave receiver via serial interface. Enter “Software Upgrade” menu in master receiver and press [ / ] keys to switch upgrade mode. 3. Upgrade modes include: allcode / maincode / videoback / radioback / defaultdb / userdb 4. Turn on slave receiver and it needn’t operate any setting. 5.
GB 8. TECHNICAL SPECIFICATION VIDEO Decoding ............................................................................. Bit rate ................................................................................ Output .................................................................................. Aspect ratio ...................................................................... Active pixel ......................................................................... Output connector ....................
9.
GB DigitalBOX Europe GmbH Sandstraße 65 - D-40878 Ratingen Installation Guide 34