Installation Guide DVB-S Receiver with Common Interface See the world through BDA Imperial DB 1 CI_GB.indd 1 27.09.
GB CONTENT GENERAL INFORMATION . . . . . . . . . . . . . . . . . . . . . . . . . . . . . . . . . . . . . . . . . . . 4 Main Features. . . . . . . . . . . . . . . . . . . . . . . . . . . . . . . . . . . . . . . . . . . . . . . . . . . . . . . . . . . . . . . . . . . 4 For your Safety . . . . . . . . . . . . . . . . . . . . . . . . . . . . . . . . . . . . . . . . . . . . . . . . . . . . . . . . . . . . . . . . . . 5 General Operation . . . . . . . . . . . . . . . . . . . . . . . . . . . . . . . . . . . . . .
GB CONTENT 4. Tools . . . . . . . . . . . . . . . . . . . . . . . . . . . . . . . . . . . . . . . . . . . . . . . . . . . . . . . . . . . . . . . . . . . . . . .27 4.1 Information . . . . . . . . . . . . . . . . . . . . . . . . . . . . . . . . . . . . . . . . . . . . . . . . . . . . . . . . . . . .27 4.2 Factory Setting . . . . . . . . . . . . . . . . . . . . . . . . . . . . . . . . . . . . . . . . . . . . . . . . . . . . . . . . .27 4.3 SatcoDx Auto Programming . . . . . . . . . . . . . . . . . . . . . .
GB GENERAL INFORMATION A Digital Satellite Receiver enables you to view a variety of programs provided through satellite. This user´s guide covers the installation of the digital satellite receiver and the necessary steps to implement various features. Information given in this document is subject to change. We reserve the right, without prior notice, to make a change in product design or performances according to engineering or technology.
GB GENERAL INFORMATION For Your Safety To avoid electric-shock hazards, do not open the cabinet, refer servicing to qualified personnel, only. Keep the receiver away from flower vases, tubs, sinks, etc., in order to avoid damaging the equipment. Do not expose the receiver under the sunlight. Keep it away from the heat source. Do not block ventilation holes of the Receiver so that air can circulate freely. When an abnormal phenomenon occurs, you should cut off the power immediately.
GB GENERAL INFORMATION General Operation • Throughout this manual you will notice that the everyday operation of the receiver is based on a series of user friendly on screen display and menus. These menus will help you getting the most from your receiver, guiding you through installation, channel organizing, viewing and many other functions. • All function can be carried out using the buttons on the RCU, and some of the functions can also be carried out using the buttons on the front panel.
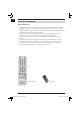
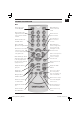
GB GENERAL INFORMATION RCU Turns power of the receiver ON/OFF When watching a channel, mutes the sound Enter number of the required menu item or select a channel number to watch Switches back to previous channel Press this key one time to run menu onscreen Switches between TV and Radio mode When watching a channel, change channels or move to the next higher or lower item in the menu Calls up the EPG (Electronic Program Guide) Executes the selected item in the menu screen or enters the desired value i
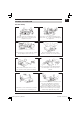
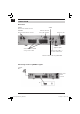
GB INSTALLATION Rear Panel LNB IN: Connect to satellite antenna LNB OUT: Connect to the other receiver SPDIF Connect to a PC for S/W upgrade Power on/off Connect to a digital amplifier connect to TV and VCR using a scart cable Connect to audio r/l to TV or audio tuner Connect video to TV using RCA JACK Connecting to TV using SCART support Satellite Dish Rear panel of the receiver TV Installation Guide BDA Imperial DB 1 CI_GB.indd 8 8 27.09.
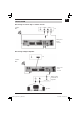
GB INSTALLATION Connecting to another digital satellite receiver Satellite Dish TV Rear panel of the receiver Connecting to Digital Amplifier TV Satellite Dish Rear panel of the receiver Digital audio convertor or amplifier Speaker 9 BDA Imperial DB 1 CI_GB.indd 9 DVB-S Receiver 27.09.
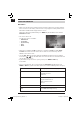
GB MENU INFORMATION Main Menu • Make sure that you have installed and connected the cables of the receiver, properly. If the receiver is in the factory status or there is no program list when power on, the Main Menu window will be displayed on the screen. During the normal TV/Radio mode, press MENU key on the RCU to enter into the Main Menu window. • This menu consists of 5 major main menus as follows.
GB MENU INFORMATION 1. Channel List • Press OK key or key to pop up the „Input Password“ dialogue, you can not enter into the menu unless the correct password is inputted. The default password is „0000“. • Press PR+, PR- keys to move the cursor up or down. • Press EXIT key or key to move the focus to the left menu. 1.1 TV Channel List • Press keys to select satellite. • Press PR+, PR- keys to select the program that you want to play, and then press OK key to view it in the small window.
GB MENU INFORMATION • Press red colour key to move the Lock button upwards. Select the program and press OK key to mark this program with the Lock mark. You can cancel this mark by pressing OK key once more. Press red colour key again to exit from the lock mode, and the Lock button returns to the original position. • Press green colour key to move the Skip button upwards. Select the program and press OK key to mark this program with the skip mark. You can cancel this mark by pressing OK key once more.
GB MENU INFORMATION i. Sort (red colour key) Press red colour key to pop up the Sort dropdown list. Name(A-Z): The ascending order, omitting the $ character, the number is ahead, then the capital letter, at last the lower case. Name (Z-A): The opposite order of the above Name (A-Z). Free/Scramble: All FTA programs are listed ahead, while all scrambled programs are listed last. Lock: all locked programs are listed at the last. 13 BDA Imperial DB 1 CI_GB.indd 13 DVB-S Receiver 27.09.
GB MENU INFORMATION ii. Edit (green colour key) Press green colour key to move the Edit button upwards. Select the program and press OK key to pop up the Rename window. In Rename window, press red colour key to switch between capital letter and lower letter; press green colour key to delete the character on the cursor; press keys to move the cursor left or right; press numeric keys (0-9) to input the character, please refer to the down table.
GB MENU INFORMATION iii. Edit (blue colour key) In Edit Channel window, press blue colour key to move the Delete button upwards. Select the program and press OK key mark this program with the deletion marks. You can cancel this mark by pressing OK key again. Press EXIT key to pop up the dialogue „Are you sure to save?“. Select Yes button and press OK key to save, or select NO button and press OK key to exit without saving. 1.2 Radio Channel List Same operation as 1.
GB MENU INFORMATION 2. Installation • Press OK key or key to pop up the „Input Password“ dialogue, you can not enter into the menu unless the correct password is put in. The default password is „0000“. • Press PR+, PR- keys to move the cursor up or down. • Press EXIT key or key to move the focus to the left menu. 2.1 Antenna Connection Press keys to select between Motor Antenna and Fixed Antenna. 2.2 Satellite List • Press PR+, PR- keys to select the satellite up or down.
GB MENU INFORMATION • Press red colour key to pop up the Edit Satellite window. Press PR+, PR- keys to move cursor up or down. Name: Use numeric keys to change the name of the satellite, please refer to the Edit Channel Name. Longitude: You can press keys to switch between east longitude and west longitude. After pressing OK key, you can use numeric keys to edit the longitude, press EXIT key or the PR+, PR- keys to exit editing mode. The range of the longitude is from 1 to 180 degree.
GB MENU INFORMATION 2.3 Antenna Setup Part A: Fixed Suppose that you have selected Fixed Antenna in the Antenna Connection window. • Satellite: All selected satellites in the satellite list are displayed in this item. Press keys to select the satellite in circle. Or press OK key to pop up the dropdown list, then select the desired satellite in the list and press OK key to confirm. • LNB Freq, Transponder, DiSEqC1.0, DiSEqC1.1: The same operation as the above.
GB MENU INFORMATION • Motor Setting: Press OK key to the Motor Setting window. Satellite: Press keys to select the satellite in circle. Or press OK key to pop up the drop-down list, then select the desired satellite in the list and press OK key to confirm. Transponder: The same operation as the above. Position No., & Save: The range is from 0 to 63. „0“ delegates the original position. You can select the proper value when you have rotated the antenna.
GB MENU INFORMATION • If select USALS, Delete All item will turn grey. Local Longitude, Local Latitude: Press keys to switch between West and East, or press keys to switch between North and South. Press OK key to enter into the editing mode. Use numeric keys (0-9) to input the longitude or latitude, press MENU key or EXIT key to exit. The range of the longitude is from 0 to 180, while the range of the latitude is from 0 to 90.
GB MENU INFORMATION • Network Search: Select between NO and YES. This item turns grey when Auto Scan is selected in the following Scan mode item. • Scan Mode: Press keys to select between Auto Scan and Preset Scan. Auto Scan is blind scan, while Preset Scan is to search the preset frequencies. • Search: Press OK key to start searching. 2.5 Multi Satellite Search From the Multi Satellite Search window, you can search several satellites at the same time.
GB MENU INFORMATION • Press red colour key to pop up the Edit TP window. Frequency, Symbol rate: Press keys to add or reduce by step one. Or press numeric keys (0-9) to input the desired value. The range of the frequency is 300013450, while the range of the symbol rate is 1000~45000. The inputted value is beyond this range, the value will return to the origin value. Polarity: Press keys to switch between Vertical and Horizontal. • Press green colour key to pop up the Add TP window.
GB MENU INFORMATION 3. System Setup • Press OK key or key to move the cursor to the right menu. • Press PR+, PR- keys to move the cursor up or down. • Press EXIT key or key to move the focus to the left menu. 3.1 Language • Press OK key to enter into the Language window. Press keys to select the language in circle, while press PR+, PR- keys to move the cursor up or down in circle. • Press MENU key or EXIT key to save and exit. • The types of the language, refer to the configuration of the customer. 3.
GB MENU INFORMATION 3.3 Local Time Setting • Summer Time: Select between ON and OFF. „OFF“ delegates the normal time. If select ON, time will add one hour. • GMT Offset: When select „ON“ in GMT Usage item, system will get the date and time information from the screen, automatically. Date and Time two items will turn grey. Select the proper option in the GMT Offset item. The default setting is GMT ON.
GB MENU INFORMATION Duration: Set the gap time. After waking up, system will power off automatically after the duration time. Press MENU or EXIT key to save and exit. 3.5 Parental Lock Before entering into the Parental Lock window, you need to put the correct password in. The default password is 0000. • Menu Lock: Press keys to select between OFF and ON. If select „On“ , you can not enter into most windows before entering the password. keys to select • Channel Lock: Press between OFF and ON.
GB MENU INFORMATION 3.7 Favorite There are 32 favorite groups listed in this window. Press PR+, PR- keys to select one and press OK key to the Rename window. Since the same operation as the above the Add Satellite window, here we don‘t explain any more. 3.8 Other • LNB Power: Select between OFF and ON. • Channel Play Type: Select among All, Free, Scramble. • Channel Change: Select between Freeze and Black screen. • Beeper: Select between OFF and ON. Installation Guide BDA Imperial DB 1 CI_GB.
GB MENU INFORMATION 4. Tools • Press OK key or key to pop up the „Input Password“ dialogue. You can not enter into the menu unless the correct password is put in. The default password is 0000. • Press PR+, PR- keys to move the cursor up or down. • Press EXIT key or key to move the focus to the left menu. 4.1 Information Press OK key to the Information window. 4.2 Factory Setting Press OK key to enter into the Factory Setting window. Select YES button and press OK key to return to the factory setting.
GB MENU INFORMATION 4.3 SatcoDX Auto Programming Press OK key at the Start button to start receiving date from RS232 for 10 seconds. 4.4 Upgrade By RS232 • Press keys to select among allcode, maincode , card , Radioback, keydate defaultdb, userdb. The default option is allcode. • Press OK key at the Start button to start checking serial port. 4.5 S/W Upgrade OTA • Satellite, Transponder: Select the proper satellite or transponder.
GB MENU INFORMATION 4.6 Common Interface Your receiver is equipped with a Common Interface. You will be able to receive coded programs together with a corresponding CI module and a validated Smartcard. For this purpose plug in the CI module with the according Smartcard into the CI slot on the front of your receiver. If you switch then to a coded program the receiver checks automatically if an according module with validated Smartcard is plugged in and displays the program uncoded. 5.
GB MENU INFORMATION 6. Hot Key 6.1 Info Press INFO key to pop up the Info bar. 6.2 EPG Press EPG key to enter into the EPG window. • Press PR+, PR-, keys to select up or down, left or right. • Press red colour key to pop up the Time Bar window. Press PR+, PR- keys to select up or down, while press keys to select left or right in the time bar. : Press OK key at this button to return to the EPG window. : Press OK key at this button to move the cursor to the current time line.
GB MENU INFORMATION • Detailed Information: In the EPG window, press PR+, PRkeys to select the channel and program, and press OK key to know the detailed information of the current program. • Press green colour key to enter into the Timer window. You can add the current program to the Timer. If 8 timers are already chosen system will inform „Timer is full!‘. 6.3 Find Press FIND key on to pop up the Find window.
GB MENU INFORMATION 6.7 Left/Right (Volume+/-) Press keys to change the volume. Press keys to decrease the volume by step 1, while press keys to add the volume by step1. 6.8 Mute Press key to close the volume. You can press ume, or press keys to open the volume. key once again to restore the vol- 6.9 Pause During the viewing, you can press PAUSE key to stop the picture while the volume continues. You can play the picture by pressing PAUSE key once again. 6.
GB MENU INFORMATION 6.11 Audio • Press keys to enter into the Audio window. keys to select among Left, • Press Right, Stereo, and Mono. • Changing the audio mode is only connected with the current channel, not all the channels. • Press MENU or EXIT key to close this window. 6.12 Recall Press key to switch the current channel to the previous channel. 6.13 FAVORITE • Press FAV key to pop up the favourite group window. • Press keys to select the favorite group.
GB MENU INFORMATION 6.15 Zoom • Press ZOOM key to switch among Zoom*1, Zoom*2, Zoom*3, Zoom*4, Zoom*5, Zoom*6, Zoom*8, Zoom*12, Zoom*16. • In zoom mode, press PR+, PRkeys to move the cursor up, left, right, down. • Press MENU or EXIT key to exit Installation Guide BDA Imperial DB 1 CI_GB.indd 34 34 27.09.
GB TROUBLE SHOOTING Problem Possible causes What to do The display on the front panel does not light up. Main cable is not connected. Check that the main cable is plugged into the power socket. No sound or picture, but the front panel shows red light. The receiver is in standby mode. Press the standby button. No sound or picture. The satellite dish is not pointing at the satellite. Adjust the dish. Check the signal level in the Antenna Setup menu.
GB TECHNICAL FEATURES Microprozessor & Memory Main chip . . . . . . . . . . . . . . . . . . . . . . . . . . . . . . . . . . . . . ALI 3329 Flash . . . . . . . . . . . . . . . . . . . . . . . . . . . . . . . . . . . . . . . . . 2 Mbyte SDRAM. . . . . . . . . . . . . . . . . . . . . . . . . . . . . . . . . . . . . . . 8 Mbyte Video Decoding . . . . . . . . . . . . . . . . . . . . . . . . . . . . . . . . . . . . . MPEG-II and MPEG-I compatible Profile . . . . . . . . . . . . . . . . . . . . . . . . . . . . .