
Installation guide

Installing a DECarray Cabinet
4.4 Installing a DECarray Cabinet in a DSSI VAXcluster Configuration
2. Apply power to the magazine tape ISE installed in position 5 (if present).
Then apply power to the magazine take ISE installed in position 6 (if
present). Observe the front panel. If a failure occurs, refer to Chapter 9.
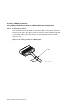
3. Apply power to each storage enclosure in the DECarray, starting with
position 1 and continuing in numerical order.
4. Press the dc power switches for all ISEs in each storage enclosure. Start
with the storage enclosure in position 1 and continue in numerical order. If
the Fault indicator lights for any disk ISE, refer to Chapter 9.
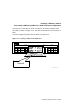
5. Observe the OCP indicators.
For SF3x Storage Enclosures:
a. Check that all dc power buttons are lit for all ISEs installed in the rear
of the storage enclosure. After about 15 seconds after power is applied,
the buttons flicker, indicating power-on self-tests.
b. Check that all dc power buttons are lit for all ISEs installed in the
front of the storage enclosure. Power is applied to the front ISEs
approximately 30 seconds after the rear ISEs. About 15 seconds after
power is applied, the buttons flicker, indicating power-on self-tests.
c. Check that all Fault indicators on the OCP are off. If a Fault indicator
is lit green or amber, press the switch. If a Fault indicator is lit red,
this indicates a faulty ISE.
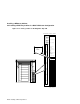
For SF7x Storage Enclosures:
a. Check that the TERM PWR indicator (behind the door of the OCP) is
on for all positions installed.
b. Check that the SPLIT indicator (behind the door of the OCP) is off for
all positions.
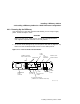
6. Press the Ready button on the OCP. The Ready indicator flickers, then
lights steadily green once the ISE is on-line.
4–38 Installing a DECarray Cabinet