
Installation guide

Installing a DECarray Cabinet
4.3 Installing the DECarray Cabinet in a Single-System Configuration
b. To determine which of the two DSSI connectors on the system I/O panel
to connect to:
• Open the system I/O panel by removing the screws that secure
it to the system chassis. Let the panel swing down to its resting
position.
• Find the first KFMSA module installed in the system XMI
backplane. It is the KFMSA module in the lowest numbered
slot of the KFMSA modules installed.
• Follow the cabling from the backplane to the system I/O panel.
• While viewing the front of the I/O panel, note that the DSSI
connector on the right is KFMSA DSSI bus 1 and on the left is bus
2.
• For ports 1 and 3 on the DECarray I/O panel, connect the 108-inch
DSSI cable to the right DSSI connector of the system I/O panel.
• For ports 2 and 4 on the DECarray I/O panel, connect the 108-inch
DSSI cable to the left DSSI connector of the system I/O panel.
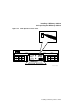
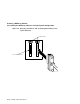
c. Install one end of the 108-inch DSSI cable (PN BC21Q–09) to one
of the ports on I/O panel at the bottom rear of the system cabinet
(Figure 4–4).
• Connect the DSSI cable from the DSSI port 1 (of the I/O panel) to
the first DSSI connector of the first KFMSA bulkhead connector on
the system I/O panel.
• Connect the DSSI cable from the DSSI port 2 (of the I/O panel) to
the second DSSI connector of the first KFMSA bulkhead connector
on the system I/O panel.
• Connect the DSSI cable from the DSSI port 3 (of the I/O panel) to
the first DSSI connector of the second KFMSA bulkhead connector
on the system I/O panel.
• Connect the DSSI cable from the DSSI port 4 (of the I/O panel)
to the second DSSI connector of the second KFMSA bulkhead
connector on the system I/O panel.
Installing a DECarray Cabinet 4–17