
Installation guide


Installing a DECarray Cabinet
4.3 Installing the DECarray Cabinet in a Single-System Configuration
4.3 Installing the DECarray Cabinet in a Single-System
Configuration
This section describes the procedures for installing the DECarray cabinet in a
single-system configuration.
Make sure that all precautions for site preparation have been completed. Refer
to Chapter 2.
The procedures provide the steps to:
• Cable the DECarray cabinet to the system in the single-system
configuration (Section 4.3.1)
• Fill out the configuration worksheet (Section 4.3.2)
• Attach labels to DSSI cables and ISEs (Section 4.3.3)
• Power up the DECarray after successfully installing (Section 4.3.4)
• Check the DECarray for correct operation (Section 4.3.5)
4.3.1 Cabling the DECarray Cabinet
Start at the rear of the DECarray cabinet.
1. Plug the main power cable of the storage array into its power receptacle.
WARNING
Hazardous voltages are in the storage array and in the components of
the storage array.
When performing any operation involving the power source, turn off
the power controls of all components and on the power controller.
Disconnect the power cable from the source outlet. Perform the
operation, then reconnect the power cable to the source.
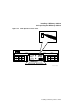
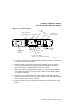
2. Connect the 108-inch DSSI cable or cables (PN BC21Q–09) from the
DECarray DSSI I/O panel to the system I/O panel.
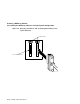
a. At the system I/O panel, remove the terminator or terminators (PN
12–31281–01). See Figure 4–4. Store these terminators in the ESD
pouch on the rear door of the storage array cabinet.
4–16 Installing a DECarray Cabinet