
Installation guide


Installing a DECarray with a VAX 4000 System
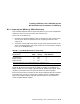
D.2 DSSI VAXcluster Installation of a DECarray
3. Connect the ground strap (provided with the cable kit). Attach one end
of the strap according to the instructions found in the System Expansion
Installation Supplement. Connect the other end to one of the screws
securing the power controller to the DECarray.
Note
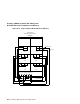
Note that DECarray I/O panel DSSI ports 5, 6, 7, 8, 13, 14, 15, and 16
are not used.
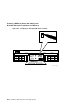
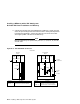
Figure D–9 VAX 4000 DSSI Connectors
slot #2 slot #1 slot #0
Mass Storage Area
Model 200
FRONT VIEW
slot #3 slot #2 slot #1 slot #0
Mass Storage Area
Operator/
Control Panel
Fan Tray
AC
on/off
H3604
J1
J2
J3
KFQSA
Q−Bus
Connector
Description
J1, J2
J3
KFQSA − J1
DSSI Bus 1 ports (external ISEs only)
DSSI Bus 0 port (internal/external ISEs)
DSSI IN/OUT port (external RF disk ISEs)
VAX4000_family.rags
AC Input
Ground
Stud
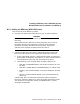
Model 200/300
BA4xx
KFQSA
Q−Bus
J1
J1
J1
Connector
Description
J1 DSSI Bus 0 port (internal/external ISEs)
KFQSA − J1 DSSI IN/OUT port (external RF disk ISEs)
BA2xx
D–22 Installing a DECarray with a VAX 4000 System