
Installation guide


Installing an SF3x-HK and SF7x-UK Upgrade Kit
B.2 Installing an RF3x ISE into an SF3x-HK Storage Enclosure
B.2 Installing an RF3x ISE into an SF3x-HK Storage
Enclosure
This section describes how to install two RF3x disk ISEs into an SF3x-HK
storage enclosure.
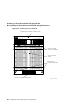
CAUTION
Do not disconnect or disturb the existing DSSI cables and terminators
on the present SF3x storage enclosures, magazine tape ISEs, or on the
DECarray I/O panel.
Customer data corruption could result.
CAUTION
Take all possible ESD precautions when unpacking the disk ISEs.
Wear a correctly grounded ESD strap.
CAUTION
Only one SF3x storage enclosure inner assembly should be extended on
the slide mount at a time.
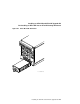
The following steps describe how to install the two-drive SF3x-UK upgrade
into an SF3x-HK storage enclosure with two RF3x disk drives. The upgrade
includes the two RF3x disk ISEs to be installed in the two front positions of an
SF3x-HK enclosure.
1. To unpack a disk ISE:
a. Open the shipping carton.
b. Remove the disk ISE wrapped in the protective wrapper.
c. Open the protective wrapper and remove the disk ISE. Discard the
desiccant bags.
d. Place the disk ISE on the protective wrapper.
Installing an SF3x-HK and SF7x-UK Upgrade Kit B–3