
Installation guide

Installation Troubleshooting
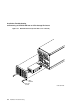
9.3 Removing an RF Disk ISE from an SF7x Storage Enclosure
9.3 Removing an RF Disk ISE from an SF7x Storage
Enclosure
This section describes the procedure for removing an disk ISE from an SF7x
storage enclosure.
WARNING
Take all possible ESD precautions when unpacking the disk ISEs.
Wear a correctly grounded ESD strap.
Perform an orderly shutdown of the SF7x enclosure containing the disk
ISE. Refer to the system documentation.
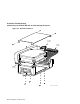
1. Power down the SF7x enclosure.
a. Take the failed disk ISE on that DSSI bus off-line by pressing and
releasing each Ready button on the operator control panel (OCP). The
button indicators go out.
b. Press and release the drive dc power switch for the failed ISE.
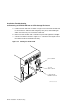
c. Remove the front cover. Remove the two screws and lockers and lift off
the cover.
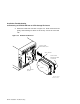
2. Remove the disk ISE.
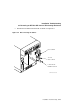
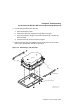
a. Remove the SF7x enclosure front cover (Figure 9–3). Loosen the screws
and lift off the covers.
b. Loosen the wedges on the disk ISE.
Installation Troubleshooting 9–11