
Installation guide
Installation Troubleshooting
9.2 Removing an RF Disk ISE from an SF3x Storage Enclosure
3. Unpack the replacement RF disk ISE:
a. Open the shipping carton.
b. Remove the disk ISE wrapped in the protective wrapper.
c. Open the protective wrapper and remove the disk ISE.
d. Place the disk ISE on the protective wrapper.
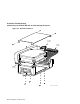
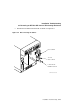
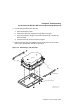
4. Remove the four screws holding the top cover on the carrier and remove
the cover.
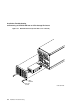
5. Remove the faulty ISE from the carrier by removing the two screws on
each side of the bottom of the carrier (see Figure 9–2).
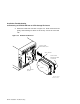
6. Lift the ISE out of the carrier and disconnect the DSSI bus, OCP, and
power connectors from the ISE.
7. Plug the DSSI bus, power, and OCP connectors into the replacement ISE.
8. Attach the ISE to the carrier.
9. Replace the top cover.
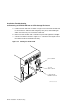
10. Install the disk ISE in the enclosure.
11. Replace the cover.
Proceed to Section 9.4.
Installation Troubleshooting 9–9