
Installation guide


Installing the Magazine Tape ISE in a DECarray Cabinet
8.1 Installing the TF8x7 Storage Enclosure
4. While the inner assembly is out of the extrusion tube, check the DSSI ID
switches on the DSSI controller module. Ensure that the DSSI ID switch
is set to 0 and that the TMSCP switch is down or enabled. Refer to the
magazine tape ISE documentation for information on how to access the
DSSI controller module.
5. Perform the following steps to complete the hardware installation of the
magazine tape ISE:
a. Lift and push the inner assembly back into the extrusion tube.
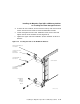
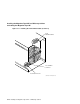
b. At the rear of the magazine tape ISE, make sure that the ac power
switch is off or in the 0 position (Figure 8–9).
c. Also check the factory set ac power on the magazine tape ISE. Model
variants –AA are 120 Vac and model variants –AB are 220 Vac.
d. Place the magazine tape ISE in the head cleaning position (first
mechanical stop).
e. Connect the ac power cord to the magazine tape ISE.
f. Check that this and all other OCP and magazine tape ISE fronts
project through the front door of the DECarray correctly. If not, adjust
the height with shims. It may be necessary to adjust cabinet door
mounting at the door hinges.
CAUTION
Do not power up the enclosure at this time.
8–20 Installing the Magazine Tape ISE in a DECarray Cabinet