
Installation guide


Field Add-On with Universal Mounting Kit H229-AB/AC
7.1 Chassis Rail Installation
WARNING
Use care in supporting the chassis rail assembly. It is heavy and
awkward to position within the cabinet. If possible, use two persons
to support and position the chassis rail assembly. The chassis rail
assembly may cause personnel injury and equipment damage if
dropped during installation.
Note
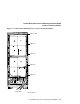
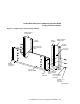
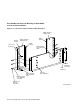
To ensure proper alignment of the chassis rail assembly, use care to
position the round standoffs in the correct front and rear chassis rail
locating holes (see Figure 7–4).
3. From the rear of the cabinet, position the chassis rail assembly at the
correct mounting holes, as shown. Ensure that the rail bracket is
positioned toward the rear of the cabinet, and that the arrow on the
rail bracket points up.
4. Insert the front round standoff into the front chassis rail locating hole.
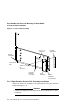
5. Support the chassis rail assembly against the front vertical cabinet rail
and maintain the front round standoff in its locating hole. Extend the rail
bracket to insert the rear round standoff into its correct rear chassis rail
locating hole.
6. Fasten the rail bracket to the rear vertical cabinet rail with its beveled nut
bar and three screws, as shown.
7. Fasten the chassis rail to the front vertical cabinet rail with its beveled nut
bar and three screws, as shown.
8. Tighten the screws fastening the rail bracket to the chassis rail.
9. Install two U-nuts along the outer flange of the front vertical cabinet rail.
Install one U-nut at the hole just above the front chassis rail locating hole
and the other at the eighth hole below the locating hole.
Field Add-On with Universal Mounting Kit H229-AB/AC 7–9