
Installation guide


7
Field Add-On with Universal Mounting Kit
H229-AB/AC
This chapter describes how to install the chassis rails of the Universal
Mounting Kit H229-AB/AC into a DECarray cabinet.
7.1 Chassis Rail Installation
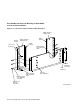
To allow the length of the chassis rail to be adjusted to fit the cabinet, one
end of the rail is extendible using a sliding rail bracket. Two round standoffs
are used to locate the chassis rail along the vertical cabinet rails. The round
standoffs are inserted into front and rear chassis rail locating holes to position
the chassis rail while it is fastened to the cabinet.
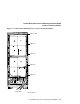
Note
Standoff location holes, front and rear, both sides, are holes 18, 36, 57,
and 75, as shown in Figure 7–1.
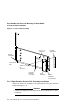
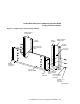
7.1.1 Chassis Rail Assembly
Before the chassis rail components can be mounted in the cabinet, they must be
assembled. Assemble the chassis rail components as follows (see Figure 7–2):
1. Position the rail bracket against the chassis rail, as shown in the
illustration.
2. Fasten the rail bracket to the chassis rail with the unbeveled nut bar and 4
screws, as shown. Leave the screws loose enough to allow the rail bracket
to be moved along the chassis rail.
3. Install a U-nut in the groove near the end of each of the beveled nut bars.
The flat side of the U-nuts must be on the beveled side of the nut bar.
Field Add-On with Universal Mounting Kit H229-AB/AC 7–1