
Installation guide


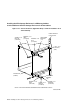

Installing the SF7x Storage Enclosure in a DECarray Cabinet
6.7 Powering Up the SF7x
6.7 Powering Up the SF7x
Follow these steps to apply power to a newly installed SF7x storage enclosure:
CAUTION
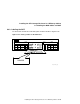
Ensure that the drive dc power switches on the front of the enclosure
are in the out position.
1. Turn the ac power switch on the rear of the enclosure on or to the 1
position. If the green power supply fault LED is lit, refer to Chapter 9.
2. Press each of the drive dc power switches on the front of the SF7x
enclosure, one at a time. If the green LED on the drive dc power switch
does not light, refer to Chapter 9.
3. Observe the OCP indicators for each drive. If the Ready indicator is lit and
no other LED comes on and stays on, the drive has passed the power-on
self-test (POST). Should the Ready indicator not come on and the red Fault
indicator come on, refer to Chapter 9.
4. Press each of the Ready buttons, one at a time. The Ready indicator should
be on and stay on, with the Fault indicator remaining off. If a fault occurs,
refer to Chapter 9.
Once these steps are done and the drive has passed POST, then—and only
then—should you proceed to the next section.
6–52 Installing the SF7x Storage Enclosure in a DECarray Cabinet