
Installation guide

Installing the SF7x Storage Enclosure in a DECarray Cabinet
6.5 Installation Procedure
4. Do the following if you are installing an SF7x in position 3 or 8 (single-
system only):
CAUTION
To maintain stability, extend only one storage enclosure or magazine
tape ISE on the slide mounts at a time.
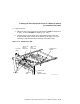
a. Loosen the four captive slide assembly screws. Slide the inner assembly
out until the drawer locks in the service position.
b. Push the inner assembly forward from the rear.
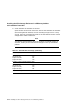
Note
Do NOT completely remove the inner drawer assembly from the
extrusion tube and extend only one at a time.
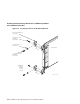
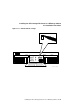
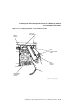
c. Reconfigure the TTM for split-bus mode by first moving the small black
jumper to the split-bus terminals, then moving cable connectors to the
right pair of sockets (see Figure 6–9).
d. Push the SF7x inner drawer back in, replace the front cover door, and
tighten the four front door screws. To prevent pinching any cables, be
sure that all cables are dressed correctly.
Installing the SF7x Storage Enclosure in a DECarray Cabinet 6–21