
Installation guide
Installing the SF7x Storage Enclosure in a DECarray Cabinet
6.1 Installing the SF7x Storage Enclosure
6.1 Installing the SF7x Storage Enclosure
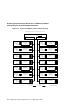
This section contains several major steps. The first step explains how to:
• Unpack, inspect for damage, and identify parts
• Determine where to install the SF7x enclosures
• Read and fill out the system configuration sheet
The next step explains how to install the SF7x enclosure itself:
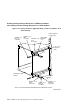
• Prepare the DECarray cabinet to receive an SF7x storage enclosure
• Install the supporting hardware and SF7x, and set the DSSI ID switches
• Cable the SF7x storage enclosure to comply with the DSSI bus cabling
conventions
The last step explains how to:
• Power up the SF7x enclosure, run the power-on self-test, and run the
configuration programs
• Label all cables and operator control panels
• Verify the operation of the enclosure after a successful installation
Follow all these steps in the order they are presented, and do not skip any
steps.
Installing the SF7x Storage Enclosure in a DECarray Cabinet 6–3