
Installation guide

6
Installing the SF7x Storage Enclosure in a
DECarray Cabinet
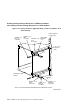
This chapter describes the add-on installation of the SF7x storage enclosure
into a DECarray cabinet. These procedures assume that the DECarray cabinet
previously has been correctly installed and configured.
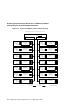
The SF7x storage enclosure that you are installing may contain two or four
RF7x disk ISEs. To determine if the SF7x contains two or four ISEs, open the
front door of the DECarray cabinet and look at the front of the SF7x enclosure.
If both sides of the enclosure contain an ISE, then the enclosure contains
four ISEs (SF7x–JK variant). If there is an ISE on only one side of the SF7x
enclosure, then that enclosure contains only two ISEs (SF7x–HK variant).
The following procedures are described in this chapter:
• Installing the SF7x Storage Enclosure (Section 6.1)
• Cabling the SF7x (Section 6.6)
Single-system configuration (Section 6.6.1)
DSSI VAXcluster configuration (Section 6.6.2)
Stripeset configuration (Section 6.6.3)
• Powering up the SF7x (Section 5.6)
• Labeling the DSSI cables and OCP (Section 5.7)
• Final verification (Section 6.9)
Only Digital Services or customer personnel that have been trained in ESD
procedures should perform the installation.
Installing the SF7x Storage Enclosure in a DECarray Cabinet 6–1