
Installation guide

Installing the SF3x Storage Enclosure in a DECarray Cabinet
5.5 Cabling the SF3x in the DECarray Cabinet
4. Install a 70-inch DSSI cable (PN BC21R–5L) in place of the panel blanks
you just removed in the previous step. Secure this cable to the I/O panel
with the two Phillips screws removed from the blank panel.
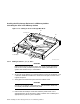
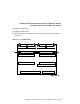
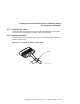
5. Remove the two screws that hold the cable tray of the SF3x enclosure in
position 1 in place and slide the cable tray out to expose the four DSSI
connectors.
6. Plug the other end of the DSSI cable into the appropriate connector in the
cable tray of the SF3x storage enclosure (Section A.4.
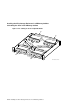
7. Install a DSSI terminator in the remaining DSSI connector for the ISEs
you are cabling. Refer to Section A.4 to determine the correct connections
for your configuration.
8. Slide the cable tray back into place and tighten the two screws.
9. Route the DSSI cable under the cable retainers.
10. Plug a 108-inch DSSI cable (PN BC21Q–09) into the DSSI cable you just
installed in the DECarray I/O port and tighten the retainer screws with
your fingers.
11. Plug the other end of the 108-inch DSSI cable into the appropriate port on
the I/O panel at the rear of the host system cabinet.
CAUTION
Do not apply power to the storage enclosure at this time.
12. Replace the DECarray I/O panel to its original position and secure it by
tightening the captive screws.
Installing the SF3x Storage Enclosure in a DECarray Cabinet 5–35