
Installation guide


Installing the SF3x Storage Enclosure in a DECarray Cabinet
5.4 Installation Procedure
5.4 Installation Procedure
This section describes the step-by-step procedures for installing an SF3x
storage enclosure in DECarray positions 1, 2, 3, 4, 7, or 8.
Be sure to:
• Follow each step in order, and do not skip any steps
• Leave sufficient room to perform the installation (approximately 1.5 meters
to 1.8 meters [5 feet to 6 feet] front and rear of the DECarray cabinet)
WARNING
Observe all ESD precautions and procedures. An antistatic wrist strap
is provided inside the DECarray front and rear doors.
WARNING
Do not attempt to pick up or support the SF3x by the handle in the
rear of the enclosure. Doing so will injure the person attempting the
installation or damage the power supply.
To maintain stability, extend only one storage enclosure or magazine
tape ISE on the slide mounts at a time.
5.4.1 Preparing the DECarray Cabinet
The following procedure describes how to prepare the DECarray to receive the
SF3x storage enclosure(s):
1. Place the SF3x to be installed to one side, in front of the DECarray cabinet.
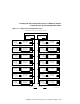
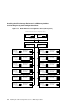
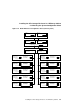
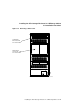
2. Open the front and rear doors of the DECarray cabinet (Figure 5–5).
3. Remove the front door filler panel that corresponds to the position of the
DECarray cabinet you are installing (Figure 5–5).
5–10 Installing the SF3x Storage Enclosure in a DECarray Cabinet